Midwest Coupon Clippers

Cudding Coupons and Saving You Some Moolah

  • Home
  • Coupons
    • Newest Coupons
    • Coupons.com
    • Red Plum
    • Smart Source
    • Hopster
    • Saving Star
    • Coupon Database
  • Deals
    • Amazon
    • eBates
  • Freebies
  • Sweeps & Giveaways
  • Store Match-ups
    • Midwest Matchups
      • Copps/Pick n’ Save
      • Festival
      • Menards
      • Piggly Wiggly
    • Nationwide Matchups
      • CVS
      • Dollar Stores
        • Dollar General
        • Dollar Tree
        • Family Dollar
      • Target
      • Walgreens
      • Wal-Mart
  • This & That
    • Recipes
    • Around the House
    • Money Saving Tips
    • Get Organized
    • Disney
    • Pets
    • Gardening
  • About
    • Contact
    • Disclosure

Instant Pot Hard Boiled Eggs, The 5-5-5 Secret!

April 20, 2019 By Leah Leave a Comment

Instant Pot Hard Boiled Eggs, The 5-5-5 Secret!

Whether you are making deviled eggs, egg salad or dying Easter Eggs you will not find an easier & faster way to prepare hard boiled eggs.

Cooking in your pressure cooker, the eggs are done in minutes! Using an easy to remember 5-5-5 method, believe me when I say you will never boil another pot of water for eggs again!

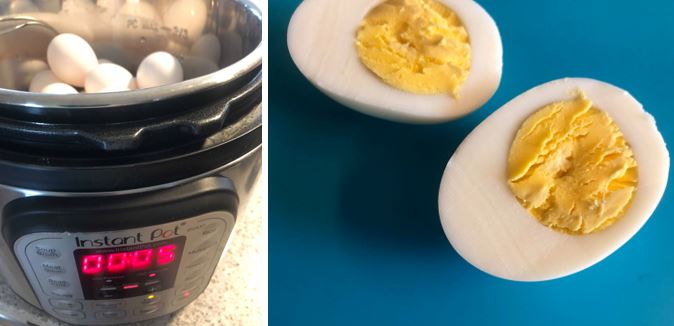
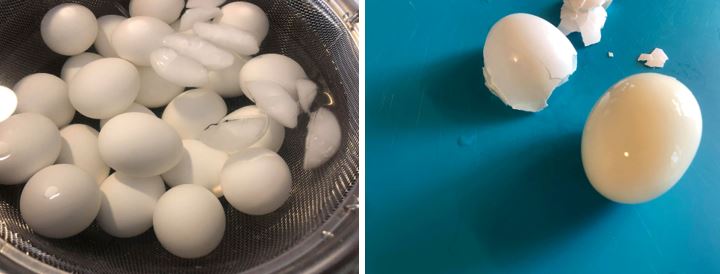
Not only are the eggs cooked PERFECTLY, they peel like a dream!

📌 Pin here for later

What you need:

  • Electric Pressure Cooker
  • 1 dozen eggs*
  • 1 c. water
  • Large Bowl, Water, & Ice

Making the eggs:

FIVE Minutes on High

  • Insert the metal rack into pressure cooker.  Layer eggs inside.  Add water.  Cover and seal.  Set timer to 5 minutes on HIGH pressure.
  • Using the large bowl, prepare an ice bath to rest cooked eggs in.  I also inserted a strainer to make removing the eggs easier after they are cooled.

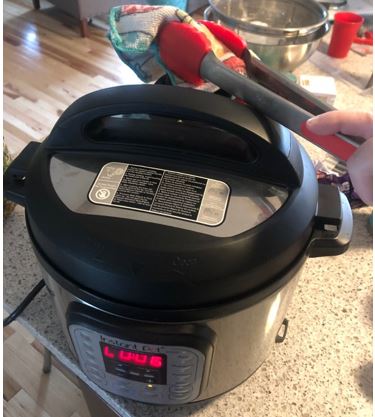
FIVE Minutes to Release Pressure

  • Allow pressure to release for 5 minutes naturally.
  • Once 5 minutes has passed, carefully, using tongs or a wooden spoon, manually release the remaining pressure.  As an added precaution, cover the release valve with a towel to protect your hand from the steam. Remove lid from cooker

FIVE Minutes in an Ice Bath

  • Remove eggs, using tongs or an oven mitt and place into the ice water bath.  Allow to cool for 5 minutes.  Remove from water and peel.

* You can do more or less than 1 dozen eggs per batch.  I did 2 dozen with perfect results following the 5-5-5 method.

Check out this idea for coloring eggs

Mess Free Easter Egg Coloring!

Filed Under: Featured, Recipes Tagged With: Eggs, hard boiled, instant pot, pressure cooker

Mess Free Easter Egg Coloring!

April 14, 2019 By Leah Leave a Comment


Mess Free Easter Egg Coloring!

There are a few things as a parent that I just can’t do.  To be honest, they mostly revolve around events with the probability of large messes. Playdoh, glitter, finger painting, and the horror that is EASTER EGG COLORING!

Yup, I am not afraid to admit it, my kids have NEVER dyed eggs!  It scares the daylight out of me.  Food coloring, liquids, eggs, all I foresee is chaos and disaster!

Well, my fears were faced when my sister in law found this idea using rice.  We boiled some eggs, put on our Pinterest Mom Pants and went for it!  OH MY GOODNESS was this amazing.  No messes, no liquid food coloring cups to spill, and no smelly vinegar.  NOTHING to worry about.

We had a mix of kids from age 3 – 13, plus lots of adults.  Everyone of all ages enjoyed this and loved mixing the colors and getting unique results.

When I say no mess, I am not joking.  After dying 48 eggs, we picked up a few random pieces of rice.  Not a single drip of food coloring, no sloppy newspapers on a table, zero ruined clothes – absolutely nothing to stress over.

📍 Pin HERE for Later!

What you need:

  • Sandwich Size Ziplock Bags
  • White Rice (long grain or instant works)
  • Liquid Food Coloring
  • Hard Boiled Eggs (check out our tips HERE)
  • Cooling Rack

Make the Eggs:

  1. Fill baggies with about 1 c. of rice (we did 15 bags; but you can do as many or as few as you want)
  2. Add 15 drops of color to a bag
  3. Add 1 egg to baggie
  4. Remove the air and seal bag
  5. Gently shake, knead, and toss the bag around until the egg is colored.  The longer you mix, the more color is on the egg.
  6. You can use tongs or just roll the egg out of the bag onto a cooling rack to dry.  If you touch with your bare fingers, you will get VERY colored fingers because the eggs are still wet.  Allow to dry for about 20 minutes.

  • You can put the egg into a different color of rice and get a beautiful mixed color egg.
  • We did mix some of the rice colors together in a bag and got very fun results.  The options are limitless.
  • About every 3 eggs we needed to refresh the food coloring with a few more drops to keep vibrant colors.
  • It is HIGHLY recommended to keep an adult on food color patrol to keep spills and over pouring at a minimum; plus making sure each bag is properly resealed is vital!

Note: Remember you are using undiluted food color.  Anything that comes into contact with the wet eggs will be heavily dyed!  We did have a few dyed fingers!

I would not cook and eat the rice.  With the volume of food color it would be quite the pot of gray!  You can dry the rice and use it for a sensory table activity.

Filed Under: Featured, Recipes Tagged With: Dye Easter Eggs, Easter, Easter Eggs

Banana Bread Pancakes

April 10, 2019 By Leah Leave a Comment

Banana Bread Pancakes

What do you do when you leave for a week long vacation and forget you have bananas on the counter?  You make banana bread since you have 6 VERY VERY ripe bananas on your counter now! Because I didn’t feel like messing with the long bake time required for a loaf of bread, I decided to give banana pancakes a try!

This recipe includes oatmeal which makes for a nice, hearty texture pancake, plus adding a handful of blueberries gives these simple flapjacks a boost of sweetness.  You can even top with a dollop of vanilla yogurt instead of syrup for a tangy twist!

📍 Pin HERE for Later!

What you need:

  • 2 c. pancake mix
  • 1/2 quick cook oats
  • 2 t. baking powder
  • 2 t. cinnamon
  • 1/4 t. nutmeg
  • 3 medium ripe bananas, mashed
  • 2 eggs, lightly beaten
  • 1 T. vanilla
  • 2 c. buttermilk (see below for a substitution trick)
  • blueberries or pecans if desired

Make it:

  1. Mix together pancake mix, oats, spices, and baking powder.
  2. Combine bananas, eggs, vanilla and milk
  3. Stir wet and dry together, do not over mix.
  4. Allow batter to rest while griddle preheats
  5. Ladle batter into buttered griddle heated to medium/low or 350° if using an electric model.  Sprinkle on blueberries or pecans if using
  6. Once batter starts to bubble, flip.  Cook on other side 2 minutes or until set.
  7. Remove and serve with butter and syrup.

The left over pancakes can be froze for later use.  I like to reheat them in the toaster.

Don’t have buttermilk on hand?  Did you know you can make your own with regular milk + lemon juice or vinegar?  Here is the simple substitution:

1 T. Lemon Juice or Vinegar
Add to a measuring cup
Level measuring cup to 1 c. using milk.
Allow the milk and acid to sit while mixing up the other ingredients.

Recipe adapted from HERE

Filed Under: Featured, Recipes

Bird Nest Cupcakes – Perfect for Easter

April 9, 2019 By Leah Leave a Comment

Bird Nest Cupcakes

When I purchased a mini bundt pan a few months ago, little did I know how much fun I would have using it.  I have found so many ways to bake & decorate with it!

These adorable nests take no special ingredients and can be done with regular cupcakes too.  I used a mini muffin tin to make bite size cakes and topped with egg shaped candy sprinkles to show the variation.

Mix up a cake mix, top with a 3 ingredient glaze, sprinkle coconut on top and add some jelly beans. DONE! How easy is that?  Plus, this is very kid friendly! They can help put cupcake liners in, shake the coconut, pour the glaze and add the jelly beans.

📌 Pin HERE for Later.

What you need:

  • (1) Box yellow or white cake mix
  • Oil, Water, Eggs needed per the cake directions
  • 2 c. powdered sugar
  • 1/4 c. heavy cream (or whole milk or half & half)
  • 1/2 t. vanilla (clear is best)
  • 1/2 c. coconut flakes
  • green food coloring
  • jelly beans, malted milk balls or sprinkles for the ‘eggs’

Make it:

  • Prepare cake mix according to the package directions
  • If using a mini bundt pan, carefully coat the pan with non-stick spray
  • If using a muffin tin, line with paper cups.  Spray the paper cups lightly with non-stick spray to ensure a clean removal
  • Bake cake according to package directions. (usually about 20 minutes for cupcakes)
  • Remove from pan and allow to completely cool

Prepare grass topping:

  • Add coconut to a storage container with a tight fitting lid
  • Add 2 drops of food color
  • Cover and shake until the coconut is green.  This takes a few minutes.  Add more food coloring if desired.

For the glaze:

  • In a mixing bowl combine powdered sugar, vanilla & cream
  • IMPORTANT NOTE: Add heavy cream 1 TBSP at a time until a pour-able consistency is reached.  You can add more cream if required.  Just add small amounts in at a time so the glaze does not become too runny.
  • Add a few drops of green food color to lightly tint green

Frost and decorate:

  • Put cakes onto a cooling rack that is set inside a cookie sheet to catch drips.
  • If using cupcakes, remove paper liners for a clean look, if desired.
  • Pour glaze over the tops of cakes so that it starts to drip down the sides.
  • Top with colored coconut
  • Add 3 jelly beans to the top of each
  • Allow for glaze to set

More Easter Ideas:

Bunny Butt Pretzel Treats

Easter Egg Pops

Filed Under: Featured Tagged With: Bundt Pan, Cake, Cupcakes, Easter

French Onion Meatballs

March 13, 2019 By Leah Leave a Comment

French Onion Meatballs

This delicious main dish tastes just like a bowl of hot, gooey cheese covered French Onion Soup!  The ground chicken makes for a very tender and mild meatball that soaks in all the amazing french onion ‘soup’ gravy.  I served this with roasted potatoes to soak up every bit of caramelized onion goodness! Because I was so excited to try this dinner, I forgot to snap a photo of the finished plate!  So until I make it again, (yes I am FOR SURE making it again) the pan of simmering meatballs will have to do!

📍 Pin here for later

What you need:

Meatballs:

  • 1 lb. ground chicken (or turkey)
  • 1/2 c. shredded Swiss cheese
  • 1/4 c. bread crumbs
  • 1 large egg, beaten
  • 1 Tbsp. (1 clove) minced garlic
  • 1 tsp. salt
  • Freshly ground black pepper

French Onion Gravy:

  • 4 tbsp. butter
  • 2 large onions, sliced
  • 1 Tbsp. (1 clove) minced garlic
  • 2 c. beef broth
  • 2 tsp. freshly chopped thyme*
  • salt
  • Freshly ground black pepper
  • 1 1/2 c. shredded Swiss cheese

Make the Meat Balls:

  • Preheat oven to 400° F.  Line a baking sheet with parchment paper and lightly grease the paper
  • In a bowl, combine ground chicken, cheese, bread crumbs, egg, garlic, salt and pepper.
  • Form into 12 meatballs and place on a baking sheet.  Bake until golden and cooked through.  About 20 minutes.

Make the gravy:

  • While meatballs are baking:
  • Over VERY low heat add onion and butter.  Caramelize the onions for about 25 minutes stirring occasionally and cook until deep golden brown and tender.
  • Add minced garlic and thyme.  Cook 5 more minutes
  • Add broth, salt, pepper and increase heat to med/low.
  • Bring to a boil, lower heat, and reduce for about 10 minutes or until slightly thickened.
  • Add cooked meatballs and heat them back through.
  • Top with remaining shredded cheese and allow to melt.

*Rather than chopping the thyme, I just tossed in a few sprigs with the onions as they cooked and let them simmer in the broth.  Just remove the stems before serving!


Recipe adapted from HERE

Check out these other dinner ideas too:

Chicken & Stuffing Casserole

Keto Friendly – Low Carb Shepherd’s Pie

Filed Under: Featured, Recipes, Uncategorized Tagged With: Dinner, French Onion, Meatball

Streusel Coffee Cake

March 10, 2019 By Leah Leave a Comment

Streusel Coffee Cake

Whenever we do a family brunch, you will find this coffee cake on the menu.  For as long as I can remember, this was my mom’s signature ‘dish to pass’.  It always looks beautiful, cuts and serves perfect and pleases the masses.  Little did I know it was made with a cake mix and comes together in minutes!  Now I find myself making it often and loving how simple it is!

Starting with a cake mix and adding just a few extra ingredients, you end up with a mildly sweet, tender cake with a tasty fruit swirl and perfect streusel crumb topping.  Serve this up with your next breakfast and everyone will be impressed with this easy coffee cake.

📍 Pin HERE for later

What you need:

  • 1 yellow cake mix
  • 1 c. flour
  • 1 packet active dry yeast (1/4 oz.)
  • 2/3 c. warm water
  • 2 eggs – slightly beaten
  • 2 Tbsp. sugar
  • 1 Tbsp. vanilla extract
  • 1 – 21 oz pie filling (any variety i.e. cherry, blueberry, apple)
  • 5 T. butter melted

Make it:

  • Preheat oven to 350° F
  • Grease a 9 x 13 Pan. (I prefer a glass pan)
  • Add 1 1/2 c. of cake mix (reserve rest for topping), flour, sugar, and yeast to a bowl.  Lightly mix.
  • Add water, vanilla and eggs.  Using an hand mixer, stir until a thick dough forms.
  • Spread into prepared baking pan.  Dough is thick, but can be spread evenly in pan.  An offset spatula works best!
  • Top evenly with pie filling.  I used a cherry/blueberry mixed can.

Prepare topping:

  • Mix reserved, remaining cake mix and melted butter.
  • Using your fingers, put small dollops of the topping all over the cake.  Do not cover completely – you want little spots peeking through with fruit filling.

Bake it:

  • Bake for 35-40 minutes at 350° F.  Turn the pan half way through.  The edges of the cake will be just brown and pull away from the sides of the pan.  A glass pan makes it easier to watch the color of the cake because the topping won’t darken much in the oven.
  • The cake will rise in spots creating bubbles and valleys.  Don’t worry – this gives it a very nice appearance when cut and served!
  • Remove from oven and allow to cool completely.
  • Optional: Drizzle with a powdered sugar glaze if desired.


Ice coffee make a refreshing accompaniment to this!

Make Your Own Cold Brew Coffee

Filed Under: Featured, Recipes Tagged With: Breakfast, Brunch, Cake, Cake Mix, Coffee Cake

Lemon Meltaway Cookies

March 7, 2019 By Leah Leave a Comment


Grab a few ingredients and mix up these melt in your mouth buttery lemon cookies.  By a few I mean ONLY FOUR ingredients – lemon juice and zest count as one item, right?!  These take just a few minutes and taste like you spent hours making a gourmet bakery cookie.

📌 Pin HERE for later!

What you need:  

  • 1 c. butter (2 sticks) – room temperature
  • 2 1/2 c. powdered sugar
  • 3 Tbsp. finely grated lemon zest
  • 2 Tbsp. lemon juice
  • 2 c. flour

Make it:

Cookies:

  • Preheat oven to 400°
  • In a large bowl, add butter, 1/2 c. powdered sugar and lemon zest.  Cream together with a hand mixer
  • Add flour and mix until a soft dough forms.  This will be a slightly dry, crumbly dough.
  • Roll into 36 balls and place onto an ungreased cookie sheet
  • Flatten to about 1 1/2″ cookies.  Do not worry about spacing.  The cookies do not flatten or spread when baking
  • Bake for 8-10 minutes until JUST set and barely brown on edges.  Bottoms should remain pale
  • Remove from oven and rest on pan for 2 minutes.
  • Immediately remove from pan and place in a bowl with 1 c. powdered sugar.  Gently toss to coat and put onto a cooling rack.  Do 3 or 4 cookies at a time to avoid breaking them.

Icing:

  • Mix remaining 1 c. powdered sugar and 2 Tbsp. lemon juice to make a glaze.  Add more lemon juice if needed to make a pourable glaze.
  • Drizzle over cooled cookies creating a zig zag pattern to decorate.  Allow to set.


Filed Under: Recipes Tagged With: cookies, Dessert, Lemon, Shortbread

Slow Cooker Chicken Chili

March 5, 2019 By Leah Leave a Comment

Slow Cooker Chicken Chili

I am one of those people that could eat soup EVERY DAY, no matter the weather.  It doesn’t even matter what kind: chili, chicken noodle, spicy tortilla, cheesy broccoli, potato . . . do I need to go on?   Give me ALL THE SOUP!

One of my go to’s is Chicken Chili.  Tossing everything in a slow cooker and using a rotisserie chicken makes the prep of this mild and rich chili a snap.

📌 Pin HERE for later!

What you need:

  • 6 c. chicken broth
  • 3 c. cooked and chopped chicken (use a rotisserie to save time)
  • 4 cans white beans (great northern, canellini, or your favorite kind) – drained & rinsed
  • 2 cans 4.5 oz. mild chopped green chilies
  • 2 t. salt
  • 2 t. cumin
  • 2 t. oregano
  • 1/2 t. cayenne pepper (more or less to your tastes)
  • 1/2 t. black pepper
  • 2 t. garlic powder
  • 1/2 c. heavy cream

Make it:

  • Put all ingredients EXCEPT cream into a slow cooker on low.  Cook for 4 hours stirring occasionally.  Taste for seasoning.  Add salt and pepper as needed.
  • Add cream before serving and allow to heat thru
  • Serve with cheese, sour cream, cilantro and/or onion if desired.

One of the BEST parts of making a big pot of chili – LEFTOVERS!  As with most chili recipes, this tastes even better the next day! It freezes well, too!  

More soup recipes

Hobo Hamburger Stew

Poultry a la King Recipe

Filed Under: Featured, Recipes Tagged With: Chicken Chili, Chili, Dinner, Soup

Grasshopper Mint Brownies with Chocolate Ganache Topping

March 5, 2019 By Leah Leave a Comment

Grasshopper Mint Brownies with Chocolate Ganache Topping

Nothing like the upcoming 🍀 St. Patrick’s Day 🍀 holiday to bring out all the delicious green & mint treats!  Don’t get me wrong, I will gladly play all along and use this as a perfect excuse to make all things mint.  Add some chocolate to the equation and BOOM how can you say no?

These tasty bites use a store bought mix and a bit ‘o the Irish with creme de menthe buttercream!  PLUS pour over a simple chocolate ganache and you have one beautiful and tasty dessert!

📌 Pin HERE for later!

What you need:

  • 1 brownie mix + the eggs, oil & water called for on the box
    Note: Prepare in the ‘fudgy’ method for best results

Buttercream:

  • 4 oz. butter, room temperature
  • 3 tsp. Creme de Menthe
  • 2 c. powdered sugar
  • 1 – 2 Tbsp. cream or milk
  • 1/2 tsp. vanilla extract

Note: if you prefer no alcohol add 1 t. mint extract and a few drops of green food coloring plus additional cream to make up for the liquid difference.

Ganache Topping:

  • 1/2 c. heavy cream
  • 1/2 c. semi sweet chocolate chips
  • colored sprinkles if desired

Make it:

  • Preheat oven temperature as indicated on the box brownie mix (usually 325-350° F)
  • Heavily spray a mini muffin tin with nonstick spray.  Be sure to get the sides and top so the brownies pop out nicely
  • Prepare brownie mix according to package directions using the ‘fudge-like’ directions
  • Fill the mini muffin tins 2/3 full with batter
  • Bake for 12 – 15 minutes until toothpick comes out clean
  • Remove from oven and allow to cool for 5 minutes
  • Remove brownies from pan and allow to cool completely

While brownies cool prepare the ganache:

  • Warm cream to a simmer over low heat
  • Remove from heat and add chocolate chips. Stir until completely combined and the sauce becomes glossy.  It takes a minute of stirring, don’t worry it will all mix together!
  • Set aside and allow to cool to room temperature (can put in fridge if necessary)

Prepare buttercream:

  • Using a hand mixer, combine butter, powdered sugar, vanilla, 2 t. creme de menthe, and 1 Tbsp. of cream.
  • Start mixing.  Add more cream and mint until desired fluffy texture has been reached.
  • Frost each brownie with a generous amount of frosting.
  • Once the ganache topping has cooled to room temperature pour a small amount on top of each brownie.
  • Decorate with sprinkles if desired.

Filed Under: Featured, Recipes

Chicken Bacon Ranch Penne

February 27, 2019 By Leah Leave a Comment

As I have mentioned before, I like to prepare a large batch of chicken in the slow cooker to use during the week for quick meal prep.  I love knowing I have a protein cooked and ready to go for any number of meals through out the week!  PLUS, I end up with a nice stash of stock for soups and chicken chili!  Even better, if you have leftover cooked meat after a few days, just toss it in the freezer for later!

I gave this new recipe a try and it received RAVE reviews from both kids!  All I have to do is mention pasta, and I have my kid’s full attention for any meal.  This is very quick to put together, requires no special ingredients and is very kid friendly.  Use a rotisserie chicken to save some time and serve with a salad for a nice balanced meal.

📌 Pin here for later!

What you need:

  • 1 lb Penne pasta (or other short cut pasta)
  • 2 cups shredded or cubed cooked chicken
  • 1 jar (15 oz) Alfredo pasta sauce
  • 1 c. ranch dressing (regular or light)
  • 2 t. ranch dressing powder/mix
  • 1/2 t. cracked black pepper
  • 6 slices chopped cooked bacon
  • 2 cups shredded mozzarella cheese (8 oz)

Make it:

  • Preheat oven to 350° F
  • Cook the bacon until crisp and chop into bite size pieces (I prefer to bake mine in the oven)
  • Cook the pasta in boiling, salted water until JUST soft.  Do not over cook or your pasta will become mushy since it is also baked
  • While pasta is cooking, mix Alfredo, ranch, seasonings, and chicken.
  • Drain pasta and mix into Alfredo/chicken mixture
  • Pour into a greased 9 x 13 baking dish
  • Top with shredded cheese and cooked bacon
  • Bake, uncovered for 25 Minutes or until cheese is melted and casserole is bubbling.
  • Let rest for 10 minutes before serving

The leftovers reheat wonderfully and taste even better the next day.

Recipe adapted from HERE

More Kid Friendly Meals:

Easy Pizza Roll

Simple Crock Pot Spaghetti

Filed Under: Featured, Recipes Tagged With: Bacon, Chicken, Dinner, Meal Prep, Pasta

  • « Previous Page
  • 1
  • …
  • 202
  • 203
  • 204
  • 205
  • 206
  • …
  • 210
  • Next Page »

{ Your info will never be shared because spam stinks }

Archives

Deals

2-Pack Girls Tank Dress w/Pockets ONLY $6.50! Sizes 4-18 & Plus

Walgreens Photo: FREE 8X10 Photo Print – Valid through 7/25

Additional 50% OFF Clearance!

Walmart Online: $5.95 (Reg. $16.98) 18 Mega Rolls Great Value Ultra Soft Toilet Paper

Summer Cyber Days at Kohl’s – Daily Deals & FREE Shipping for Everyone

More Deals

Coupons

75% Off! 5×7 or 8×10 Wood Panel Photo Prints

Hellmann’s (Unilever) Sign UP Rewards! $5 towards your next purchase + Get exclusive details about new products, recipes & savings

Kohl’s Last Minute Gift Sale – Valid thru 12/24

EXCLUSIVE OFFERS: Additional 10% off ALL these sale prices!

Have you tried Mike’s Popcorn? If not, you are MISSING OUT!

More Coupon Posts

Sweeps & Giveaways

Merry Christmas Giveaway – 2 Hatchimals & One Nintendo NES

Win A Zoo Pass From Zoological Society Of Milwaukee!

Culver’s Cow Tippin’ Instant Win Game!

WIN a Dream Vacation from Club Med!

WIN a Trip to the Indy 500 from Craftsman (2 Tickets, Airfare, and Hotel Included)

More Sweeps & Giveaways

Copyright ©2025, Midwest Coupon Clippers. All Rights Reserved. Site by Pixel Me Designs