Midwest Coupon Clippers

Cudding Coupons and Saving You Some Moolah

  • Home
  • Coupons
    • Newest Coupons
    • Coupons.com
    • Red Plum
    • Smart Source
    • Hopster
    • Saving Star
    • Coupon Database
  • Deals
    • Amazon
    • eBates
  • Freebies
  • Sweeps & Giveaways
  • Store Match-ups
    • Midwest Matchups
      • Copps/Pick n’ Save
      • Festival
      • Menards
      • Piggly Wiggly
    • Nationwide Matchups
      • CVS
      • Dollar Stores
        • Dollar General
        • Dollar Tree
        • Family Dollar
      • Target
      • Walgreens
      • Wal-Mart
  • This & That
    • Recipes
    • Around the House
    • Money Saving Tips
    • Get Organized
    • Disney
    • Pets
    • Gardening
  • About
    • Contact
    • Disclosure

Easy Halloween Monster Krispy Treats & Pretzel Eye Balls, Pumpkins & Ghosts!

October 20, 2017 By Leah Leave a Comment

Easy Halloween Monster Krispy Treats & Pretzel Eye Balls, Pumpkins & Ghosts!

Create super easy and fun Halloween treats using colored melting chocolates and sprinkles!  These come together in MINUTES and look adorable & festive on a tray.

📌 Pin HERE for later!

Monster Krispy Treats

  • Prepared Rice Krispy Treats Cut into rectangles.  Go ahead and cheat here – purchase some store bought ones!
  • Various Colored Melting Chocolate Wafers.  I prefer the Wilton brand.
  • Eye Ball Decorating Candies in different Sizes

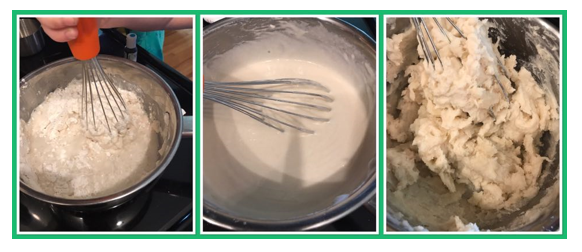
Melt the wafers according to package directions.  Dip the Krispy Treats halfway into the chocolate.  Decorate each with the eye ball candies.  Mix and match the sizes and layout.  There is no exact science and just have fun!  Allow to set.

Eye Ball Pretzels

  • Ring Pretzels
  • White Melting Chocolate Wafers
  • Red Sanding Sugar
  • M&M Candies
  • Black Frosting or Melting Chocolate

Line a baking sheet with the pretzel rings.  Put a white wafer inside each.  Preheat oven to 250º – and shut it off.  Place sheet in oven for 3-5 minutes until melted.  Remove from oven and sprinkle a bit of Red Sanding Sugar on each ‘eye ball’.  Top each one with a M&M.  Once set, dot the top of each M&M with the frosting or Black melted chocolate to create a pupil. Allow to set.

Pumpkin Pretzels

  • Mini Twist Pretzels
  • Orange Melting Wafers
  • Green M&Ms, Jimmy Sprinkles or similar for a ‘stem’

Melt the orange wafers according to package directions.  Dip each pretzel in the chocolate and place a green candy at the top.  Allow to set.

Ghost Pretzels

  • Mini Twist Pretzels
  • White Chocolate, Almond Bark or Melting Wafers
  • Small Eye Ball Candy Decorators

Melt white chocolate according to package directions. Dip each pretzel into chocolate.  Add 2 eye balls at the top and allow to set.

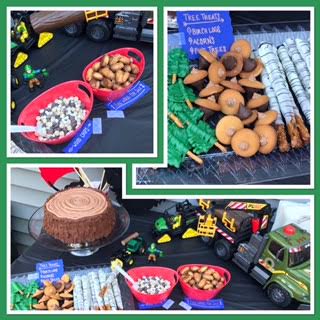
💰 Super saver tip 💰:   Shop holiday clearance and grab decorative sprinkles marked down.  Craft stores like JoAnn Fabrics & Michaels are great places to look!  Dip pretzel rods in melted chocolate and add some fun seasonal sprinkles & instantly dress up your table with fun themed snacks for pennies!
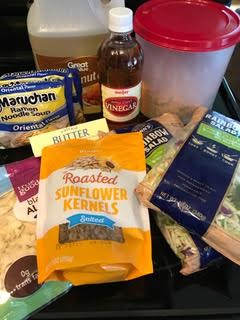
 

Filed Under: Featured, Recipes, This & That

Homemade Play Dough

August 24, 2017 By Leah Leave a Comment

Homemade Play Dough


When the supply list came home for back to school and it said Play Doh (homemade is preferred) I had a moment of panic.  Homemade Play Dough? Really, that doesn’t sound like something I should attempt.  Well, after scouring the internet and reading blogs and reviews, I put on my Pinterest Mom Pants and went for it! … and guess what?  IT’S EASY, turns out PERFECT, and uses pantry staple ingredients!

What you need:

  • 1 c. flour
  • 1/2 c. salt
  • 2 teaspoons cream of tartar
  • 1 teaspoon cooking oil (canola or vegetable)
  • 1 cup cold water
  • Food coloring as desired
  • Latex gloves (if you don’t want food colored finger nails!)


Now, lets make some play dough

In a medium sauce pan, mix everything except food coloring.  Cook over medium low heat, stirring constantly for 3-5 minutes or until mixture pulls away from the sides of the pan. Once it starts to thicken, you will want to switch from a whisk to a wooden spoon.  It will be MUCH easier to move around the pan!  The dough will have the consistency of mashed potatoes and become very hard to stir.  Make sure it is stiff and set.

Remove from the heat and turn out to a clean, dry surface.  Allow to cool for 1 minute.  At this point, I would recommend throwing the gloves on to keep those hands clean and dye free!  Add food coloring to tint as desired.  To attain a rich deep color I suggest a good quality gel food color.  Don’t be afraid to add a lot.  It will take more than you think to get a vibrant color.  Knead the coloring into the dough for several minutes to distribute color and cool dough.

Allow dough to completely cool, uncovered, for an hour.  Knead occasionally to keep it from drying out on the surface.  Store in an air tight container.

While the ingredients are non-toxic, given the high salt content, please do not eat the dough!

📌 Pin HERE for later!


Filed Under: Family Savings, Featured, Fun for the Family, Recipes, This & That, Uncategorized

Luuup 3 Sifting Tray Litter System B2G1 FREE

June 9, 2017 By Leah Leave a Comment

Disclaimer: This post may contain affiliate links. You can view MCC’s Full Disclosure Policy HERE.

If you like Shopping Online, Join our Deals Group on Facebook HERE!

Luuup 3 Sifting Tray Litter System B2G1 FREE

Toss your scoop and ditch your litter liner. Meet the only litter box you’ll want to come home to.  Luuup is more than a litter box. It’s functional and stylish.  Grab these innovative litter boxes for $49.95 OR Buy 2 and get 1 FREE!   That is 3 complete litter box sets for $99 & FREE shipping.  View in depth instruction on this litter box works HERE.


Filed Under: Featured, Instagram, Online Deals, Pets

Lumber Jack Birthday Party

June 9, 2017 By Leah Leave a Comment

Lumber Jack Birthday Party

When your son asks for a ‘sawmill’ birthday party you stop and ponder how does one make that happen? I knew there was no way to make a physical ‘sawmill’ cake for him!  So after a little searching around we settled for a more streamlined Lumber Jack Theme!  A few easy treats and toys we had already made for an adorable tablescape!

The CAKE – a Tree Stump!

I baked 2 round cakes and stacked them on a cake tray.  For the frosting you can use a store bought or homemade buttercream.  For this, I made a classic buttercream.  Once mixed, I removed a few cups and added a sprinkle of cocoa powder to tint it slightly tan.  Then added more cocoa powder to the rest and some brown food color to get deep brown bark color.

For decorating:

Fill a piping bag or ziptop bag with the dark brown frosting and snip a small opening.  Making straight lines up and down cover the entire cake.  Neatness doesn’t matter and it doesn’t have to be exact. Just get that tree stump covered in bark! Then make a circle around the top, outer edge of the cake.  Let frosting set and slightly dry for about 20 minutes.  Using a flat edge (knife, narrow spatula or flat pastry spreader) press the frosting upwards to give a pattern of bark, slightly overlapping each pass. Again, neatness isn’t required and there is no exact science! You cannot mess this up.  For the top, simply fill another piping bag with the lighter frosting.  Swirl in circles and create a ‘growth ring’ like pattern.

The SNACKS!

Birch Logs: 

Dip pretzel rods in white melting chocolate.  Drizzle with dark chocolate or black melting wafers to create the ‘birch tree’ look.

Acorns:

Using the melting chocolate from the logs above put a small dab on Hershey’s Kisses & press onto Vanilla Wafers. Top with a butterscotch or peanut butter chip using the same melted chocolate.

Evergreen Trees:

Melt green melting wafers and put in a piping bag or ziptop bag.  Lay pretzel sticks on parchment paper and carefully drizzle the chocolate side to side into a free form tree shape over the sticks.

Fire Wood For Sale:

Pretzel Nuggets in a bowl

Wood Chips:

Mini Marshmallows, Mini Chocolate Chips, and Granola in bowl

To finish out the table, I added a log hauling truck we had, plus a few chain saw toys, logs, and photo props to add to the fun.  Plus we used red balloons, bowls and plates over a black table cloth bringing the lumber jack ‘flannel’ into the party.


📍 Pin HERE


Filed Under: Baby, Featured, Miscellaneous, Recipes, This & That

Ramen Noodle Broccoli Slaw Salad

April 18, 2017 By Leah Leave a Comment

Ramen Noodle Broccoli Slaw Salad

Turn ordinary Ramen Noodle Soup Packets into a tasty salad no one will be able to resist.  Trust me, take this to a potluck and everyone will want the recipe!

Ingredients:

  • 1/4 cup sunflower seeds
  • 1/4 cup slivered or sliced almonds
  • 2 T. butter
  • 2 (3 oz) bags Oriental Flavor ramen noodle soup + seasoning packets
  • 2 (12 oz) bags broccoli coleslaw mix
  • 3/4 cup Canola, Peanut OR Vegetable oil
  • 1/4 cup brown sugar
  • 1/4 cup apple cider vinegar


Preparation:

Empty the ramen into a zip-top bag (set aside seasoning packets for use in the dressing).  Crush with a rolling pin.  Melt the butter over low heat in a large skillet.  Toss the Ramen noodles and almonds in butter and carefully brown over low heat.  Keep stirring or it will get away from you and burns quickly! Once browned, remove from heat and allow to cool.

While noodles and almonds cool prepare dressing.  Mix oil, vinegar, sugar and seasoning packets thoroughly.  Mix slaw, noodles, almonds, and dressing all together.  Allow to set overnight in the refrigerator for best flavor.  It is best to mix once or twice while it sits.  I like to store it in a large plastic container so I can just give it a good shake a few times! Toss in sunflower seeds before serving.

📍 Pin it HERE

Filed Under: Recipes

John Deere Tractor Farm Birthday Party

April 13, 2017 By Leah Leave a Comment

John Deere Tractor Farm Birthday Party


My son is John Deere Tractor OBSESSED and refers to himself as a John Deere Farmer Kid. He lives for those green and yellow tractors and spots them everywhere we go.  When he said he wanted a John Deere Birthday party, I knew that we had to go all in! Taking inspiration from the tractors and farm equipment toys we had around the house, I put together a simple spread of treats and snacks representing all things John Deere!

For the cake, using a flat cardboard sheet and mini cupcakes, I arranged them into a rough tractor shape.  Using tinted frosting and piping gel, the tractor came to life.


Our guests were treated to sugar cookies (with green and yellow sprinkles) in a tractor loader bucket, ‘hay bale’ rice crispy treats loaded onto a semi flatbed, and corn nuts in the grain hauler wagon right from the combine!  Of course we had to include a farm fresh veggie tray and being from the Midwest every good dairy farmer puts out a cheese tray!


Check out these simple cups we made ourselves.  Using dollar store colored cups and stickers, we made our own themed cups for a just a few bucks!  
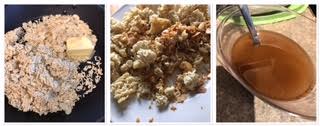
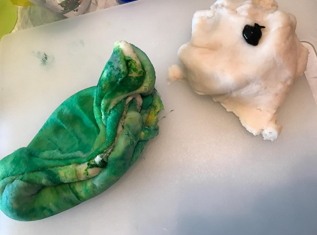
It was a fun project to keep small hands occupied and easily included him in the party prep!


With few toys and a bit of prep, my not so little anymore ‘farmer kid’ had a fun birthday party.  Everyone had a great time and loved the personal touches!


📌 Pin it HERE


Filed Under: Featured, Recipes, This & That

Easter Bunny Suckers

April 1, 2017 By Leah Leave a Comment

This post contains affiliate links and we will be compensated if you make a purchase after clicking on our links. You can view MCC’s Full Disclosure Policy HERE.  

Easter Bunny Suckers

📌 Pin it HERE

Turn those classic Saf-T-Pops that we all remember getting from the doctor into adorable Easter Bunny treats in just a few easy steps!

What you need:


◾ Saf-T-Pops

◾ Parchment Paper or Wax Paper

◾ White Pom Poms

◾ Ribbon

◾ Hot Glue or Craft Glue


These adorable treats come together in just a few steps.

Directions:

  • Cut the parchment or wax paper into 4″ squares.
  • Unwrap the suckers from their original wrappers.

Did you know they come with different letters stamped into them? My son loved looking for the letters in his name while we unwrapped them!

  • Stack 2 suckers together and wrap them up tightly in the parchment.
    I secured the paper in place with a tiny clear rubber band so I didn’t have to struggle keeping the paper in place!  
  • Trim the excess paper around the top to expose the ‘ears’.
  • Tie a simple bow around the top with ribbon.
  • Using hot glue or bit of craft glue secure that fluffy bunny tail on.


price & availability accurate as of
Apr 5, 2019 @ 10:38 am CST
 

Filed Under: Featured, This & That, Uncategorized

Hobo Hamburger Stew

March 29, 2017 By Leah Leave a Comment

Hobo Hamburger Stew

This easy hearty soup is a hint spicy, but a little sweet. It comes together in a few minutes and you can mix and match veggies to what you prefer or have on hand.

Ingredients

• 1 tablespoon of oil
• 1 cup chopped onion
• 1/2 cup celery
• 1 tablespoon minced garlic
• 1 pound ground beef
• 2 tablespoons of all purpose flour
• 1 46-48 oz bottle of original or spicy V-8 juice
• 2 cups of diced carrots (about 2 large)
• 2 cups of corn
• 2 cups of cut green beans
• 3 tablespoons sugar
• 10 dashes of hot sauce (I always use Frank’s & doesn’t make it spicy, just
rounds the flavor out)
• 1 teaspoon of kosher salt, or to taste
• black pepper, to taste
• 2 c. small cut pasta – cooked just until tender

Instructions

In the bottom of a Dutch oven or other heavy pot, heat the oil over medium high heat. Add the onions and celery; cook and stir until softened, about 4 minutes. Add the garlic and ground beef, cook and stir until meat is browned and cooked through. Drain off excess fat. Sprinkle meat with flour; cook and stir for 3 minutes. Add the V-8 juice. Stir in the carrots, corn and green beans. Add hot sauce, sugar and seasonings to taste. Stir, cover and simmer over medium to medium low (low bubble) for about 30 minutes or until veggies are tender, stirring occasionally. Taste and adjust seasonings as needed.  Feel free to add more sugar or hot sauce depending on your preferences!  Just before serving, add cooked pasta.

You can add diced potatoes, but I prefer to add the pasta. Toss in whatever veggies you have on hand. I have used diced tomatoes, peas, and even canned or frozen veggies to get it done quickly! You can skip the flour part, too if you want a runnier soup. The flour makes it rich & thick.

Idea: Serve with Homemade Beer Bread or Soft Pretzels!


📍 Pin HERE

Filed Under: Featured, Recipes, Uncategorized

Easy Easter Carrot Snack Bags

March 10, 2017 By Leah Leave a Comment

Easy Easter Carrot Snack Bags

What you Need:

  • Goldfish Crackers or Cheese Balls
  • Cone Shaped Favor Bags
  • Twist Ties, Ribbon or similar to tie shut

If you are looking for a fun yet fast Craft/Treat project for you and your little one to do, this is it!

My son’s attention span does not last long on projects, so this was perfect for his age. I ordered THESE snack bags that came with a variety of colored twist ties, and worked perfect! Of course you could also use ribbon, a pipe cleaner, or whatever you like. We filled our favor bags with some Goldfish Crackers we had recently purchased, but you could also use Cheese Balls if you have them and either will give you the same fun carrot look!

If you want to avoid the orange cheesy fingers, I would suggest going the Goldfish route. Candy Corn would also be an option, but seeing as my son will be taking these as a treat to his classmates, I am pretty sure his teacher would not appreciate a classroom full of sugar enhanced preschoolers.

And there you have it, Easy Easter Treats to share.

Disclaimer:

Keep Reading…

Filed Under: Featured, Recipes, Uncategorized

Chocolate Lasagna

February 4, 2017 By Leah Leave a Comment

Chocolate Lasagna

What you need:

  • 1 package of Oreos (appx. 16 oz)
  • 4 T. butter (melted)
  • 2 boxes Chocolate Instant Pudding
  • 2 – 8 oz. Cool Whip – thawed
  • 1 – 8 oz. Cream Cheese (room temperature)
  • 1/4 c. Powdered Sugar
  • 3 c. milk
  • 1/4 c. mini chocolate chips

Directions:

  1. Crush Oreos into fine crumbs using blender or food processor
  2. Reserve 1/4 c. of the Oreo crumbs for garnish
  3. Mix remaining Oreos and Butter and press firmly into a 9 x 13 pan
  4. Beat Cream Cheese and Powdered Sugar in a bowl until light and fluffy
  5. Fold in 1 carton of Cool Whip into Cream Cheese mixture
  6. Spread evenly over Oreo crust
  7. Sprinkle Chocolate Chips over Cream Cheese Layer
  8. Wisk Milk and Pudding Mix together until combined and starting to thicken
  9. Carefully add Pudding to pan.
  10. Allow to chill for 30 minutes in refrigerator
  11. Top with Cool Whip and sprinkle reserved Oreo Crumbs for garnish
  12. Refrigerate 4 hours before serving

Filed Under: Recipes, Uncategorized

  • « Previous Page
  • 1
  • …
  • 204
  • 205
  • 206
  • 207
  • 208
  • Next Page »

{ Your info will never be shared because spam stinks }

Archives

Deals

Coming back soon!

10% off Target Gift Cards (Up to $500)

$79.99 (Reg. $199.99) Beats Solo 4 Bluetooth Wireless On-Ear Headphones

3pc Steel Mega Cookie Sheet and Cooling Racks Set $11.99 (reg. price $24.99)

25 Count XL Tide + Downy April Fresh HE Deep Cleaning Concentrated Laundry Detergent Pods

More Deals

Coupons

75% Off! 5×7 or 8×10 Wood Panel Photo Prints

Hellmann’s (Unilever) Sign UP Rewards! $5 towards your next purchase + Get exclusive details about new products, recipes & savings

Kohl’s Last Minute Gift Sale – Valid thru 12/24

EXCLUSIVE OFFERS: Additional 10% off ALL these sale prices!

Have you tried Mike’s Popcorn? If not, you are MISSING OUT!

More Coupon Posts

Sweeps & Giveaways

Merry Christmas Giveaway – 2 Hatchimals & One Nintendo NES

Win A Zoo Pass From Zoological Society Of Milwaukee!

Culver’s Cow Tippin’ Instant Win Game!

WIN a Dream Vacation from Club Med!

WIN a Trip to the Indy 500 from Craftsman (2 Tickets, Airfare, and Hotel Included)

More Sweeps & Giveaways

Copyright ©2026, Midwest Coupon Clippers. All Rights Reserved. Site by Pixel Me Designs