Midwest Coupon Clippers

Cudding Coupons and Saving You Some Moolah

  • Home
  • Coupons
    • Newest Coupons
    • Coupons.com
    • Red Plum
    • Smart Source
    • Hopster
    • Saving Star
    • Coupon Database
  • Deals
    • Amazon
    • eBates
  • Freebies
  • Sweeps & Giveaways
  • Store Match-ups
    • Midwest Matchups
      • Copps/Pick n’ Save
      • Festival
      • Menards
      • Piggly Wiggly
    • Nationwide Matchups
      • CVS
      • Dollar Stores
        • Dollar General
        • Dollar Tree
        • Family Dollar
      • Target
      • Walgreens
      • Wal-Mart
  • This & That
    • Recipes
    • Around the House
    • Money Saving Tips
    • Get Organized
    • Disney
    • Pets
    • Gardening
  • About
    • Contact
    • Disclosure

Instant Pot Pulled Pork – One Meat Prep, 5 Delicious Meals!

April 13, 2018 By Leah Leave a Comment

Disclaimer: This post contains affiliate links and we will be compensated if you make a purchase after clicking on our links. You can view MCC’s Full Disclosure Policy HERE.
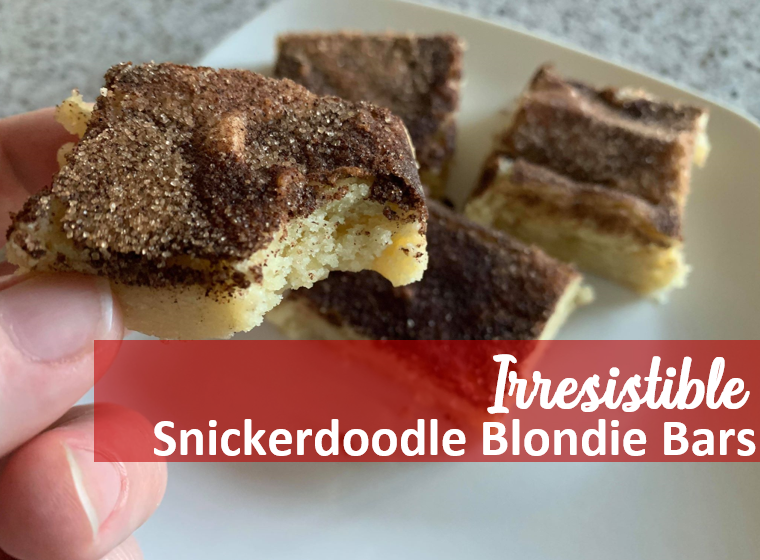
Instant Pot Pork – One Meat Prep, 5 Delicious Meals!

After much debate and hearing from EVERYONE how much they loved their pressure cookers – I did it,  I caved and purchased an Instant Pot!

After letting it sit in the box for a few weeks, scared to death of it, I finally pulled it out.  Boy am I glad I finally got brave and fired that bad boy up!  It is amazing how quickly the food cooks.  So far my trials have included mashed potatoes, chicken a few different ways, and an amazing pork tenderloin.

In this post I am going to share with you a basic pulled pork recipe and how to make it into a  5 meals. One meat prep and 5 delicious meals. Now that is the way to meal plan!!

📍 Pin it HERE!

Meal #1

Basic Pulled Pork

4 lb. Bonless Pork Loin or Shoulder Roast
1 1/2 c. Chicken Broth
2 cloves of garlic minced
Salt & Pepper to Taste

Prepare it:

Chunk the pork into 4 equal chunks.  Add chicken broth to bottom of Instant Pot.  Place the pork piece into the pot.  Season liberally with Salt & Pepper and top with minced garlic.  Seal lid on cooker and set timer for manual high pressure at 60 minutes.

Once it is done cooking, allow it to naturally release pressure for 10-15 minutes and then finish releasing manually.  Your pork is now fork tender and ready to be shredded.  Remove as much fat as you can from the cooked meat and shred.

TIME SAVER TIP:  Using a stand mixer with the paddle attachment -`  Place cooked meat in the mixer bowl and starting on low, shred for a few moments and increase speed for about 30 seconds.

Serve pulled pork with a veggie/salad and rice, pasta or beans for meal #1.

Store left over pork in fridge with some of the broth from the instant pot cooking liquid!  You can freeze the leftover meat in ziptop bags, for making meals later.  I love having cooked meat in the freeze for last minute meals or unexpected dinner guests!

Meal #2

BBQ Pulled Pork Pizza

Prepared Pizza Crust (or use homemade)
1/2 c. alfredo sauce or ranch dressing
1 c. BBQ sauce – whatever is your favorite (no need to measure, just as much as you like really!!)
2 c. pulled pork
2 c. shredded cheese (I used mozzarella and cheddar jack, but ANYTHING works!)

Prepare it:

Preheat your oven per the crust directions.  Par bake it for 5 minutes & remove from oven.  Mix the alfredo sauce and 1/4 c. of BBQ sauce.  Spread over pizza crust.  Crumble pulled pork over pizza crust.  Drizzle BBQ sauce over the meat.  Top with shredded cheese and drizzle more BBQ on top.  Bake for 10 minutes until cheese is melted and bubbling.  Allow to cool and serve!

Meal #3

Pork Fried Rice:

1 1/2 c. White Rice – cooked according to package directions
1 c. pulled pork
1 c. diced carrots
1 minced onion
1 c. diced celery
2 cloves minced garlic
1 T. sesame Oil
1/4 c. soy sauce
2 eggs – lightly beaten

Saute onion, carrots & celery in sesame oil in a LARGE skillet over medium/low heat.  Cook just until tender.  Add garlic and saute a few more minutes.  Toss in pork.  Add soy sauce and rice.  Stir to coat rice.  Push rice to one side of the skillet.  Pour eggs in and scramble quickly.  Mix together.  Serve with egg rolls if desired!

Meal #4


Pork Nachos

Tortilla Chips
2 c. Pulled Pork
Taco Seasoning
Nacho Cheese
Grated Cheese
Salsa, Sour Cream, Lettuce, Tomatoes, Olives, Jalapenos, etc. as preferred

Prepare it:

Cook Pork with taco seasoning as directed on package. Serve over chips with desired toppings.

Super Saver Tip: Add a can of beans to your meat to stretch the quantity even further!

Meal #5

BBQ Pork Bowls

Left Over Pork
Your Favorite BBQ Sauce in a bottle
Mashed Potatoes
2 c. milk (whole is best – but please, nothing less than 2%!)
2 T. Butter
2 T. Flour
Salt & Pepper to Taste

Prepare it:

In a skillet – warm the pork with your favorite BBQ.  Heat very low and stir often.  Meanwhile, prepare mashed potatoes as desired.

Using a small pot, melt the butter over medium low heat.  Add the flour and stir constantly.  Cook 5 minutes stirring often while the flour is cooked.  Using a wisk, slowly add the milk to flour & butter mixture and keep stirring it to prevent clumps.  Heat over medium low to a boil.  Once it has thickened and boiled, add salt & pepper to taste.

To serve:

Layer mashed potatoes, pork & gravy in a bowl.  Enjoy!

Time Saver Tip: There are very good ‘country gravy’ mixes available in the spice and prepared meals aisles.  Usually they cost about a dollar. Following the very simply directions on the packet works fast, tastes great, and saves a lot of time compared to making homemade white gravy!

Filed Under: Featured, Recipes, Uncategorized

S’More Valentine’s Day Treats!

January 30, 2018 By Leah Leave a Comment


S’More Valentine’s Day Treats!

📍 Pin HERE to find again!

What you need:

  • Golden Graham Cereal
  • Chocolate Chips
  • Mini Marshmallows
  • Favor Bags or Zip Top Bags
  • Colored paper, stickers, stamps, etc. for decorating

To Make:

  • To make the paper labels, I just typed ‘Let’s Play S’M❤RE’ onto a Microsoft Word Document and added the lines to write to & from.  Then printed on bright colored paper.
  • Once printed and cut, we wrote names on each and then decorated with stickers and stamps.
  • Fill each bag with a handful of cereal, marshmallows, and chocolate chips.  We used a 1/4 c. measure to scoop. You could mix it together & fill each one, but I was afraid the chocolate chips would all fall to the bottom of a big bowl!
  • Fold the bags over and secure with tape or a staple.
  • Fold each label in half and staple over the top portion of your treat bag.  Double sided tape would work well, also!

Check out these other fun Valentine’s Ideas:


Valentine’s Oreo Pops Recipe


Filed Under: Recipes, This & That, Uncategorized

The Best Cocktail Meatballs – A Crock Pot Recipe!

January 30, 2018 By Leah Leave a Comment

The Best Cocktail Meatballs – A Crock Pot Recipe!

I love a good shortcut recipe & using premade frozen meatballs gives you a 10 minute prep time for these yummy and super easy appetizer.

📍 Pin HERE to find again!

What you need:

  • 28 oz. – 32 oz. Bag of Frozen Meatballs
  • 1 1/2 c. Ketchup
  • 1 c. Brown Sugar
  • 1 c. White Sugar
  • 1 t. Worcestershire Sauce (or a couple of heavy dashes)

To make:

  • Place meatballs into crockpot.  I prefer to use a liner to avoid the messy clean up!
  • Bring Ketchup, both sugars, and Worcestershire sauce to a gentle boil over low heat, stirring often.  Boil 1 minute.
  • Pour sauce over meatballs.
  • Cook on low heat for 4 hours until heated through.
  • Keep on warm for several hours for service.

Tip: This sauce is also perfect for cocktail weiners!

Filed Under: Recipes, This & That

Breakfast Taco Casserole Recipe

November 16, 2017 By carry Leave a Comment

Breakfast Taco Casserole Recipe

After having an AMAZING Mexican Omelette at a diner recently, I needed to find a way to recreate those flavors at home.  Using left over taco meat and a few items I had on hand, I think I nailed the taste and textures SPOT ON.  My family loved this easy to whip up combination of taco meat, hash browns and eggs!

📌 Pin HERE for later!

Ingredients:

  • Leftover Taco Meat
  • Shredded Hashbrowns
  • Salsa – any brand or heat level
  • 1 Green Pepper
  • 1/4 of a large Sweet Onion
  • 12 Eggs
  • 8 oz Shredded Cheddar Cheese
  • 1/4 Cup Milk
  • Butter

Directions:

Grease a 7 x 11 or similar casserole dish and preheat your oven to 350 Degrees.

Clean and chop 1 green pepper and about 1/4 of a large sweet onion.

Fry your hashbrowns with just a bit of butter (about ten minutes) Do not worry about getting them browned, you just want to soften them. Once done, press them in the bottom of your casserole dish.

Throw your leftover taco meat with the onion and green pepper in the frying pan and fry for about five minutes. Just enough to heat up the meat and soften up your onions and green peppers. Now spread this in your casserole dish over your hashbrowns.

Spread a layer of salsa (add as much as you like!) over the hamburger mixture

In a mixing bowl beat eggs, milk, & a pinch of salt and pepper to taste. Once beaten well, pour over your layers in the casserole dish. I took a fork and poked it down around the casserole and pulled the edges away a bit so the egg soaked down. (Do not worry if your salsa is floating up a bit, it probably will)

Bake for 30 to 40 minutes or until the egg is set and firm in the middle, then remove put shredded cheese over the top, and let sit for 10 minutes.

Enjoy with some more salsa on top and a big dollop of sour cream! YUMMY!


Filed Under: Featured, Recipes, This & That

Pumpkin Crunch Bars

October 23, 2017 By Leah Leave a Comment

Pumpkin Crunch Bars

Start with canned pumpkin and a box cake mix and end up with a delicious, rich dessert very similar to a pumpkin pie!  One of my favorite goodies of the season is a slice of pumpkin pie.  This poses a problem as I am not a skilled pastry chef and honestly, pie crust scares me!  Too many variables and the mess of rolling it out, nope, I just can’t bring myself to deal with it!

This EASY recipe mirrors the perfect pumpkin custard in a pie without the worry of a pastry crust!  Plus, the topping is ONLY 2 ingredients! How amazing is that?!

📍Pin it HERE for later!

Ingredients:

  • 1 – 15 oz. can pumpkin puree
  • 1 – 12 oz. can evaporated milk
  • 1 1/2 c. sugar
  • 3 eggs
  • 1 t. cinnamon
  • 1/4 t. nutmeg
  • 1/4 t. allspice
  • 1/4 t. salt
  • 1 yellow cake mix
  • 1 stick butter, melted
  • 1 c. pecan or walnuts (totally optional!)

Lets make it:

Preheat oven to 350°.  Grease a 9×13 pan.  Mix all ingredients except cake mix, butter & nuts.  Once smooth, pour into prepared pan.  Sprinkle the cake mix over the top.  Top with nuts if using.  Carefully drizzle the butter over the top.  It is okay if it isn’t all covered completely with butter.  Bake 45 minutes to 1 hour until set and browned.  A knife will come out clean.  Allow to cool and serve with a dollop of whip cream if desired!

Filed Under: Featured, Instagram, Recipes, This & That

Easy Halloween Monster Krispy Treats & Pretzel Eye Balls, Pumpkins & Ghosts!

October 20, 2017 By Leah Leave a Comment

Easy Halloween Monster Krispy Treats & Pretzel Eye Balls, Pumpkins & Ghosts!

Create super easy and fun Halloween treats using colored melting chocolates and sprinkles!  These come together in MINUTES and look adorable & festive on a tray.

📌 Pin HERE for later!

Monster Krispy Treats

  • Prepared Rice Krispy Treats Cut into rectangles.  Go ahead and cheat here – purchase some store bought ones!
  • Various Colored Melting Chocolate Wafers.  I prefer the Wilton brand.
  • Eye Ball Decorating Candies in different Sizes

Melt the wafers according to package directions.  Dip the Krispy Treats halfway into the chocolate.  Decorate each with the eye ball candies.  Mix and match the sizes and layout.  There is no exact science and just have fun!  Allow to set.

Eye Ball Pretzels

  • Ring Pretzels
  • White Melting Chocolate Wafers
  • Red Sanding Sugar
  • M&M Candies
  • Black Frosting or Melting Chocolate

Line a baking sheet with the pretzel rings.  Put a white wafer inside each.  Preheat oven to 250º – and shut it off.  Place sheet in oven for 3-5 minutes until melted.  Remove from oven and sprinkle a bit of Red Sanding Sugar on each ‘eye ball’.  Top each one with a M&M.  Once set, dot the top of each M&M with the frosting or Black melted chocolate to create a pupil. Allow to set.

Pumpkin Pretzels

  • Mini Twist Pretzels
  • Orange Melting Wafers
  • Green M&Ms, Jimmy Sprinkles or similar for a ‘stem’

Melt the orange wafers according to package directions.  Dip each pretzel in the chocolate and place a green candy at the top.  Allow to set.

Ghost Pretzels

  • Mini Twist Pretzels
  • White Chocolate, Almond Bark or Melting Wafers
  • Small Eye Ball Candy Decorators

Melt white chocolate according to package directions. Dip each pretzel into chocolate.  Add 2 eye balls at the top and allow to set.

💰 Super saver tip 💰:   Shop holiday clearance and grab decorative sprinkles marked down.  Craft stores like JoAnn Fabrics & Michaels are great places to look!  Dip pretzel rods in melted chocolate and add some fun seasonal sprinkles & instantly dress up your table with fun themed snacks for pennies!


Filed Under: Featured, Recipes, This & That

Homemade Play Dough

August 24, 2017 By Leah Leave a Comment

Homemade Play Dough


When the supply list came home for back to school and it said Play Doh (homemade is preferred) I had a moment of panic.  Homemade Play Dough? Really, that doesn’t sound like something I should attempt.  Well, after scouring the internet and reading blogs and reviews, I put on my Pinterest Mom Pants and went for it! … and guess what?  IT’S EASY, turns out PERFECT, and uses pantry staple ingredients!

What you need:

  • 1 c. flour
  • 1/2 c. salt
  • 2 teaspoons cream of tartar
  • 1 teaspoon cooking oil (canola or vegetable)
  • 1 cup cold water
  • Food coloring as desired
  • Latex gloves (if you don’t want food colored finger nails!)


Now, lets make some play dough

In a medium sauce pan, mix everything except food coloring.  Cook over medium low heat, stirring constantly for 3-5 minutes or until mixture pulls away from the sides of the pan. Once it starts to thicken, you will want to switch from a whisk to a wooden spoon.  It will be MUCH easier to move around the pan!  The dough will have the consistency of mashed potatoes and become very hard to stir.  Make sure it is stiff and set.

Remove from the heat and turn out to a clean, dry surface.  Allow to cool for 1 minute.  At this point, I would recommend throwing the gloves on to keep those hands clean and dye free!  Add food coloring to tint as desired.  To attain a rich deep color I suggest a good quality gel food color.  Don’t be afraid to add a lot.  It will take more than you think to get a vibrant color.  Knead the coloring into the dough for several minutes to distribute color and cool dough.

Allow dough to completely cool, uncovered, for an hour.  Knead occasionally to keep it from drying out on the surface.  Store in an air tight container.

While the ingredients are non-toxic, given the high salt content, please do not eat the dough!

📌 Pin HERE for later!


Filed Under: Family Savings, Featured, Fun for the Family, Recipes, This & That, Uncategorized

Lumber Jack Birthday Party

June 9, 2017 By Leah Leave a Comment

Lumber Jack Birthday Party

When your son asks for a ‘sawmill’ birthday party you stop and ponder how does one make that happen? I knew there was no way to make a physical ‘sawmill’ cake for him!  So after a little searching around we settled for a more streamlined Lumber Jack Theme!  A few easy treats and toys we had already made for an adorable tablescape!

The CAKE – a Tree Stump!

I baked 2 round cakes and stacked them on a cake tray.  For the frosting you can use a store bought or homemade buttercream.  For this, I made a classic buttercream.  Once mixed, I removed a few cups and added a sprinkle of cocoa powder to tint it slightly tan.  Then added more cocoa powder to the rest and some brown food color to get deep brown bark color.

For decorating:

Fill a piping bag or ziptop bag with the dark brown frosting and snip a small opening.  Making straight lines up and down cover the entire cake.  Neatness doesn’t matter and it doesn’t have to be exact. Just get that tree stump covered in bark! Then make a circle around the top, outer edge of the cake.  Let frosting set and slightly dry for about 20 minutes.  Using a flat edge (knife, narrow spatula or flat pastry spreader) press the frosting upwards to give a pattern of bark, slightly overlapping each pass. Again, neatness isn’t required and there is no exact science! You cannot mess this up.  For the top, simply fill another piping bag with the lighter frosting.  Swirl in circles and create a ‘growth ring’ like pattern.

The SNACKS!

Birch Logs: 

Dip pretzel rods in white melting chocolate.  Drizzle with dark chocolate or black melting wafers to create the ‘birch tree’ look.

Acorns:

Using the melting chocolate from the logs above put a small dab on Hershey’s Kisses & press onto Vanilla Wafers. Top with a butterscotch or peanut butter chip using the same melted chocolate.

Evergreen Trees:

Melt green melting wafers and put in a piping bag or ziptop bag.  Lay pretzel sticks on parchment paper and carefully drizzle the chocolate side to side into a free form tree shape over the sticks.

Fire Wood For Sale:

Pretzel Nuggets in a bowl

Wood Chips:

Mini Marshmallows, Mini Chocolate Chips, and Granola in bowl

To finish out the table, I added a log hauling truck we had, plus a few chain saw toys, logs, and photo props to add to the fun.  Plus we used red balloons, bowls and plates over a black table cloth bringing the lumber jack ‘flannel’ into the party.


📍 Pin HERE


Filed Under: Baby, Featured, Miscellaneous, Recipes, This & That

No Melt ‘Ice Cream’ Cones

May 5, 2017 By carry Leave a Comment

My challenge was to make “Ice Cream Cone Treats” for a bake sale. I wanted to do the cupcake ones in the cones, but they tend to get soggy.  Plus, I would have had to make them the night before, so it would have been worse.  Instead, we did a spin on them with things I had in the cupboard! After making these with my son and seeing how much fun we had, I think it would be a GREAT idea to make at a birthday or slumber party. 📌 Pin it HERE for use later!

No Melt ‘Ice Cream’ Cones

Ingredients:

  • Sugar Cones
  • Camp size marshmallows (the big ones)
  • Melting Chocolate Wafers (any colors) or chocolate chips, white chocolate chips, almond bark, butterscotch chips)
  • Sprinkles
  • Red Candy – we used bite size Twizzlers, but could use a red gum drop, red M&M’s, red Sixlets, etc.
  • Disposable aluminum cake or lasagna sized pan

Directions:

  • Cut the top & bottom of the marshmallow around the edge so it will fit in the cone, but tight enough so that you still have to stuff it just a bit that is will stay stuck in the cone. This will be your ice cream! We also cut around the top with a kitchen sheers so it had more of an ice cream scoop look! If it requires too much stuffing, cut off a little bit more so it doesn’t break your cone (we lost 2 cones from over stuffing, but no complaints, they were a nice snack ).
  • Carefully melt your chocolate over a double boiler  or in the microwave.  Dunk your ice cream (marshmallow) in the melted chocolate of your choice! We used what we had on hand, but any color chocolate would be fun!

  • Roll in sprinkles! (hey, NOT YOU, the “ice cream” scoop. Though rolling around in sprinkles I may have to add to my bucket list, that just sounds like fun!)
  • Put a spoonful chocolate melted chips on top of the cone (milk, semi-sweet, dark – as long as it’s brown). This is your hot fudge!
  • Top with your red candy to look like a cherry!

  • To set, I put holes in an aluminum foil pan to hold them (and also used some of our water bottles that had small top openings and some wine glasses, I have plenty of those in the kitchen).
  • I picked up the clear treat bags at the Dollar Tree and individually wrapped each cone!

Here is our final product. Simple to do and they taste OH SO YUMMY!

This fun little project was written by a dear friend and Midwest Coupon Clippers follower Brooke. A huge thanks to her and cute little Tucker for their continued help thru the years.

📌 Pin it HERE for use later!


Filed Under: Featured, Instagram, Recipes, Uncategorized

Ramen Noodle Broccoli Slaw Salad

April 18, 2017 By Leah Leave a Comment

Ramen Noodle Broccoli Slaw Salad

Turn ordinary Ramen Noodle Soup Packets into a tasty salad no one will be able to resist.  Trust me, take this to a potluck and everyone will want the recipe!

Ingredients:

  • 1/4 cup sunflower seeds
  • 1/4 cup slivered or sliced almonds
  • 2 T. butter
  • 2 (3 oz) bags Oriental Flavor ramen noodle soup + seasoning packets
  • 2 (12 oz) bags broccoli coleslaw mix
  • 3/4 cup Canola, Peanut OR Vegetable oil
  • 1/4 cup brown sugar
  • 1/4 cup apple cider vinegar


Preparation:

Empty the ramen into a zip-top bag (set aside seasoning packets for use in the dressing).  Crush with a rolling pin.  Melt the butter over low heat in a large skillet.  Toss the Ramen noodles and almonds in butter and carefully brown over low heat.  Keep stirring or it will get away from you and burns quickly! Once browned, remove from heat and allow to cool.

While noodles and almonds cool prepare dressing.  Mix oil, vinegar, sugar and seasoning packets thoroughly.  Mix slaw, noodles, almonds, and dressing all together.  Allow to set overnight in the refrigerator for best flavor.  It is best to mix once or twice while it sits.  I like to store it in a large plastic container so I can just give it a good shake a few times! Toss in sunflower seeds before serving.

📍 Pin it HERE

Filed Under: Recipes

  • 1
  • 2
  • 3
  • …
  • 17
  • Next Page »

{ Your info will never be shared because spam stinks }

Archives

Deals

Solid Wood Maranella Atala 19″ Vanity w/ Glass Vanity Top $99.00 (reg. $299.00)

Under Armour Men’s UA Storm Lightweight Waterproof Jacket $32.00 (Reg. $99.00) + FREE Shipping

Rachael Ray Yum-o! Oven Lovin’ 3-Piece Nonstick Cookie Pan Set $23.99 (reg. $60.00)

Save Up to 80% on Vera Bradly Handbags, Accessories + More & FREE Shipping!

Amazon: Pack of 12 Plum Organics Stage 1 Baby Food as low as $8.99

More Deals

Coupons

Target: Double Stack on Newman’s Own Frozen Pizza

Target: Coppertone Sun Care $3.03 (reg. $6.99!)

Walgreens: Bic Soleil Balance Razors $1.99 (reg. $5.99!)

Save $0.75 on any ONE (1) Pine-Sol multi-purpose cleaner

Save 75¢ on Ragu Pasta Sauces

More Coupon Posts

Sweeps & Giveaways

Target: Barilla Collezione Tortellini $1.14 (Reg. $4.79!)

Sam’s Club: Earn a FREE Cafe Pizza Slice & Sundae!

Merry Christmas Giveaway – 2 Hatchimals & One Nintendo NES

Rock the Lunch: Win FREE Lunches for a MONTH!

WIN a Keep Collective Keeper – $30 Value

More Sweeps & Giveaways

Copyright ©2018, Midwest Coupon Clippers. All Rights Reserved. Site by Pixel Me Designs