Midwest Coupon Clippers

Cudding Coupons and Saving You Some Moolah

  • Home
  • Coupons
    • Newest Coupons
    • Coupons.com
    • Red Plum
    • Smart Source
    • Hopster
    • Saving Star
    • Coupon Database
  • Deals
    • Amazon
    • eBates
  • Freebies
  • Sweeps & Giveaways
  • Store Match-ups
    • Midwest Matchups
      • Copps/Pick n’ Save
      • Festival
      • Menards
      • Piggly Wiggly
    • Nationwide Matchups
      • CVS
      • Dollar Stores
        • Dollar General
        • Dollar Tree
        • Family Dollar
      • Target
      • Walgreens
      • Wal-Mart
  • This & That
    • Recipes
    • Around the House
    • Money Saving Tips
    • Get Organized
    • Disney
    • Pets
    • Gardening
  • About
    • Contact
    • Disclosure

Meal Prep Crock Pot Chicken

January 6, 2020 By Leah Leave a Comment

Meal Prep Crock Pot Chicken

Let’s talk meal prep.  Are you a planner, scheduler, thought it all out person or a fly by the seat of your pants and hope to pull something together each night person?  In case you haven’t heard it before, I am a TAD BIT of a control freak/over planner.  So you guessed it, I am the meal planner guru type.

My goal is to have a homemade (or MOSTLY) meal 5 of the 7 nights a week.  This is a pretty hefty goal to take on as the sole parent in our home.  However, family meals are something we bond over and I have made it a priority.  The kids weigh in on meal ideas, help prepare meals whenever possible, just hang out with me in the kitchen, and it is a time we really connect.

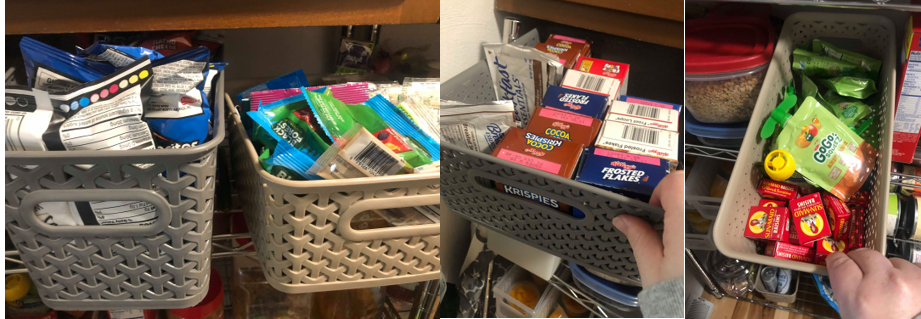
In order to keep my goal of not eating out or calling for pizza, I like to prep a protein in advance for the week.  Making a large batch of meat keeps the stress of a meal each night at bay.  No worrying about thawing or cooking it each night.  Usually I do this large prep ahead with chicken, however pork loin or shoulder using this same seasoning is a nice change of pace.

At least once I week, typically on Sunday, I prep a large Crock Pot of chicken Breasts.

This tasty, mildly seasoned chicken turns into soup, chicken tacos, chicken salad sandwiches, Chicken Bacon Ranch Pasta, BBQ Chicken Sliders, and so much more!

📍 Pin HERE for later!

What you need:

3-5 Pounds Chicken Breasts (bone in or boneless)
1 Tbsp. Salt (Kosher or Sea Salt is Best)
1 tsp. Smoked Paprika (NOT hot)
1 tsp. Black Pepper
1 tsp. Granulated Garlic
1 tsp. Onion Powder or 1 Tbsp. Dried Minced Onion Flakes (which is what I prefer)
a few pinches of Cayenne Pepper (if you like a little spice)

Make It:

  1. Mix the spices together in a small bowl
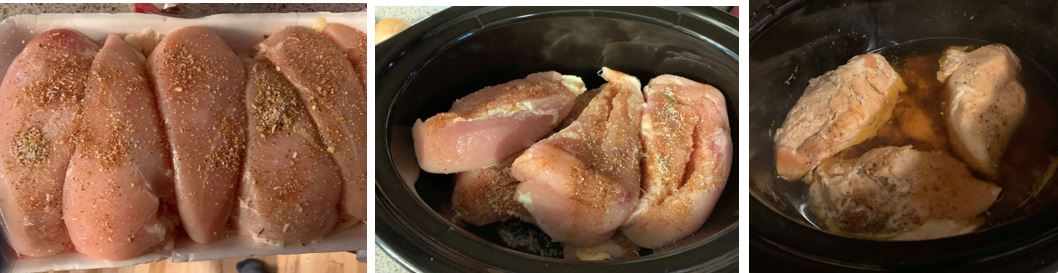
  2. Sprinkle generously over one side of the Chicken.
  3. Layer, seasoned side down, in a crock pot.  Sprinkle remaining seasoning on each layer of chicken.  You can double up your layers to fit it all in.  It will cook fine.
  4. After about 4 hours, using tongs, rotate the chicken around so the top ones get to sit in the broth for a bit while they finish cooking.
  5. Cook on low for 6-8 hours until fork tender and shred-able.
  6. Serve immediately or shred/cube for use during the week.
  7. Don’t toss the broth at the bottom.  Strain the tasty liquid with a mesh strainer and save for soups or casseroles.  I pour it over my leftover chicken and it keeps it nice and flavorful all week.
  8. If your Crock Pot lid does not fit securely, add a splash of water or broth at the start to prevent over drying.  A few pats of butter on the top also helps! You don’t want it to poach in a ton of liquid but not be completely dry either.

You can also use a whole chicken and cook it the same way if you prefer.  Just cover the inside and outside of the bird well with the seasoning.  Don’t forget to make bone broth with the left overs!


Filed Under: Featured, Recipes, Uncategorized Tagged With: Chicken, Crock Pot, Dinner, Meal Prep

Pull Apart Olive Cheese Bread

December 30, 2019 By Leah Leave a Comment

My family takes olives VERY SERIOUSLY.  We often kid it isn’t a family gathering if there are not olives out!  For Christmas this year we were doing hot appetizers rather than a full meal.  Combining olives with a crusty loaf of bread sounded like an AMAZING idea to me!  It did not disappoint and we managed to destroy the entire loaf! You could serve it with warm marinara for dipping as well.

What you need:

1 – 6 oz. Jar Green Olives (with or without pimentos)
1 – 6 oz. Jar Black Pitted Olives
1 stick softened butter
2 T. Mayonnaise
1 – 8 oz. bag finely shredded cheese (I used a fiesta blend)
1 round loaf of hearty bread (I used a sourdough loaf)

Make it:

  1. Preheat oven to 350°
  2. Cover a large baking sheet with parchment paper, then place a large piece of foil over it
  3. Using a bread knife or electric knife, cut the round loaf in strips in one direction, being careful not to cut all the way through the loaf. Rotate the bread 90 degrees and cut in the other direction. Take your time as to not cut all the way through or pull the loaf apart.  This was pretty easy since the bread I choose was very sturdy and crusty.
  4. Finely chop the olives (I used a hand chopper/processor)
  5. Mix olives with butter and mayonnaise
  6. Fold in cheese
  7. Using a spatula stuff the olive mixture into the loaf between each cube.  Be sure to press all the way to the bottom.  The loaf will start to open as you work through each rows.  Finely chopping the olives as opposed to just slicing will make this much easier to squish into the loaf.
  8. Wrap the loaf in the foil and place on parchment covered sheet.  Bake for 15 minutes.
  9. Remove from oven and open foil covering.  Return to oven for an additional 15 minutes or until brown and bubbly.
  10. Serve immediately

Note: You could leave the mayo out if it isn’t your thing!  No one even noticed it at our get together.  I think it just helps make the mixture more spreadable as you put it into the bread.


More snacks & appetizers to try:

Super Simple Soft Pretzels

Deviled Strawberries

Sweet & Savory Chicken Wings (The Secret Ingredient – Lemon Gelatin!)


Filed Under: Featured, Recipes Tagged With: appetizers, bread, Cheese, olives, Snacks

Gingerbread Muffins

December 5, 2019 By Leah Leave a Comment


Turn the warm spices and flavors we all know and love this time of year into a tasty muffin!  Instead of a cutout gingerbread boy, enjoy a sweet, molasses muffin with all the cinnamon, ginger, and cloves you expect from the traditional decorated cookie!

Making these muffins even more special, they are topped with a Lemon Glaze! This is a classic combination and truly hard to resist sitting out on a tray for your next holiday brunch!

📍 Pin HERE for later!

What you Need:

1/2 cup (1 stick) butter
3/4 cup  dark molasses
2 & 2/3 cups  all purpose flour
1 & 1/2 teaspoons baking soda
1/4 teaspoon salt
1 & 1/2 teaspoons ground cinnamon
1 & 1/4 teaspoons ground ginger
1/2 teaspoon ground cloves
1/2 cup packed  brown sugar
1 large egg
1/2 cup plain yogurt or sour cream (not nonfat)
1/2 cup milk (not skim)
Optional: coarse sugar for sprinkling – this makes a HUGE texture difference and I highly recommend it

Lemon Glaze:

1 cup confectioners’ sugar (or more, as needed)
2 Tablespoons fresh lemon juice
1 Tablespoon milk

  1. Preheat oven to 425°F
  2. Grease or line muffin pan with paper cups.
  3. In a large microwave-safe bowl, heat the butter (cube butter for faster melting) and molasses together in the microwave on high for about 1 minute. Stir until combined and set aside to slightly cool
  4. Blend the flour, baking soda, salt, cinnamon, ginger, and cloves together.
  5. Into the molasses/butter mixture, whisk the brown sugar, egg, yogurt (or sour cream), and milk until all wet ingredients are combined.
  6. Pour wet ingredients into dry ingredients and mix JUST until combined. Do not over-mix. A few lumps and thick batter is OKAY!
  7. Fill prepared muffin pan, Sprinkle with coarse sugar (if desired, but HIGHLY recommended as it add a nice crunchy texture)
  8. Bake at 425°F for 5 minutes, then, while keeping muffins in the oven, LOWER the oven temperature to 350°F
  9. Continue to bake for 15-16 minutes until the tops are cracked and centers are set (a toothpick comes out clean)
  10. Allow to cool for about 5 minutes in pan before glazing and serving.

Glaze:

  1. While muffins cool, prepare the glaze by mixing all ingredients together. If needed, add more confectioners’ sugar to thicken or more milk to thin out.
  2. Drizzle on top of warm muffins. Icing will set as the muffins cool

Store on the counter for 2 days or 1 week in the refrigerator.

Recipe courtesy of Sally’s Baking Addiction, HERE

More Holiday Ideas:

Mini Cinnamon Sticky Rolls

Snow Ice Cream!

Paint Chip Christmas Tree Ornaments

Children’s Book Advent Count Down

Filed Under: Featured, Recipes Tagged With: Breakfast, Christmas Baking, Christmas Cookies, Gingerbread, Muffins

Halloween Bucket Cookies

November 14, 2019 By Leah Leave a Comment

I stumbled on this recipe in an Instagram story and thought it looked fabulous!  After reading the reviews, I KNEW we had to give it a try.  We certainly had plenty of candy still sitting around from Halloween and it was the perfect opportunity to use it up.  Nolan deemed this a HUGE success and a must do next year, too.  It was PERFECT for little helpers in the kitchen.  Candy wrappers to open, eggs to crack, hand mixer to run, and of course using the cookie scoop to plop down dough.

These are delicious cookies with a slightly crisp snap and the bits of different candies in each bite are AMAZING!  We used a crazy combination of M&Ms, Baby Ruth, Reese’s Take 5 (salty pretzel!! YUM), Classic Reese’s, and Milky Way.  Plus, I chopped up a handful of roasted peanuts when measuring out the 2 cups.

Ingredients:

  • 2 c. PLUS 2 Tbsp. Flour
  • 1/2 tsp. baking soda
  • 1/2 tsp. salt
  • 1 c. packed light brown sugar
  • 1 1/2 sticks (12 Tbsp.) butter, melted and cooled slightly
  • 1/2 c. sugar
  • 1 1/2 tsp. vanilla
  • 1 WHOLE egg
  • 1 egg YOLK
  • 2 c. chopped leftover Halloween candy (Reese’s, M&M, Butterfingers, Snickers, Baby Ruth, Hershey’s, etc.)

Make them:

  1. Preheat the oven to 325° F.
  2. Melt butter and set aside to cool
  3. Chop the 2 cups of candy bars into small pieces (I also added a hand full of chopped peanuts while measuring)
  4. Line cookie sheets parchment paper or use a silicone baking mat
  5. Mix the flour, baking soda and salt
  6. In a separate bowl, combine the light brown sugar, butter, granulated sugar, vanilla, whole egg and egg yolk and blend until smooth
  7. Add in the dry ingredients and mix until just combined.
  8. Fold in the candy pieces.
  9. Using a large cookie scoop, drop cookies on each prepared baking sheet and bake until slightly golden and puffy, 14 to 17 minutes.
  10. Let cool for 15 minutes on a wire rack.
  11. Makes appx. 30 large cookies

Recipe courtesy of FoodNetwork HERE

Streusel Coffee Cake

Chocolate Lasagna

Filed Under: Featured, Recipes Tagged With: Candy, cookies, Dessert, Recipe

Never use a Box Again Brownies

October 11, 2019 By Leah Leave a Comment

One of my all time favorite sweet treats is a warm fudgy brownie.  Most of us keep a brownie mix or 2 in our pantry to cure those pesky chocolate cravings!  Put that box down and give these AMAZING homemade brownies a try.  They take no more work than a box mix and the flavor & texture from these homemade ones cannot be beat!

📍 Pin HERE for later!

What you need:

2 c. Sugar
1 c. Canola or Vegetable Oil
4 Eggs
1 Tbsp. Vanilla
1 c. Flour
2/3  c. Cocoa Powder
1/2 t. Baking Powder
1/2 t. Salt
1 c. Chopped Nuts (optional)
1 c. Chocolate Chips or Chunks (optional)

Make them:

Beat together oil and eggs well.  Mix in sugar & vanilla.  Sift flour, cocoa, salt & baking powder into wet ingredients.  Add nuts & chips if desired.  Mix JUST until combined.  Do not over mix or you will lose the fudgy consistency once these bake.  This is a thick batter.

Pour batter into a greased 9×13 pan (I prefer a glass dish).  Bake in a preheated 350º oven for 20-25 minutes until a toothpick comes out JUST barely clean – a tiny bit still stuck is OKAY!  Do not over bake!

Top with powdered sugar or your favorite frosting.  Even better, serve warm with a scoop of vanilla ice cream and chocolate syrup!

Deviled Strawberries

Streusel Coffee Cake

Chocolate Chip Blondies

Filed Under: Featured, Recipes, This & That Tagged With: brownie recipe, Brownies, Chocolate, Dessert

Trick or Treat Bucket Totem Pole

October 8, 2019 By carry Leave a Comment

Supplies:

  • Five Trick or Treat Buckets
  • 1 Witches Hat
  • Hot Glue Gun & Glue
  • Plastic Grocery Bags
  • Piece of Cardboard
  • Rocks for Weight

📍 Pin HERE for later!

Directions:

Prepping the Hat

  • Cut a cardboard circle to fit inside the hat inner circumference. I also covered mine with a plastic bag to protect from the elements. Make sure the plastic is pulled firmly.

  • Stuff (and pack them in) grocery store plastic bags. I used these because I figured they would hold up best in the outside weather.
  • Hot Glue the cardboard disk inside the brim of the hat. I even put some glue on the crunched up bags to hold it firmly.

Stacking the Pumpkins

  • Cut off the handles of the pumpkins.
  • Put a rock(s) in the bottom (first) pumpkin for weight and support.
  • Hot glue pumpkins in the desired pattern! I found it easiest to apply the glue to the bottom of the pumpkins. MAKE SURE to line the faces up straight if that the preferred look.

  • Lastly glue the hat to the top of the last pumpkin!
  • TA DA – Finished Product!

Some Suggestions and Ideas:

If the pumpkin totem pole will be outside in an open area, I suggest getting a piece of rebar from the local hardware store and drilling some holes in the very bottom pumpkin to go partially into the ground.  Then holes in a few of the bottom pumpkins and stack them that way for support in the wind.

Easily add some white lights inside the pumpkins if using the rebar support and run them up through the holes for a lighted effect.

Feel free to add some extras the pumpkins! I had this Halloween scarf from the Dollar Tree and think it adds a nice touch!

Filed Under: Dollar Stores, Dollar Tree, Featured, This & That

Mock Applesauce – A KETO Friendly Recipe!

October 7, 2019 By carry Leave a Comment

After recently being diagnosed with Type 2 Diabetes, I had to make some BIG changes to my diet. I decided to give a Keto based diet a whirl. When following Keto you can have strawberries, blueberries, blackberries, and raspberries, but apples are a BIG NO NO. They are high in natural sugars. The problem is I LOVE applesauce! I had to figure out a way to get it back in my life, so decided, WHY NOT give zucchini a whirl.  They really do not have much taste, are high in fiber, naturally low carb, and with some spices it should work!

This did take a few trial and error experiments with lots of playing around to get it to taste right!  Of course everyone has a different taste and texture preference when it comes to applesauce, so play around like I did!  This recipe will help you get started designing your own custom profile!

🍎 Pin HERE for later!

Ingredients: 

  • 10 c. Chopped Zucchini
  • 1 Large Cinnamon Stick
  • 1 large Lemon
  • 1/4 c. Water
  • 1/4 c. Apple Cider Vinegar
  • 1 c. Sweetener Substitute (I prefer Swerve)
  • 1/4 tsp. Salt
  • 1 Tbsp. Cinnamon
  • 1/8 tsp. Nutmeg

Directions:

(1)  Wash & peel the zucchini. Remove both ends & split the zucchini lengthwise.  Scoop out the insides removing the seeds (like a zucchini boat)

(2)  Small dice the zucchini & add to crock pot.  Sprinkle salt over zucchini

(3)  Zest the lemon – look for appx. 2 tsp. of zest

(4)  After zesting, slice & juice the lemon into crock pot over zucchini.  Be careful to not add any seeds!

(5)  Add water, apple cider vinegar, lemon zest, and cinnamon stick (or even two). I also throw both halves of lemon in to give it a more intense lemon flavor, this is optional.

(5)  GENTLY stir your zucchini to mix up and coat everything. Set crock pot to low and let it cook for 4 hours. Stir every hour or so.

(7)  After 4 hours a good amount of liquid will be in the bottom from the zucchini sweating out. Spoon or drain off as much as possible before the next step. (Careful, IT WILL BE HOT)

(8)  Turn off crock pot, leave top off and allow zucchini cool. Remove the lemons and cinnamon stick.

(9)  Use a food processor or masher on about half of the zucchini. (more or less depending on how “chunky” you want it.) ONLY use “pulse” on the food processor or it will end up WAY to smooth. A stick immersion blender would work also.  Add back to crock pot and turn back on

(10)  Add sweetener, cinnamon, and nutmeg and gently stir to mix all spices well.

(11)  Cook on low again for another 4 hours stirring often.

(12)  After 4 hours, taste and adjust any spices. I added a little more cinnamon (I LOVE cinnamon) and let it cook for another hour on low. This way you can also test the texture. If you want the chunks of zucchini mushier, cook for longer.

  • Eat it warm or refrigerate first. I preferred it chilled, but it will all be by taste preference!


Filed Under: Featured, Recipes, Uncategorized Tagged With: Keto, KETO dessert recipes, low carb recipes, mock applesauce, zucchini recipes

KETO Fat Head Sausage Biscuits

September 30, 2019 By carry Leave a Comment

📍 Pin HERE for later!

Ingredients:

  • 1 & 1/2 c. Shredded Mozzarella Cheese
  • 3 Tbsp. Cream Cheese (low fat is fine)
  • 2/3 c. Fine Almond Flour
  • 3 tsp. Baking Powder
  • 1 c. Shredded Cheddar Cheese
  • 1 Pound Pork Breakfast Sausage (any flavor, brand)
  • 2 Eggs
  • 1/2 c. Finely Chopped Green Pepper

Directions:

1. Brown sausage and green pepper. Drain any grease and set aside to cool

2.  In a mixing bowl combine almond flour, baking powder, and eggs. Mix well.

3.  In microwave safe bowl, heat mozzarella and cream cheese for 30 Seconds. Remove and Stir. Repeat, 3 times total (1 minute, 30 seconds total).

4.  Pour hot mozzarella mixture into flour mixture. Mix well.

5.  Add cooled sausage/green peppers and cheddar cheese to mixture and stir well.

6.  Make your “Dough” into a ball. Use plastic wrap or spray the inside of a Ziploc bag and put mixture inside and form a ball. Chill in the fridge for 20 minutes.

7.  Divide dough mixture into eight sections and form into balls.

8.  Spray cupcake tins (REALLY well) and place balls into eight outer sections. (make sure to add a little water to the inside sections)

9.  Bake at 400° F for 10 to 14 minutes until golden brown and set..

Additional Notes: You really could add any ingredients you like to this. Bacon (fried first of course), onions, broccoli, there are SO MANY options! I first tried making these on a cookie sheet with parchment paper. They  browned more on the edges, but were a dryer muffin, and I wanted them more moist.  On my second attempt I used a muffin tin and they turned out PERFECT. It was a bit of a challenge getting them to come out in “Muffin” form with the tin though, so your choice, both ways worked.  I am thinking aluminum muffin liners heavily sprayed may be a good option too.

 More low carb recipes

Low Carb Cheese Steaks – KETO Friendly!

Parmesan Chicken Tenders

Keto Snickerdoodles

Filed Under: Featured, Recipes Tagged With: fathead dough, Keto, Keto recipe, low carb

Deviled Strawberries

September 3, 2019 By Leah Leave a Comment


Need a perfect finger food dessert for your next get-together?  You HAVE GOT TO try these ‘Deviled Strawberries’  They come together in just a few minutes and use a only a handful of simple ingredients.  These remind me of a delicious bite of cheesecake, but without the spring form pan and long baking time!

PLUS, you can make these keto/low carb friendly by just substituting your favorite alternative sweetener!  Oh and they are gluten free!

📍 Pin HERE for later

What you need:

  • 1 – 8 oz cream cheese (set out to room temperature)
  • 1 c. heavy whipping cream
  • 1 t. vanilla
  • 2/3 c. sugar
  • 2 T. Fresh Lemon Juice
  • 1 pound of large strawberries (approximate).  You will want large berries.  Smaller ones will not work well for this! I learned the hard way!
  • Optional: Graham Cracker Crumbs or Crushed Vanilla Wafers for garnish

Make these:

Prep the Berries.

  • Clean and dry the strawberries.  Slice the top (hull) off of each.
  • Slice each berry in half lengthwise.
  • Remove a small piece off the back round side so the berry will lay flat on the serving tray.
  • Using a hull tool, melon baller or spoon, carefully remove the middle of the strawberry so there is a ‘hole’ to catch the filling.

Make the filling:

  • Beat the cream cheese in a large mixing bowl until smooth & slightly fluffy
  • Mix in vanilla, sugar, and lemon juice.
  • In a separate bowl beat whipping cream until stiff peaks form.
  • Carefully fold the cream cheese mixture and whipping cream together.
  • Put filling into a piping bag or ziptop bag fitted with a star tip (optional) or just nip off the corner for filling.
  • Pipe each strawberry, generously filling the hole you created.
  • If adding the cracker crumbs do so now.  I did not for this photo, because I needed a gluten free dessert option.

Important Note: I would not prep these too far ahead of service.  These held up well for my event and set out about one hour.  The strawberries will eventually start to become soft and more juicy as the sugar and lemon juice from the filling start to macerate.


Keto Peanut Butter Cups

Keto Snickerdoodles

Filed Under: Featured, Recipes

What’s in my Pantry? How I Stock and Organize my Space!

August 1, 2019 By Leah Leave a Comment

Disclaimer: This post contains affiliate links and we will be compensated if you make a purchase after clicking on our links. You can view MCC’s Full Disclosure Policy HERE.

What’s in my Pantry?

How I Stock and Organize my Space…

I continually strive to keep things streamlined and organized & running smoothly in our little world!!  Part of keeping myself organized is a very well stocked pantry (fridge and freezer, too).

By maintaining a good inventory of our favorites along with a well organized space, it helps me make almost any meal in a snap.

Because I have 2 young kids plus babysit, my items are usually pretty kid friendly and set up so they can help grab items or get their own snacks.

I joke that I bought our home because of the pantry space! (Honestly, there may be a lot of truth to that statement 😉) Trust me, I know not everyone has the storage space that my home has, but my hope is that you can get some ideas for better meal planning and some tips or tricks for organizing!

📌 Pin HERE for Later!

Let’s explore what I consider pantry MUST haves and why I always keep these on hand……

Basic Baking Supplies – Flour, Granulated Sugar, Powdered Sugar, Brown Sugar, baking soda, baking powder, cocoa powder, vanilla & almond extract, plus a few flavors of baking chips.  I am a SERIOUS baker and probably stock more than a typical person! I keep one or two extra bags of flour and sugar available.  I use cheap Walmart storage containers but am looking for something with better snapping lids!  Keeping these baking supplies lets me whip up my favorite chocolate chip cookies ANYTIME!

MUST haves for baking needs:

  • Cake Mixes (at least one chocolate and one white or yellow ALWAYS)
  • Betty Crocker Cookie Mixes – I am almost always a from scratch baker, but these make great cookie/brookie bars and are especially great for last minute ‘need a dish to pass’ events.  They really are good quality and typically only need an egg, water, and oil/butter!  You can even pick them up at the Dollar Tree or on sale for about a buck.
  • Pie Filling – any flavor.  So handy for making special pancakes or french toast, topping for cheesecake and this EASY ‘fancy’ coffee cake.
  • Almond Bark or Quality Melting Chocolate – it seems many recipes call for this and it makes yummy gnaches, dipped pretzels and other desserts
  • Instant Pudding – a few boxes of vanilla & chocolate.  A tasty filling for pies and cakes plus a staple in this crazy good Chocolate Lasagna!
  • Marshmallows – Always necessary for bon fires, but I use them in rice crispy treats regularly plus a few other favorite recipes.
  • Nuts – A few cans of almonds and pecans are handy for so many things from sweet breakfast treats to savory salads and dinners.  Once I open a can, I store them in the fridge or freezer for longest shelf life.
  • Evaporated Milk & Sweetened Condensed Milk – a mandatory for lots of baked sweet treats.  I keep one can of each as a must have item.  Plus, evaporated milk is a substitute item in casseroles and dinner staples if I run out of milk and can’t make it to the store that day!

Canned Goods – The typical mix of fruits and veggies.  Usually a few cans of corn, carrots, green beans, pineapple, peaches, and mandarin oranges.  Plus a few cans of beans – black, pinto, refried, Bushes baked beans and kidney/red beans.  I don’t keep a set number or variety, just so there are always enough on hand to make a few favorite meals.  One of my most made potluck/family meal items are these Ranch Beans.  At least 4 cans of diced or crushed tomatoes for chili and homemade spaghetti. Also 2 or 3 cans of cream soups for casseroles and slow cooker dinners.

Breakfast/Snacks – You will notice I have a row of plastic bins stocked with essentials.  Whether it is smoothies, oatmeal, running out the door in a hurry, or fast snacks I am ready!  These bins HERE from Target are sturdy and nice quality.  They fit well on the shelves and keep things looking tidy.  I keep a lot of breakfast items so the kids get a variety and can help decide what you like/want each day.  Typically one kid gets to choose breakfast each day during the week so everyone gets to feel involved and part of the decision making.  I do my best to please each kid so every one feels included and doesn’t always have to eat one person’s favorite.  It is easy to fall into a habit of just giving them cereal, but having oatmeal and dried fruit always in the pantry makes breakfast just as simple as pouring cereal in a bowl!

  • Pancake Mix & Syrup – Try these Banana Pancakes!
  • Regular, plain old fashioned Oatmeal.  We add dried fruit, apples, cinnamon, peaches and honey to ours.
  • Peanut Butter – usually 2 or 3 jars minimum.  Between PBJ sandwiches, toast, and baking we use at least a jar a week.

Whats in the bins:

  • Carnation Instant Breakfast Shakes.  Blend with milk, banana, berries and ice for a smoothie
  • Instant Oatmeal Packets &/or Bowls
  • Small single serve bowls &/or boxes of Cereal. These are usually road trip snacks.  No mess/no fuss
  • Granola for yogurt parfaits – toss on top of fruit and yogurt for a filling breakfast
  • Dried Fruit (raisins, craisins, berries, etc.)
  • Granola & Cereal Bars – a rotated variety of quick grab snacks for on the go.  We don’t use these habitually as meals, but if we have a lot of fresh fruit to use up, I will let the kids grab a bar to go with it for a fast breakfast or serve with a yogurt cup.
  • Fruit Snacks/Fruit Leathers
  • Mixed Nuts/Trail Mix Packets
  • Single Serve chips & crackers.  I would rather pay a few cents more per serving for these single serve bags knowing we don’t have open large bags of snacks that can easily go unused and stale.  Plus, the portion sizes are perfect for my kids and make lunch packing easy!

Fruit Cups – For school lunches we use a lot of these! Between coupons and sales, the 4 or 6 single serve cups are generally cheaper than a single can of fruit.  PLUS, it is good portion control and self serve for the kids.  I also keep applesauce pouches and small single serve raisin or craisin boxes.  The 2-Tier Utility Storage Bin Organizers are from Target and found HERE.  

Dinner Staples – Below is a list of my always stocked items.  I keep sauce packets and quick fix items available to help build my meals.  At this point in our busy lives, they are convenient and help me still make mostly homemade meals every night!  Since my meal plans for the week revolve around re-purposing at least one meal a week, for a second new meal, items like instant mashed potatoes and rice turn leftover chicken into creamy rice soup or mashed potato bowls.

  • Bread Crumbs
  • Instant Mashed Potatoes – Make mashed potato bowls with left over pork or chicken.  Recipe HERE
  • Bisquik or other Biscuit Mix
  • Long Grain Rice
  • Spaghetti Noodles + a few boxes of short cut noodles (elbow, penne, etc.)
  • Pasta Sauce & Alfredo Sauce (at least 3 jars of red sauce and 1 Alfredo)  My kids LIVE for pasta.  It is a weekly menu item for us.  Any way, shape, or form keeps them happy! Our current go to fav is THIS Chicken Bacon Ranch Pasta.  Lasagna, baked mac & cheese, and of course spaghetti are always ready to go when you stock these items.  I love when Prego is included in Meijer’s Buy 5/Save $5 or 10/$10 sales! I can’t resist stocking up!
  • Corn Bread Mix – goes great with soups or bake over taco meat for tamale casserole
  • Tortilla Shells/Chips – ONE word – NACHOS – a leftover makeover dream! Chili, BBQ pulled pork, sloppy joes, pizza toppings, and of course taco meat all make amazing nacho dishes!
  • Au Juice, Gravy and Onion Soup Mixes.  A must for crockpot roasts!
  • Prepared Jarred Gravy
  • Taco Seasoning
  • A few boxes of Mac & Cheese and Rice side dish packets.  The blue box is ever present with kids! Whether it is lunch or a side with burgers or THIS BBQ Kielbasa.  Just a few of each for dinner options.
  • Soup Pouches – chicken noodle is our favorite & gets made often with leftover chicken
  • Extra bottle or 2 of Ranch, Ketchup, BBQ, Soy Sauce, Vinegar, and Mayo.

More organization ideas:

  • If you open a bag or box of an item you are not using the entire package, store it in a clear plastic container.  I HATE accidentally spilling an open bag all over the place (been there, done that A LOT!)  If it is rice or similar item, tape the directions on the outside of the container so you remember the ratios, directions and cooking times.
  • Store open items in plain sight so they are used first.  We have made it a general rule that no new snacks are opened until the prior is gone.  Limits waste and keep indecisiveness at a minimum!
  • Write the expiration dates of items with a marker on the lids so at a glance you know what is the oldest on the shelf.
  • Keep a list in the ‘notes’ section of your phone of items you are running low on.  If you use up an item, add it to your list right away.  Most of us don’t shop without our phones so you always have your list!
  • Items like crackers and chips rotate often in sale cycles, especially around all major holidays.  Don’t buy tons of them just because it is a good sale.  They have short shelf life and go stale quickly.  You will find them again soon at about the same price to refresh your stock.  For example; Ritz, Townhouse, and Club crackers go on sale at major grocers with Buy 5 Save $5 Sales.  Grab 2 boxes during the sale and get cheaper filler items instead of 5 boxes of crackers.  We know the sales come around every few months and you get get fresh new stock rather than holding 5 boxes in storage!

See how I stock my fridge, too!

What’s in my Fridge – How I Stock and Organize my Refrigerator

Filed Under: Featured, Money Saving Tips, Recipes

  • « Previous Page
  • 1
  • 2
  • 3
  • 4
  • 5
  • 6
  • …
  • 33
  • Next Page »

{ Your info will never be shared because spam stinks }

Archives

Deals

Walgreens Photo: FREE 8X10 Photo Print – Valid through 6/15

Target: Crayola Supertips 20ct Pastel Markers ONLY $3.49

Target Circle Deal: $1 Women’s flip flops

Target: Sun Squad Inflatable Lounge Pool Float $5.00 (Reg. $10.00)

72% Savings! 3-Pack 2.5-inch Blue & Orange Squeaker Toy Dog Balls

More Deals

Coupons

75% Off! 5×7 or 8×10 Wood Panel Photo Prints

Hellmann’s (Unilever) Sign UP Rewards! $5 towards your next purchase + Get exclusive details about new products, recipes & savings

Kohl’s Last Minute Gift Sale – Valid thru 12/24

EXCLUSIVE OFFERS: Additional 10% off ALL these sale prices!

Have you tried Mike’s Popcorn? If not, you are MISSING OUT!

More Coupon Posts

Sweeps & Giveaways

Merry Christmas Giveaway – 2 Hatchimals & One Nintendo NES

Win A Zoo Pass From Zoological Society Of Milwaukee!

Culver’s Cow Tippin’ Instant Win Game!

WIN a Dream Vacation from Club Med!

WIN a Trip to the Indy 500 from Craftsman (2 Tickets, Airfare, and Hotel Included)

More Sweeps & Giveaways

Copyright ©2025, Midwest Coupon Clippers. All Rights Reserved. Site by Pixel Me Designs