Midwest Coupon Clippers

Cudding Coupons and Saving You Some Moolah

  • Home
  • Coupons
    • Newest Coupons
    • Coupons.com
    • Red Plum
    • Smart Source
    • Hopster
    • Saving Star
    • Coupon Database
  • Deals
    • Amazon
    • eBates
  • Freebies
  • Sweeps & Giveaways
  • Store Match-ups
    • Midwest Matchups
      • Copps/Pick n’ Save
      • Festival
      • Menards
      • Piggly Wiggly
    • Nationwide Matchups
      • CVS
      • Dollar Stores
        • Dollar General
        • Dollar Tree
        • Family Dollar
      • Target
      • Walgreens
      • Wal-Mart
  • This & That
    • Recipes
    • Around the House
    • Money Saving Tips
    • Get Organized
    • Disney
    • Pets
    • Gardening
  • About
    • Contact
    • Disclosure

Whipped Coffee – Make your Own Coffeehouse Iced Latte from Home!

April 5, 2020 By Leah Leave a Comment

If you love Online Shopping as much as we do, make sure you come over and join our “Online Deals – Check them out” Group on Facebook HERE, Where we share some of our favorite deals we find!


Disclaimer: This post contains affiliate links and we will be compensated if you make a purchase after clicking on our links. You can view MCC’s Full Disclosure Policy HERE.

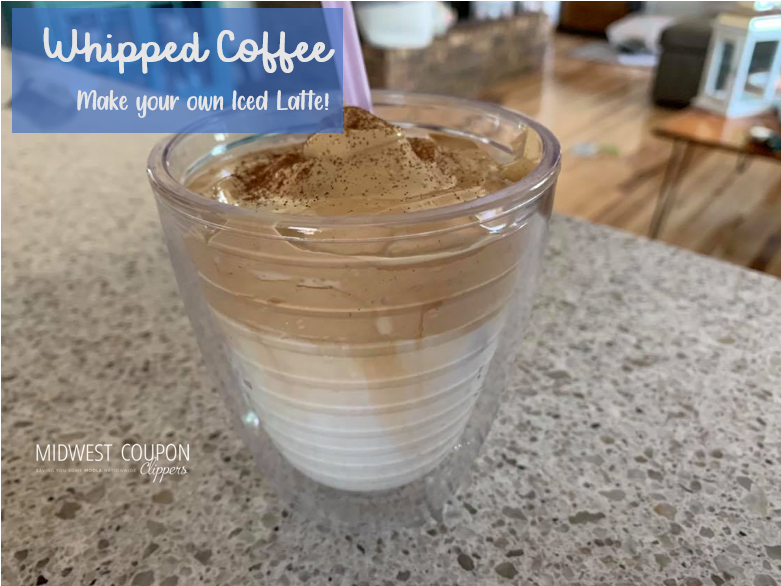
Whipped Coffee – Make your Own Coffeehouse Ice Latte from Home!

Okay, I fell for the viral videos of this ‘Dalgona’ style whipped coffee.  Well I was SHOCKED when it (1) Worked and (2) Tasted Great!  You only need a few ingredients and 5 minutes to make an iced coffee that tastes like any expensive Iced Latte made by your favorite Barista!

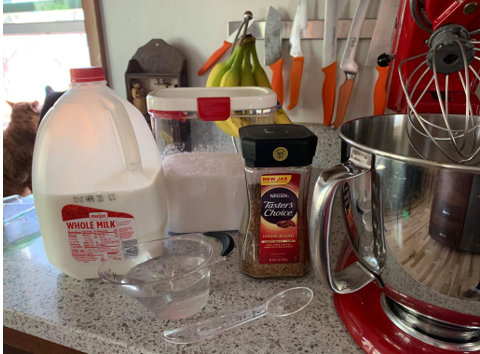
Gather Up the Goods:

  • 2 Tbsp. Instant Coffee Grounds
  • 2 Tbsp. Boiling Water
  • 2 Tbsp. Sugar
  • Milk (any will work including non-dairy options)
  • Ice in a cup
  • Cinnamon for garnish if desired

Now make it:

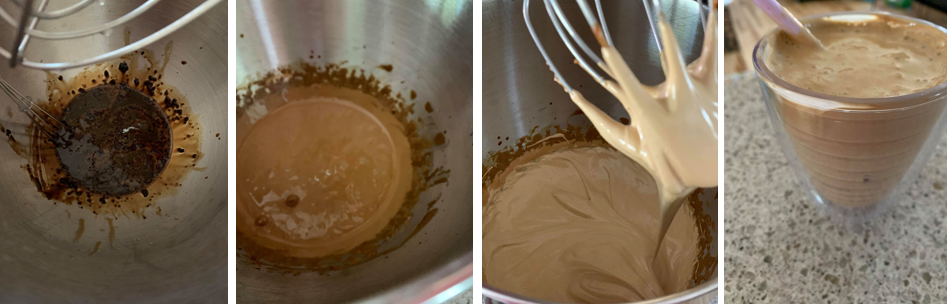
  1. Bring a cup of water to boil.  Using a measuring spoon, dip out 2 Tbsp and add to the bowl of a stand mixer.
  2. Add the instant coffee grounds to mixing bowl
  3. Stir to completely dissolve the coffee – it will be thick but be sure to get all the crystals stirred in
  4. Add Sugar to coffee/water mix
  5. Turn mixer on to high and whip for 5 minutes until light, fluffy, and glossy.  It will form soft peaks
    A hand mixer will work, also!
  6. Fill a cup with ice and add milk.
  7. Dollop the whipped mixture into the cup and top with cinnamon if desired. The whip is sticky, almost like marshmallow cream.
  8. Slowly stir to combine and the result is a frothy, rich, delicious iced latte.

I use about 1 c. of milk and a few generous scoops (about 2 TBSP) of the whipped coffee on top.  I would say this makes 2 small size drinks or one large single serving.  Add more or less milk base on how strong your enjoy your coffee!

I LOVE these reusable straws found HERE or HERE  They both are tall enough for my Yeti Tumbers and work in smaller cups, too!

Notes: The whipped mixture tastes OKAY plain, but is very strong and bitter, so don’t take a giant spoonful to give it a taste!  Also, I highly suggest the cinnamon, its a perfect note to enhance the coffee flavor.  I have stored one part of the whipped mixture in the fridge overnight to use the following day, and it held its texture perfectly to make a second drink.

Applesauce Muffins Recipe

Mini Cinnamon Sticky Rolls

Streusel Coffee Cake


Disclaimer: Midwest Coupon Clippers is a participant in the Amazon Services LLC Associates Program. Product prices and availability are accurate as of the date/time indicated above and are subject to change.

Keep Reading…

Filed Under: Featured, Recipes, Uncategorized

Pasta Easter Egg Craft

March 21, 2020 By Leah Leave a Comment

If you love Online Shopping as much as we do, make sure you come over and join our “Online Deals – Check them out” Group on Facebook HERE, Where we share some of our favorite deals we find!


Disclaimer: This post contains affiliate links and we will be compensated if you make a purchase after clicking on our links. You can view MCC’s Full Disclosure Policy HERE.

Are your kids cooped up and looking for something to do? Don’t worry, we are right there with you, too!  In an effort to find things to keep minds busy and avoid more screen time (we already are doing extensive e learning), I found this SIMPLE idea to make Decorated Paper Easter Eggs.

Using items you probably already have, turn the kids loose with some construction paper and glue! Talk about colors, shapes, sizes, textures, and encourage them to cut their eggs and sort the pasta.  There are endless ways to incorporate learning opportunities with this one!

What you need

  • Ziplock Baggies
  • Pasta in Different Shapes
  • Food Coloring
    I prefer gel colors because less is needed to get deep, true colors, but ANY will work! One brand I like are THESE.
  • Rubbing Alcohol or Vinegar
  • Construction Paper or Card Stock
  • Glue
  • Scissors

To color pasta

  1. Put a small portion of pasta into a ziplock bag (about 1/3 c.) Add a few drops of rubbing alcohol to the bag and a few drops of food coloring.  You don’t need much alcohol to spread the color around.  Just enough to make it slightly fluid.  I would say about 1/2 tsp.
  2. Seal the bag up tight and shake it around.  Once pasta has taken on the color, pour it out onto a sheet of newspaper or parchment paper.
  3. Repeat for each additional color – be sure to space dyed pasta on the paper so they don’t run together until dry.
  4. After a few hours you can shake the paper around to turn the pasta to make sure it gets evenly dry.
  5. Allow to dry overnight.  The rubbing alcohol will evaporate and leaves the pasta a rich color and still completely dry and hard.
  6. If pieces stick together, gently roll with dry fingers and they break loose.
  7. Vinegar would also work in place of the alcohol, but will not evaporate as quickly.
  8. We used penne, bowties, stars, broken spaghetti, and a short cut tube pasta I had.

Make the eggs

  • Using construction paper or card stock, cut out an egg shape.
  • Paste the pasta onto the egg in any pattern you like.  Be sure to talk about the shapes and patterns as you work.  Encourage your crafters to be creative and spot the patterns whether a shape or color!
  • Note, we used q-tips to apply the glue to the paper and then placed the pasta on top.  Putting the glue on the pasta proved (1) hard to manipulate (2) made the color start to bleed.
  • OVERALL, this was nearly mess free.  If the pasta got too much glue, it did bleed a little but putting the glue to the paper first seemed to keep this under control.


Mess Free Easter Egg Coloring!

Easter Egg Pops


Filed Under: Around the House, Featured, Fun for the Family, This & That, Uncategorized Tagged With: Craft, Easter, Easter Eggs, Kids Crafts, Preschool Crafts

Preschool Counting Busy Activity

March 20, 2020 By Leah Leave a Comment

If you love Online Shopping as much as we do, make sure you come over and join our “Online Deals – Check them out” Group on Facebook HERE, Where we share some of our favorite deals we find!


Disclaimer: This post contains affiliate links and we will be compensated if you make a purchase after clicking on our links. You can view MCC’s Full Disclosure Policy HERE.

Preschool Counting Busy Activity

Pin HERE

Welcome to quarantine, social distancing, and self isolation! Words I never thought I would say in a blog post.  BUT, since that is our current life we are making the best of it.  Both of my kids are expected to maintain some level of learning while we are on their extended period off school.

Nolan has been provided a well put together curriculum, however Carlie is expected to do 2 learning activities, away from screen time, per day. Her teacher provided a few ideas but the rest is up to us!

This a.m. I needed something to keep her occupied so one of the kid’s could take a test.  This EASY task bought me a solid 2 hours of entertainment for her and was a perfect age level skill drill.  Even better, no special items needed! You have everything you need!

Using just a muffin tin, sticky notes, and counter toys she played happily and quietly.

Make one:

  • Grab a muffin tin (or ice cube tray, some paper cups, or draw a chart on a sheet of paper)
  • Using post it notes, write and spell out the numbers 1-12
  • Put one number sheet inside each muffin cup
  • Now your preschooler can count their ‘counter’ figures into each muffin cup.

I had the automotive shapes stashed away for a day of boredom and glad I could pull them out!  There are tons of other options you probably have right at home!  Q tips, cotton balls, craft pom poms, pasta (penne, bowties, etc), jelly beans, m&ms, buttons, dried beans, or hair ties, to name a few!

Now because I had colors and shapes with this set, it quickly went from let’s count to… just use red, or just use green, to find all the trains or cars! These counter sets are between $10 & $15 but for the entertainment value – PRICELESS!  Occasionally, Target has these in small bins of 30 count in the ‘Buck Spot’ for $3.  Be on the lookout!

Look a few sets I spotted on Amazon HERE

  • Learning Resources Backyard Bugs Counters, Educational Counting and Sorting Toy, Set of 72
  • Learning Resources Three Bear Family Counters, Educational Counting and Sorting Toy, Rainbow, Set of 96 Ages 3+
  • Roylco Inc. Really Big Buttons 60/Pkg.
  • Learning Resources Mathlink Cubes 100 ct


Filed Under: Around the House, Featured, This & That, Uncategorized

Quick and Easy Meals on a Budget

March 16, 2020 By carry Leave a Comment

Quick and Easy Meals on a Budget

Written By: Annette Dahlke Schladweiler

First, start by making a list of your family’s favorite meals.  These are the ones you should always have on hand, because sometimes life happens and you just need to know you can grab the quick and easy throw together meal that no one will fuss over (unless you have a toddler, because we know their taste buds change daily, LOL).  If you can afford, and have the resources, to store bulk meat, consider buying a portion of a hog or a quarter or half beef; this not only supports your local meat shop and butcher, but also local farmers who are just trying to keep THEIR families fed as well. We buy bulk when we can, and then separate chicken breasts and freeze individually (if I find a fresh pack on sale, otherwise we use the bags of IQF).

Our Favorite SIMPLE Meals

  1. Macaroni and Cheese with a can of tuna tossed in, or cheapo kid hot dogs either on the side or chopped and put in.  Warm up some veggies and you have a complete meal.
  2. Eggs and toast, french toast, or an egg bake – we have chickens, enough said. Currently no one in our neighborhood is lacking eggs, especially us. I think we have 6 dozen in our fridge, which is why we eat so many. But really, eggs are a fairly cheap protein option.  Many people don’t realize, they are also freezable if you scramble them first, so when i get too overwhelmed we scramble and put them in 2 and 6 egg portion bags to freeze, those sizes are perfect for baking or making a meal. They last approximately 4-6 months.
  3. Spaghetti. A pound of burger, can of tomato sauce, can of tomato paste, and seasonings.  Boil the noodles, warm up veggies and supper is served. This can also be made ahead and layered into a pan so that anyone who can cook a pizza can warm it up for when you get home.
  4. Chicken Alfredo. My recipe. Two smallish chicken breasts, chopped and cooked. Add 8 oz cream cheese, roughly ⅔ cup sour cream, about ½ cup white cooking wine and enough chicken broth to get it to the consistency you like. Sometimes we add in precooked mushrooms or broccoli, depending on our mood. Serve over Alfredo or penne noodles.
  5. Stroganoff. Ground burger, can of cream of mushroom soup, a little water or broth, and serve over egg noodles. And of course, veggies.
  6. Tacos. We love tacos. We also love enchiladas, either beef and rice or chicken and rice. Add a side of corn and black beans and you’re set!  Make a little extra meat and sprinkle the meat over tortilla chips for a fun nacho lunch the next day. (I made simple enchiladas – meat, cooked rice and a little cheese in tortilla, roll up and put in pan. Cover with a mixture made with a can of cream of chicken soup, half cup of sour cream and about half the soup can of milk. Sprinkle on a little cheese and bake for 20 minutes.)
  7. Wraps and Sandwiches – we always have hard salami, ham or turkey, and pepperoni for lunch meats, PB&J, along with bread and soft tortilla shells.  Make a sandwich or wrap and grab a jar of fruit. Easy lunch. We do this 2-4 times a week.  NOTE For wraps, put a thin layer of cream cheese, sprinkle on shredded cheese and put 2-3 pieces of lunch meat. I have one kid that prefers pepperjack, so she skips the shredded cheese and just uses a piece of “her” cheese to go on her pepperoni and pepperjack wrap. And those little pickles with cream cheese wrapped in ham can be recreated as a wrap with cream cheese, ham and sandwich slicer pickles (just put between paper towels to get liquid off first.
  8. Use French Bread – grab french bread when it’s clearanced if you can. We cut, butter, season, and flash freeze for garlic bread.  We also use french bread to make pizza – cut the bread in half lengthwise and hollow out, leaving at least a half inch of bread still in the loaf halves. Brown a pound of burger – for taco pizza add regular seasoning, for cheeseburger pizza add an 8 oz can of tomato sauce (sometimes we add bacon too). Put the burger into the two hollowed out halves of bread and sprinkle on cheese. Bake until the cheese is melted. Add a quick side salad or veggie.

Fix and Forget it Meals

  1. Crock Pot Chicken – throw a full chicken in the crock pot and season however you’d like.  Use the leftovers to make soup and freeze, either in a large family batch, or smaller portions for lunch.
  2. Simple Pulled Pork – throw a pack of pork ends in the crock pot. You’ll probably want to drain off SOME liquid, but not all or it gets too dry (my husband learned this the hard way LOL).  Put on a bun and serve with french fries, or over bread with mashed potatoes.
  3. Meatballs – this is not a super cheap meal option unless you find a good sale, so we make our own.  A 3 pound tube of ground beef made into meatballs will last a long time. If you thaw meat, you CAN cook it and refreeze (but you shouldn’t just refreeze). Mix the meat mixture like for meatloaf, roll into 1” balls and bake at 350 degrees for roughly 25 minutes.  Let cool, bag and freeze. We put foil on the cookie sheets, one time scraping burger bits off was enough to learn my lesson. You can reheat in crockpot or on the stove top.
  4. Soups – homemade soups are THE BEST and all cream soups start with essentially the same base.  Here it is by ratio so you can more or less based on your needs (we do one of these per person).
  • Cream Soup Base – in sauce pan put 1 Tbsp butter, melt. If you want more flavor use a little bacon grease to replace the butter. Add 1 Tbsp flour and whisk together (it will get thick, fast. Slowly add 1 cup broth (I use mostly chicken because of food allergies in the family), then one cup milk.  For potato soup, precook your potatoes and add to cream base. For cheddar broccoli add chopped broccoli (blend up) and few handfuls cheddar cheese. For tomato soup, omit the chicken stock and replace with tomato sauce.
  • Make a big batch of chili, or white chicken chili (use the leftovers from the crockpot chicken) to come home to. YUM!

Make Ahead Meals

Anyone who can make a pizza, can put these in the oven so they’re ready to eat. 

  1. Tater Tot Hotdish
  2. Buffalo Chicken Bake
  3. Tuna Hotdish
  4. Oven Baked Potatoes – chunk potatoes and put in baking dish, cover with foil and cook like you would as potato packets on the grill, only in the oven! Usually 425 degrees for 45-60 minutes is about right.

My Go-To Sides

Quick and easy sides that kids can make themselves or for you to whip up when you get home are wonderful. These are some of our favorites…

  • Lunch – carrot sticks, celery sticks, fresh or canned fruit.
  • Supper – Potato (so many ways to make – chunk, cover and bake in oven; baked; mashed to name a  few), Rice, Couscous, Quinoa, and we almost always have a frozen veggie along with potato.

Good for You Snacks – yogurt, fruit (buy on sale in season), string cheese (not individually packed), a few crackers, cottage cheese, parfait, hard boiled egg, homemade cookies, rice krispie or corn flake bars, homemade granola bars, a box of raisins

Final note.  Portion control is a huge part of all this.  Learning what the serving size recommendations are for each age group and start with about that or a little less.  They can always ask for more. Also, sit down and talk about the day or events that are happening. This is a two fold win – they are learning to discuss and take turns, and it also forces them to slow down while eating. It takes roughly twenty minutes to start feeling full, so those who eat slower also tend to eat less because they are better able to read the bodies’ signals.

My background is child care, stay-at-home mom while my husband worked seasonally, and now homeschooling mom working full time as the only income.  Budgeting and having a base of food has been a necessity for most of my adult life. We feed a family of 5 three meals a day for roughly $50-60 a month, it can be done, it just takes some planning.  I will add that with my child care background and having to follow the food program, as well as having a child who was anemic at one year who was unable to tolerate iron supplements, I am a stickler for making sure that we meet daily requirements most days for food groups.  I encourage my kids (and numerous other children I have cared for over the years) to try new things by letting them participate in choosing and making their meals.


Filed Under: Family Savings, Miscellaneous, Money Saving Tips, Recipes, Uncategorized

Leprechaun Blossom Cookies

February 25, 2020 By Leah Leave a Comment

Leprechaun Blossom Cookies

I turned one of my favorite shortbread cookies into a St. Patrick’s Day green cookie. By adding a bit of mint flavor, green food color, and seasonal sprinkles, these simple little cookies become Leprechaun Blossoms!

📍 Pin HERE for later!

  • 1/2 c. butter – room temp.
  • 1/2 c. powdered sugar
  • 1 t. vanilla
  • 1/2 t. mint extract
  • 1 1/4 c. flour
  • 1 T. milk
  • green food color

Filling:

  • 1/4 c. heavy cream
  • 1/2 c. chocolate chips
  • green sprinkles

Make it:

  1. Using a mixer, cream butter and sugar until combined and fluffy.
  2. Add vanilla, mint, and green color (a few drops to make a nice green color).
  3. On low, mix in flour.  Dough will be very dry and crumbly.
  4. Add milk (may need a bit more) just until dough comes together. Don’t make the dough sticky, just moist enough to roll into balls
  5. Form dough into 1″ balls and chill for 30 minutes
  6. Preheat oven to 350° while dough chills.
  7. Bake for 12 minutes until set and just barely brown
  8. Remove from oven and immediately, using the end of a wooden spoon or teaspoon measuring spoon, press a divot into each cookie.
  9. Move to a cooling rack and completely cool

While cookies are baking prepare ganache filling:

  1. In a microwave safe bowl, bring cream to a simmer in microwave (about 45 seconds)
  2. Remove from microwave and stir in chocolate chips.  keep mixing until combined and glossy.
  3. Allow ganache to cool, but still pourable, as cookies bake and cool
  4. Once cookies are completely cool, fill indents with chocolate.
  5. Top with sprinkles if desired.

You could fill cookies with your favorite buttercream or even some store bought frosting!

Filed Under: Featured, Recipes, Uncategorized Tagged With: cookies, Dessert, Holidays, St. Patrick's Day

Super Easy Quiche Recipe

February 11, 2020 By Leah Leave a Comment

Super Easy Quiche Recipe

As part of my regular meal planning, I take advantage of turning leftovers into a second (or third) whole new meal during the week.  Lately my kids have been LOVING this Quiche and even ask for it as part of the regular rotation.

I LOVE it because it meets all my go to criteria! This uses leftovers, the kids can help make it, it uses everyday pantry/fridge staples, and it is CRAZY easy!

You can use any leftover protein and veggie combo for this meal.  We have done broccoli and ham, spinach and chicken, mushrooms, peppers, onion, and sausage, and even taco meat with salsa! This is easily a breakfast, brunch, or dinner dish!

Leave out the meat and make it all veggie based or flip it and do meat and no veggie to meet your tastes!  This is great with a nice green salad and vinaigrette on the side!

What you need:

  • 4 eggs
  • 1 can Cream of Mushroom condensed soup
  • 1/2 c. sour cream or plain greek yogurt
  • 1 c. shredded cheese – whatever your family likes!
  • 2 c. cooked chicken, sausage, pork, or beef
  • 1 c. cooked and drained veggies
  • 1 (9 inch) unbaked pie crust (I use the refrigerator crusts that come in a 2 pack, but a frozen shell is fine, also; or make your own if you have that skill – I DO NOT!!)

Okay – get ready for this super tough instruction 😉

  1. Preheat oven to 350° F.
  2. Lightly beat the 4 eggs in bowl.  Stir in all remaining ingredients and pour into the pie shell
  3. Bake for 50-60 minutes until set and slightly browned. Remove and let rest for 10 minutes prior to cutting.

French Onion Meatballs

Instant Pot Fall Off the Bone Country Style Ribs

Filed Under: Featured, Recipes, Uncategorized Tagged With: Breakfast, Brunch, Dinner, Eggs, Pie

Applesauce Muffins Recipe

February 7, 2020 By Leah Leave a Comment

We were discussing our menu plans last week for the Super Bowl and Sheri said she was making Applesauce Muffins.  After she shared a picture of her finished masterpieces, I HAD to make them!

Thankfully, Sheri handed over her recipe and I got right on whipping these up!  They did not disappoint.  Tender, moist, incredibly flavorful, and warm from all the cinnamon goodness, everything you want from a homemade bakery style muffin.

These will be perfect for your next brunch or served along side your favorite soup!

Applesauce Muffins

  • 2 cups all-purpose flour
  • 2 teaspoons ground cinnamon
  • 1/4 teaspoon ground nutmeg
  • 1 1/2 teaspoons baking powder
  • 1/2 teaspoon baking soda
  • 1/4 teaspoon salt
  • 1/2 cup unsalted butter , melted
  • 1/2 cup white sugar
  • 1/4 cup brown sugar
  • 2 teaspoons vanilla extract
  • 2 large eggs
  • 1 cup unsweetened applesauce

Cinnamon Sugar Topping

  • 1/3 cup butter – melted
  • 1/4 cup white sugar
  • 1 teaspoon ground cinnamon
  1. Preheat the oven to 375º F.
  2. Line a muffin pan with muffin papers.  I also recommend spraying the papers lightly as well as the top of the muffin tin as these are tall and full muffins.
  3. Sift together the flour, cinnamon, nutmeg, baking powder, baking soda and salt.
  4. In a large bowl whisk together the melted butter and sugars.
  5. Then blend in the eggs, vanilla extract and applesauce.
  6. Stir in about 1/2 of the flour mixture into the wet ingredients, then gently fold in the rest using a rubber spatula or wooden spoon.
  7. Spoon the batter into the prepared muffin pan.  Fill to the top.  You want nice large round tops so fill them up!
  8. Bake for 17-22 minutes, or until the tops are slightly firm to the touch and an inserted toothpick comes out clean.
  9. Cool for 10 minutes in the pan.
  10. In a small bowl whisk together the sugar and cinnamon.
  11. Melt remaining 1/3 c. butter
  12. Dip the top of a warm muffin in the melted butter, shaking off any excess. Then dip the top in the bowl of cinnamon sugar. Repeat the process with the rest of the muffins.  Allow to cool on a baking sheet or cooling rack.
  13. Serve immediately or cover and store for up to 5 days.

Filed Under: Featured, Recipes, Uncategorized

Crack Pretzels – You Can’t Eat Just One!

January 31, 2020 By Leah Leave a Comment

If you love Online Shopping as much as we do, make sure you come over and join our “Online Deals – Check them out” Group on Facebook HERE, Where we share some of our favorite deals we find!


Disclaimer: This post contains affiliate links and we will be compensated if you make a purchase after clicking on our links. You can view MCC’s Full Disclosure Policy HERE.

Crack Pretzels – You Can’t Eat Just One!

Maybe you remember a few months back I went a little crazy at the Fisher Nut Store and bought a 25 pound box of mini pretzels.  Well, now that Christmas has passed and I have dipped way more than my fair share of pretzels in chocolate; I STILL had a ton of pretzels left!

After trying a bag of a VERY expensive flavored pretzels (as in $5.99 for a 16 oz package) there was a major LIGHT BULB MOMENT! Season those salty twists with a savory mix of spices and make a delicious snack for a FRACTION of the cost of the very expensive store bought ones.  These are perfectly salty, a tad spicy, and impossible to stop eating.

📍 Pin HERE

What you need:

16 oz. pretzels (whatever style you want!)
3/4 c. butter flavored popcorn oil *
3 Tbsp. ranch dressing mix – I have bulk bottle so I measured, but its about 1 1/2 packets if you have the single servings
1 t. lemon pepper
1/8 t. cayenne pepper (go for more if you like spicy)

Make it:

  • Preheat oven to 250°
  • Combine dry seasonings in a small bowl
  • Add pretzels in a large mixing bowl and pour butter oil over.  Toss to coat
  • Sprinkle dry spices over oil coated pretzels and carefully stir
  • Put in a large baking sheet or roasting pan in a single layer.  Bake for 1 hour, stirring every 15-20 minutes.
  • Remove from oven and allow to cool.  Store in a sealed container for 1 week.

*Note: If you don’t have the popcorn oil, use melted butter OR use butter flavored pretzel braids and vegetable oil.  The butter notes are key to the flavor profile so don’t skip out!

Pull Apart Olive Cheese Bread

KETO Fat Head Sausage Biscuits

Filed Under: Featured, Recipes, Uncategorized

“You Blow Me Away” Valentines

January 25, 2020 By Leah Leave a Comment

This post contains affiliate links and we will be compensated if you make a purchase after clicking on our links. You can view MCC’s Full Disclosure Policy HERE.  

I like to do a little personal something for my kid’s Classroom Valentine Cards each year at school.  They don’t have to be expensive or extravagant, but something sweet and maybe punny!  Check out these adorable ‘Blow me Away’ Valentines made from everyday dollar store.

Pin HERE for later!

What you Need:

  • Small Bottles of Bubbles OR Blow Pops (I bought 3 packs of bubbles at Dollar Tree)
  • Favor Bags
  • Print off with ‘Valentine, You Blow Me Away
  • Stickers & Construction Paper if desired
  1. Make a Word Document that says VALENTINE, YOU BLOW ME AWAY.  Add a border or some free clipart and print that puppy off.
  2. Using a paper cutter or scissors trim the cards to size.
  3. Sign your cards however you wish.
  4. I added a pink construction paper background to make my printer paper more sturdy, but it isn’t necessary.  Using some Dollar Tree stickers, we added a few to each to make them pretty and lets be honest, stickers and kid helpers go together like besties.
  5. Now, you can attach these however you want.  I put the bubbles into a small favor bag and tied it with a twist tie (they came with the favor bags) and used the same tie to string the cards on.  Double sided tape would work great also tape the card right to the bottle.  Whatever bubbles you use will determine the best way to put the cards on.

IDEA:

Bubbles also can found here or here from Amazon.  You could just tie a string with the card to the loop at the top and EASY PEASY DONE!  Even small party favor sized bubbles would work for this idea!  Oriental Trading and Party Supply stores are a great place to grab bulk items for CHEAP!

price & availability accurate as of
Jan 25, 2020 @ 7:59 pm CST 

Alternative concept using the same cards

Punch a hole in 2 spots on the cards and thread a BLOW POP sucker through . Use a piece of tape to secure the sucker in place.


Filed Under: Featured, This & That, Uncategorized

Cherry Chip Cookies

January 18, 2020 By Leah Leave a Comment


Does anyone else have a particular recipe they remember from their childhood?  Something you can picture clear as day and practically taste if you close your eyes?  These cookies are THAT item.  My grandma made them all the time!  I can even see them sitting on the cookie plate in her kitchen ready to enjoy with a cup of coffee!  We always had ‘coffee breaks’ whenever we visited.  Of course ours was mostly milk with a drop of coffee, but we thought it was so grown up!

I recently stumbled on a bag of the Cherry Chips and all those great childhood memories came right back!  The sweet bright red chips, crispy bits of corn flakes, mild almond flavoring, and tender butter shortbread – I HAD to make these cookies!

After searching through my Grandma’s recipe cards and cookbooks, the Cherry Chip Cookie recipe was no where to be found! Luckily, a quick text message to my mom turned up the details on this childhood favorite!

Check out my mom’s recipe ‘card’ below! You know it is as good one when the paper is THAT stained and there are not even directions!!  I forgot how cute they turn out! Little drops of sweet butter cookies, dotted with red chips – these would be PERFECT for Valentine’s Day!

Pin HERE for Later!

What you need:

1 c. butter (no substitutions) – room temperature
1 egg yolk
1 t. almond extract
1/2 c. white sugar
3/4 c. corn flakes (crushed)
2 1/4 c. flour
pinch of salt
1 c. cherry chips (I found at Woodmans, but have seen them in the baking section of large grocery stores)

Make them:

  1. Cream butter & sugar until fluffy
  2. Stir in egg yolk and almond extract
  3. Add flour, corn flakes, and salt and mix just until combined.
  4. Fold in Cherry Chips
  5. This is a dry dough, but easily forms into balls for baking
  6. Roll into tablespoon size balls and flatten slightly with a fork.
  7. Bake at 350° for 10 – 12 minutes until just slightly browned on the edges
  8. Rest on baking sheet for 2 minutes and move to a cooling rack

More Valentine’s Ideas:

Lunch Box Valentine’s Ideas – Using Pantry Staples!

Valentine’s Oreo Pops Recipe

Valentine’s Day Candy Bouquet

Filed Under: Featured, Recipes, Uncategorized Tagged With: Cherry, cookies, Valentine, Valentine's Day

  • « Previous Page
  • 1
  • …
  • 15
  • 16
  • 17
  • 18
  • 19
  • …
  • 64
  • Next Page »

{ Your info will never be shared because spam stinks }

Archives

Deals

200 Count Paper Napkins ONLY $1.99 (Limit 3) Reg. $3.49

Clearance BLOWOUT! Additional 50% off

2-Pack Girls Tank Dress w/Pockets ONLY $6.50! Sizes 4-18 & Plus

Walgreens Photo: FREE 8X10 Photo Print – Valid through 7/25

Additional 50% OFF Clearance!

More Deals

Coupons

75% Off! 5×7 or 8×10 Wood Panel Photo Prints

Hellmann’s (Unilever) Sign UP Rewards! $5 towards your next purchase + Get exclusive details about new products, recipes & savings

Kohl’s Last Minute Gift Sale – Valid thru 12/24

EXCLUSIVE OFFERS: Additional 10% off ALL these sale prices!

Have you tried Mike’s Popcorn? If not, you are MISSING OUT!

More Coupon Posts

Sweeps & Giveaways

Merry Christmas Giveaway – 2 Hatchimals & One Nintendo NES

Win A Zoo Pass From Zoological Society Of Milwaukee!

Culver’s Cow Tippin’ Instant Win Game!

WIN a Dream Vacation from Club Med!

WIN a Trip to the Indy 500 from Craftsman (2 Tickets, Airfare, and Hotel Included)

More Sweeps & Giveaways

Copyright ©2025, Midwest Coupon Clippers. All Rights Reserved. Site by Pixel Me Designs