Midwest Coupon Clippers

Cudding Coupons and Saving You Some Moolah

  • Home
  • Coupons
    • Newest Coupons
    • Coupons.com
    • Red Plum
    • Smart Source
    • Hopster
    • Saving Star
    • Coupon Database
  • Deals
    • Amazon
    • eBates
  • Freebies
  • Sweeps & Giveaways
  • Store Match-ups
    • Midwest Matchups
      • Copps/Pick n’ Save
      • Festival
      • Menards
      • Piggly Wiggly
    • Nationwide Matchups
      • CVS
      • Dollar Stores
        • Dollar General
        • Dollar Tree
        • Family Dollar
      • Target
      • Walgreens
      • Wal-Mart
  • This & That
    • Recipes
    • Around the House
    • Money Saving Tips
    • Get Organized
    • Disney
    • Pets
    • Gardening
  • About
    • Contact
    • Disclosure

Homemade Ice Cream in a Bag

July 19, 2019 By Leah Leave a Comment

Homemade Ice Cream in a Bag

Pin It HERE

With record setting heat hitting us the next few days, I thought why not give Ice Cream in a Bag a whirl!  Who doesn’t love rich, creamy, fresh churned ice cream?

With a few kids on board, take advantage of the manual labor and let them beat the heat with a fun cool treat while burning some energy.  I mean, its practically EDUCATIONAL – after all it is a science experiment!!  

Turn a few every day ingredients into ice cream in a flash!  Mix, pour & shake.  That is it! Who doesn’t love something that easy!

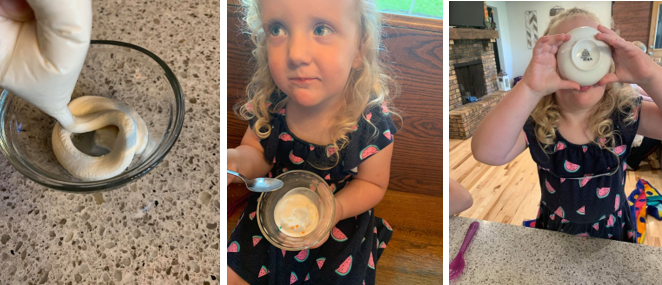
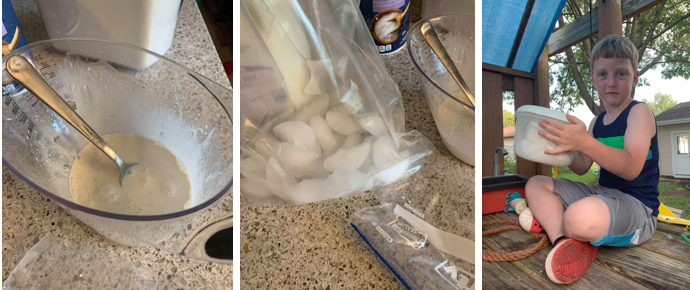
The first batch, we did with a baggie in a larger baggie.  It worked great, but we had trouble keeping the bag sealed.  For the second experiment we put the baggie inside a Rubbermaid container and tossed, shook & danced around with the container and found much better success.

Give it a try:

  • 1/2 c. heavy cream
  • 1/2 c. milk
  • 2 T. sugar
  • 1 t. vanilla
  • 1 qt. zip-top bag
  • 1 gallon zip-top bag or large Rubbermaid/plastic container
  • 3-4 c. ice
  • 1/3 c. salt (table salt is FINE!)

Now here is where the magic happens:

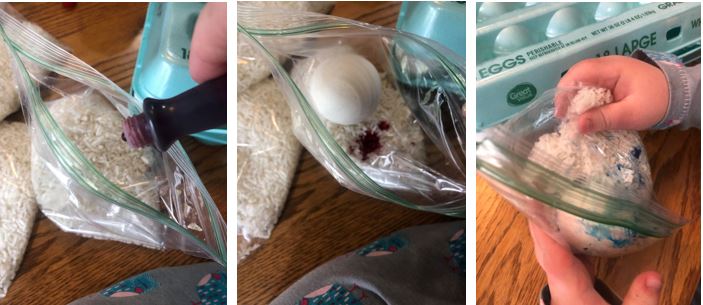
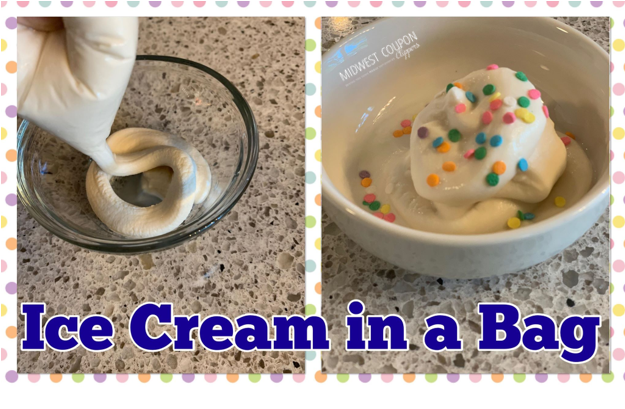
Wisk together the sugar, vanilla, and milk until sugar is dissolved.  Pour into the quart size bag.  Now seal the baggie up REALLY WELL.  Add the ice and salt to the gallon bag or the plastic container.  Place the quart bag inside the larger bag or container.  Seal it up TIGHT.

NOW, go crazy! Dance, shake, toss that bag/container around.  Keep it moving.  It takes about 5 minutes to firm up with a lot of good motion.  We took it outside and threw it around and everyone gave it a good shake when they caught it.  Make it a dance party or a game of hot potato!  If you shake it longer, it will get more firm.  We ended up going about 10 minutes total and got a very thick and frozen ice cream.

The first try with the double baggie method was not as easy.  The larger bag opened up several times making things wet and messy!  Not a terrible thing, but if you are using 2 baggies, consider this an outside activity!  My opinion is the quart size baggie in a Rubbermaid worked MUCH better!

Remember, if you are outside, it may take longer or you may need to add more ice.  Once the bag is firm and set, take it inside to serve up!  Give the quart bag a quick rinse under COLD water to get the salt residue off. Nip a corner off and serve it up in cups!

This makes about TWO 1/2 cup servings.  Top with sprinkles, chocolate or fruit!  It does melt quickly, and you could toss it into the freezer to firm up after shaking.  It is definitely a SOFT SERVE style, but tastes quite good!

NOTE: If you do not have heavy cream, you could use half & half or whole milk.  It will not have the same rich, smooth consistency but will taste the same and freeze just as fun!

Filed Under: Featured, Recipes, Uncategorized Tagged With: Dessert, Homemade Ice Cream, Ice Cream, Kids Activities

Instant Pot Pressure Cooker Bone Broth

June 28, 2019 By Leah Leave a Comment


I have become a TRUE Instant Pot convert! Any chance I get, I pull it out and get my pressure cook on!  It is so fast, convenient and easy to use.  Making my own bone broth is something I have long done on the stove, but it is a BREEZE in the pressure cooker and no boiling hot pot on the stove!

I used a rotisserie chicken after picking the meat off for another meal.  Why waste the bones when it can become 6 or 8 cups of delicious and flavorful broth for soup, casseroles, or gravy.  Use it right away for your next dinner or freeze it in 2 or 4 cup containers for the next round of Chicken & Noodles!

📍 Pin HERE for later!

What you need:

  • Chicken bones (left overs from a rotisserie or whole chicken)  Picked mostly clean
  • 6-8 cups water
  • 1 T. Salt
  • 1 t. Pepper
  • 1 t. Garlic
  • 1 whole onion (cut in half) or 2 T. Dried, Minced Onion
  • 1 or 2 carrots in large chunks (optional)
  • 1 or 2 stalks of celery (optional)
  • Additional seasoning to your tastes – sage, poultry seasoning, cayenne pepper, etc.

Make it:

  1. Place rack in bottom of the Pressure Cooker.  Place chicken bones in.
  2. Pour water filling to about 1″ under max fill line.
  3. Add seasonings and vegetables
  4. Set cooker to manual pressure cook, HIGH, and 45 minutes
  5. Once timer has gone off, allow to naturally release or manually release if in a hurry.   REMEMBER, if using manual release, use a towel over the valve and a long handled spoon or tongs to keep away from the steam.
  6. Place a strainer over a large bowl.  Carefully ladle or pour out the broth allowing to strain.
  7. Feel free to taste and adjust the seasoning to your liking.  Once cool, store in the fridge or freeze for use later

Note: Adding the carrots and celery gives the broth the deep rich color and adds an earthy flavor boost.

Try these tasty recipes with your next batch of broth

Slow Cooker Chicken Chili

Chicken & Stuffing Casserole

Simple Broccoli Cheese Soup Recipe

Filed Under: Featured, Recipes Tagged With: bone broth, Chicken, chicken broth, Dinner

What’s in my Fridge – How I Stock and Organize my Refrigerator

June 13, 2019 By Leah Leave a Comment

Disclaimer: This post contains affiliate links and we will be compensated if you make a purchase after clicking on our links. You can view MCC’s Full Disclosure Policy HERE.

Hi, my name is Leah and I am an OVERPLANNER!  One of those I need to know what is happening tomorrow, yesterday types. Yup, that is me! While these traits are annoying A LOT of the time, I have found that planning, list making, and over thinking has made me a pretty organized person who is prepared for most things at anytime!

One thing I have become VERY obedient about is keeping a well stocked pantry, freezer and refrigerator.  This allows me freedom to make a nice variety of meals, pack kid’s lunches quickly, and almost always have ingredients on hand to whip up a favorite dessert without a last minute grocery run.

Since I have 2 young kids, plus babysit, you will notice my fridge runs more ‘family friendly’ but I think these tips and ideas will inspire you to get the most out of your budget and more bang out of every day ingredients!

📍 Pin HERE for later!

Let’s explore what I consider fridge MUST haves and why I always keep these on hand.

Milk – a gallon or two always on hand. When grabbing it at the store ALWAYS look for the furthest expiration date.  This is an easy habit to start when shopping the refrigerated section.  Nothing is worse than getting home and realize your milk only has 2 days left before the best buy date when you can get a gallon with a date 10 days or 2 weeks out!

Eggs – 2 or 3 dozen at all times.  A breakfast must have and with 4 kids each morning a dozen doesn’t last long!  Plus I am an avid baker and seem to go through them quite quickly. Eggs have a super long shelf life so don’t be afraid to stock up on a good sale.  Hard boiled eggs can become deviled eggs for any potluck in minutes. Read how to cook them in the Pressure Cooker HERE!

Heavy Cream – I always have at least a pint on hand.  It is a staple for adding to sauces, soups, and gravy for an extra thick, rich base.   Using leftovers for soups is a BIG part of my meal planning.  Adding a few tablespoons of cream to a basic soup puts it over the top and seems like hours were spent making it.  Not only for savory dishes, heavy cream makes THE BEST frosting and glazes.  Add to powdered sugar and you have a pourable glaze for cookies and cinnamon rolls.  Check out this iced lemon cookie recipe for inspiration!

Butter/Margarine – Always REAL stick butter for baking, gravies, and sauces.  I keep at least one pound in the fridge. Find it on sale, grab extra and store in the deep freezer for up to 6 months!  I keep spreadable margarine for toast and sandwiches.  I don’t use it often, but it is nice for quick grilled cheese or spreading on toast.

Sour Cream – a MUST for tacos, stroganoff, baked potatoes and many other recipes including baked goods.  It too has a LONG expiration date, so don’t be afraid to buy a few when it is on sale!  Try this taco breakfast casserole for a change up at your next brunch!

Cream Cheese – Load up on this when it is on sale – the expiration dates go out for MONTHS!  I use this for buffalo chicken dip, cheesecake, frosting, smeared on bagels, and of course Pickle/Ham Rolls.  Learn how to make Micki’s family cheesecake recipe HERE (you will never believe how she makes the crust!)

Pita bread &/or Soft Tortillas – mini pizzas, quesadillas, chicken or tuna salad wraps and tacos are always an option when these are kept stocked.  Plus, quarter the pita bread, brush with olive oil, season with salt and bake until crisp for a warm fresh cracker for dipping in humus, pizza dip, olive salad and MORE!

Beef & Chicken Base – I buy these in larger tubs at Sam’s Club or GFS, however, you can find it at any grocery store in the soup/broth aisle.  NEVER be without broth again when you keep these these bullion style flavorings.  Make soups, gravies, sauces and more anytime.  These French Onion Meatballs use Beef Broth and will become a FAVORITE dinner option!

Cheese – I am from the Midwest so you KNOW it is practically it’s own food group in our house!  I like to have several blocks of cheese for snacking or grating.  Cheddar and co-jack are my mainstays.  However, mozzarella and provolone are staples too!  I keep a bag of shredded cheese stocked also.  Generally a 4 cheese blend for tacos, pizza, quesadillas, etc.  American cheese slices are a must with kids.  Grilled cheese sandwiches are a go to lunch or late night dinner!  Find some AMAZING grilled cheese tips HERE!

Fresh Fruit – Apples, Oranges and Lemons are ALWAYS in my fridge.  Typically some berries and grapes (or anything seasonally available and on sale) are chilling, too.  I keep a washable plastic basket at kid level full of fruit.  The kids can help themselves and are easily drawn to it when it is at their level.  Lemons are handy for adding freshness to many meals and is a must have for lots of baked goods (like this Lemon Poppyseed Bread).

Kid’s Drawer – One drawer is designated with kid friendly, grab & go items.  Whether it is a snack on the run, packing lunches, or a fast breakfast, these keep the kids happy and able to self serve!  Cheese sticks, yogurt cups, beef sticks, baby carrots, Gogurts and Danimals.  My yogurt stash is rotated heavily with whatever is on sale or has coupons (find printable coupons HERE).  I always keep a quart of plain or vanilla yogurt for smoothies or fruit parfaits, too.

A few more items that are mandatory

    • Dressings – Ranch, Western, Italian (great for making pasta salads!!)
    • Mayo, Ketchup, Mustard, Worcestershire Sauce, Jelly, Pickles
    • Cooked chicken that I prep once a week – dinner is ready in snap without having to thaw and prep a protein
    • Lunchables or Protein snack packs (not an everyday item, but lunch on the run or for fun picnics)
    • Juice boxes and Gatorade
    • Canned Biscuits or Crescents – Lots of meal options with these on hand. Crescent chicken is a fav.
    • Refrigerated Cookie Dough – I bake from scratch most of the time, but occasionally its nice to just toss some in the oven for a quick treat!
    • Sliced cheese & lunch meat for sandwiches and wraps
    • Lettuce or bagged salad
    • Prewashed veggies like broccoli and carrots.  I roast them often for a side dish and use the left overs for soups or stir fry.

Now will all these ideas work for your family? NO, but hopefully you can find some inspiration for better meal planning or stretching your budget.

Do I keep my fridge this organized? YES!  It has taken me a long time to get a good system into place.  Don’t try and take it all on at once.  Focus on one area and slowly get your own method down and stick with what works.

Keeping drawers and bins organized and sorted is necessary to know what is on hand.  I got these Y-Weave ones from Target HERE.  As an additional note, I clean out leftovers and bins once a week.  Every Sunday I purge or freeze any leftovers from the previous week and check expiration dates.  Never let leftovers build up and consume the space.  Don’t be afraid to freeze leftovers for a use later.  Cooked proteins like chicken or ground beef freeze great and make meal prep later so simple!  Chili, spaghetti, and even Sloppy Joes freeze and reheat better than the original meal!  Items you may not think to freeze include mashed potatoes (great for soups later) and shredded cheese.  Don’t let these items waste away in your refrigerator.

I also find keeping my leftovers in clear containers helps me use them.  I never have the ‘mystery’ container everyone is afraid to open!  Plus, if they are stored at the front, in plain sight, it is easy to use them up whether reheated or as as leftover makeover!

If you are struggling with meal prep always look to re-purpose at least one meal a week.  For example chili on Sunday becomes chili dogs or loaded baked potatoes later in the week.  One prep, two meals!  With a good fridge inventory, you will have shredded cheese and sour cream on hand for either one of these meals.

Filed Under: Family Savings, Featured, Recipes

The PERFECT Grilled Cheese!

June 4, 2019 By carry Leave a Comment

Have you ever wondered how some restaurants get the perfect grilled cheese put on your plate? Wonder no more, I am going to show you ALL the TRICKS!

📍 Pin HERE for later!

Say Cheese! Cheese, Cheese, & More CHEESE. Use different types of cheese, and lots of it!

Mayo is the Secret! Usually you make a traditional grilled cheese with butter… BUT did you know most restaurants use (real) MAYO instead? It’s TRUE! If you think about it… mayo is really just oil and eggs! (Trust me you don’t taste the mayo once it gets toasted up)

You missed a little right there! Make sure to spread the mayo (or butter) EDGE-to-EDGE! This is crucial for an even golden brown.

Turning the heat up! Preheat your pan. This will help both sides cook evenly. You don’t want your pan scorching hot but a nice little sizzle when you put the bread on is PERFECT! (A medium-high heat will works best)

Listen for that sizzle! Place your bread MAYO side down once & now put the cheese on. Layer upon layer, upon layer.. YUM! Once it is golden brown, FLIP IT!

What, WATER? In order to create that perfect melty center steam the inside (Do not fear, this will not make your soon-to-be perfect grilled cheese soggy). Place a couple of teaspoons of water on the hot pan with the grilled cheese, it will SIZZLE & that it fine! Quickly cover with a large pan lid or metal bowl (something that is high heat safe – that won’t melt of course)

Let’s Eat! Look at this, oyey-goey-melty-cheesy-goodness, YUM!


Filed Under: Featured, Recipes Tagged With: grilled cheese, grilled cheese recipe, mayo on grilled cheese, restaurant style grilled cheese

Mini Cinnamon Sticky Rolls

April 26, 2019 By Leah Leave a Comment

Transform a frozen loaf of bread dough into sweet and sticky cinnamon rolls in minutes with this simple recipe.  Gooey, warm, and full of cinnamon & nuts, these turn any breakfast or brunch into a special meal.  Even better, they take minimum effort and come together with easy ingredients.  The best part is – NO mixing up yeast dough. 

The hardest thing is remembering to set the dough out to rise the night before!

📍 Pin HERE for Later

What you need:

  • 1 loaf frozen bread dough
  • 1/2 c. corn syrup
  • 1/2 c. chopped pecans
  • 1 T. vanilla
  • 1 stick butter (split in half)
  • 1 T. cinnamon
  • 1/4 c. sugar
  • 1 – 24 ct. Mini Muffin Tin
  • Parchment Paper

Make it:

THE NIGHT BEFORE.  Place a piece of parchment on a cookie sheet.  Heavily spray with cooking oil.  Place a loaf of frozen bread dough on it.  Spritz more oil on top of the loaf and cover with another piece of parchment.  Place out the way for the night to thaw & rise.  I usually stick mine in the oven to keep it safe from pets!  Let rise for 8-12 hours so set out according to when you plan to bake the dough the following day.

Prepare pecan topping:

  • Very thoroughly spray the muffin tin with cooking spray.  Make sure each cup is well coated and the top of the pan as well.
  • Bring 4 T. (1/2 stick) butter, corn syrup, and pecans to a gentle boil over low heat in a sauce pan.  Boil for 3 minutes.
  • Remove from heat and add vanilla
  • Put approximately 1 t. of the pecan topping into each muffin tin

Prepare the rolls:

  • Preheat oven to 350° F
  • Lift the dough off the cookie sheet, keeping it on the parchment paper
  • Using a rolling pin or your hands flatten dough into a thin rectangle.  I prefer to do it with my hands.  Start in the middle and just work the dough outward.  It is very easy to work with and you can’t really hurt it! Aim for approximately 24″ long by 8″ deep.
  • Soften the remaining 1/2 stick of butter.
  • Spread into the dough rectangle
  • Combine cinnamon and sugar and sprinkle over the butter covered dough
  • Roll the dough, from the longest side into a tight roll.
  • Using a serrated knife (a bread knife is best) cut the dough roll into 24 equal portions
  • Place a dough round into each prepared muffin cup

  • Bake for 15-17 minutes until lightly browned and raised
  • Remove from oven.  Immediately place a piece of parchment paper on top of rolls
  • Put a cookie sheet over the parchment lined rolls and CAREFULLY turn over.  You are moving a very hot pan with very hot liquid sugar.  USE OVEN MITTS ON BOTH HANDS
  • After inverting, lift off muffin tin. The rolls will have pop out easily as long as you quickly flip them out while very hot.  If a few pecans stay in pan, just spoon them back on top!
  • Allow to cool slightly.  Serve warm

Recipe adapted from HERE


Filed Under: Featured, Recipes Tagged With: Breakfast, Cinnamon Rolls, Frozen Bread Dough, Sticky Buns

Instant Pot Hard Boiled Eggs, The 5-5-5 Secret!

April 20, 2019 By Leah Leave a Comment

Instant Pot Hard Boiled Eggs, The 5-5-5 Secret!

Whether you are making deviled eggs, egg salad or dying Easter Eggs you will not find an easier & faster way to prepare hard boiled eggs.

Cooking in your pressure cooker, the eggs are done in minutes! Using an easy to remember 5-5-5 method, believe me when I say you will never boil another pot of water for eggs again!

Not only are the eggs cooked PERFECTLY, they peel like a dream!

📌 Pin here for later

What you need:

  • Electric Pressure Cooker
  • 1 dozen eggs*
  • 1 c. water
  • Large Bowl, Water, & Ice

Making the eggs:

FIVE Minutes on High

  • Insert the metal rack into pressure cooker.  Layer eggs inside.  Add water.  Cover and seal.  Set timer to 5 minutes on HIGH pressure.
  • Using the large bowl, prepare an ice bath to rest cooked eggs in.  I also inserted a strainer to make removing the eggs easier after they are cooled.

FIVE Minutes to Release Pressure

  • Allow pressure to release for 5 minutes naturally.
  • Once 5 minutes has passed, carefully, using tongs or a wooden spoon, manually release the remaining pressure.  As an added precaution, cover the release valve with a towel to protect your hand from the steam. Remove lid from cooker

FIVE Minutes in an Ice Bath

  • Remove eggs, using tongs or an oven mitt and place into the ice water bath.  Allow to cool for 5 minutes.  Remove from water and peel.

* You can do more or less than 1 dozen eggs per batch.  I did 2 dozen with perfect results following the 5-5-5 method.

Check out this idea for coloring eggs

Mess Free Easter Egg Coloring!

Filed Under: Featured, Recipes Tagged With: Eggs, hard boiled, instant pot, pressure cooker

Mess Free Easter Egg Coloring!

April 14, 2019 By Leah Leave a Comment


Mess Free Easter Egg Coloring!

There are a few things as a parent that I just can’t do.  To be honest, they mostly revolve around events with the probability of large messes. Playdoh, glitter, finger painting, and the horror that is EASTER EGG COLORING!

Yup, I am not afraid to admit it, my kids have NEVER dyed eggs!  It scares the daylight out of me.  Food coloring, liquids, eggs, all I foresee is chaos and disaster!

Well, my fears were faced when my sister in law found this idea using rice.  We boiled some eggs, put on our Pinterest Mom Pants and went for it!  OH MY GOODNESS was this amazing.  No messes, no liquid food coloring cups to spill, and no smelly vinegar.  NOTHING to worry about.

We had a mix of kids from age 3 – 13, plus lots of adults.  Everyone of all ages enjoyed this and loved mixing the colors and getting unique results.

When I say no mess, I am not joking.  After dying 48 eggs, we picked up a few random pieces of rice.  Not a single drip of food coloring, no sloppy newspapers on a table, zero ruined clothes – absolutely nothing to stress over.

📍 Pin HERE for Later!

What you need:

  • Sandwich Size Ziplock Bags
  • White Rice (long grain or instant works)
  • Liquid Food Coloring
  • Hard Boiled Eggs (check out our tips HERE)
  • Cooling Rack

Make the Eggs:

  1. Fill baggies with about 1 c. of rice (we did 15 bags; but you can do as many or as few as you want)
  2. Add 15 drops of color to a bag
  3. Add 1 egg to baggie
  4. Remove the air and seal bag
  5. Gently shake, knead, and toss the bag around until the egg is colored.  The longer you mix, the more color is on the egg.
  6. You can use tongs or just roll the egg out of the bag onto a cooling rack to dry.  If you touch with your bare fingers, you will get VERY colored fingers because the eggs are still wet.  Allow to dry for about 20 minutes.

  • You can put the egg into a different color of rice and get a beautiful mixed color egg.
  • We did mix some of the rice colors together in a bag and got very fun results.  The options are limitless.
  • About every 3 eggs we needed to refresh the food coloring with a few more drops to keep vibrant colors.
  • It is HIGHLY recommended to keep an adult on food color patrol to keep spills and over pouring at a minimum; plus making sure each bag is properly resealed is vital!

Note: Remember you are using undiluted food color.  Anything that comes into contact with the wet eggs will be heavily dyed!  We did have a few dyed fingers!

I would not cook and eat the rice.  With the volume of food color it would be quite the pot of gray!  You can dry the rice and use it for a sensory table activity.

Filed Under: Featured, Recipes Tagged With: Dye Easter Eggs, Easter, Easter Eggs

Banana Bread Pancakes

April 10, 2019 By Leah Leave a Comment

Banana Bread Pancakes

What do you do when you leave for a week long vacation and forget you have bananas on the counter?  You make banana bread since you have 6 VERY VERY ripe bananas on your counter now! Because I didn’t feel like messing with the long bake time required for a loaf of bread, I decided to give banana pancakes a try!

This recipe includes oatmeal which makes for a nice, hearty texture pancake, plus adding a handful of blueberries gives these simple flapjacks a boost of sweetness.  You can even top with a dollop of vanilla yogurt instead of syrup for a tangy twist!

📍 Pin HERE for Later!

What you need:

  • 2 c. pancake mix
  • 1/2 quick cook oats
  • 2 t. baking powder
  • 2 t. cinnamon
  • 1/4 t. nutmeg
  • 3 medium ripe bananas, mashed
  • 2 eggs, lightly beaten
  • 1 T. vanilla
  • 2 c. buttermilk (see below for a substitution trick)
  • blueberries or pecans if desired

Make it:

  1. Mix together pancake mix, oats, spices, and baking powder.
  2. Combine bananas, eggs, vanilla and milk
  3. Stir wet and dry together, do not over mix.
  4. Allow batter to rest while griddle preheats
  5. Ladle batter into buttered griddle heated to medium/low or 350° if using an electric model.  Sprinkle on blueberries or pecans if using
  6. Once batter starts to bubble, flip.  Cook on other side 2 minutes or until set.
  7. Remove and serve with butter and syrup.

The left over pancakes can be froze for later use.  I like to reheat them in the toaster.

Don’t have buttermilk on hand?  Did you know you can make your own with regular milk + lemon juice or vinegar?  Here is the simple substitution:

1 T. Lemon Juice or Vinegar
Add to a measuring cup
Level measuring cup to 1 c. using milk.
Allow the milk and acid to sit while mixing up the other ingredients.

Recipe adapted from HERE

Filed Under: Featured, Recipes

French Onion Meatballs

March 13, 2019 By Leah Leave a Comment

French Onion Meatballs

This delicious main dish tastes just like a bowl of hot, gooey cheese covered French Onion Soup!  The ground chicken makes for a very tender and mild meatball that soaks in all the amazing french onion ‘soup’ gravy.  I served this with roasted potatoes to soak up every bit of caramelized onion goodness! Because I was so excited to try this dinner, I forgot to snap a photo of the finished plate!  So until I make it again, (yes I am FOR SURE making it again) the pan of simmering meatballs will have to do!

📍 Pin here for later

What you need:

Meatballs:

  • 1 lb. ground chicken (or turkey)
  • 1/2 c. shredded Swiss cheese
  • 1/4 c. bread crumbs
  • 1 large egg, beaten
  • 1 Tbsp. (1 clove) minced garlic
  • 1 tsp. salt
  • Freshly ground black pepper

French Onion Gravy:

  • 4 tbsp. butter
  • 2 large onions, sliced
  • 1 Tbsp. (1 clove) minced garlic
  • 2 c. beef broth
  • 2 tsp. freshly chopped thyme*
  • salt
  • Freshly ground black pepper
  • 1 1/2 c. shredded Swiss cheese

Make the Meat Balls:

  • Preheat oven to 400° F.  Line a baking sheet with parchment paper and lightly grease the paper
  • In a bowl, combine ground chicken, cheese, bread crumbs, egg, garlic, salt and pepper.
  • Form into 12 meatballs and place on a baking sheet.  Bake until golden and cooked through.  About 20 minutes.

Make the gravy:

  • While meatballs are baking:
  • Over VERY low heat add onion and butter.  Caramelize the onions for about 25 minutes stirring occasionally and cook until deep golden brown and tender.
  • Add minced garlic and thyme.  Cook 5 more minutes
  • Add broth, salt, pepper and increase heat to med/low.
  • Bring to a boil, lower heat, and reduce for about 10 minutes or until slightly thickened.
  • Add cooked meatballs and heat them back through.
  • Top with remaining shredded cheese and allow to melt.

*Rather than chopping the thyme, I just tossed in a few sprigs with the onions as they cooked and let them simmer in the broth.  Just remove the stems before serving!


Recipe adapted from HERE

Check out these other dinner ideas too:

Chicken & Stuffing Casserole

Keto Friendly – Low Carb Shepherd’s Pie

Filed Under: Featured, Recipes, Uncategorized Tagged With: Dinner, French Onion, Meatball

Streusel Coffee Cake

March 10, 2019 By Leah Leave a Comment

Streusel Coffee Cake

Whenever we do a family brunch, you will find this coffee cake on the menu.  For as long as I can remember, this was my mom’s signature ‘dish to pass’.  It always looks beautiful, cuts and serves perfect and pleases the masses.  Little did I know it was made with a cake mix and comes together in minutes!  Now I find myself making it often and loving how simple it is!

Starting with a cake mix and adding just a few extra ingredients, you end up with a mildly sweet, tender cake with a tasty fruit swirl and perfect streusel crumb topping.  Serve this up with your next breakfast and everyone will be impressed with this easy coffee cake.

📍 Pin HERE for later

What you need:

  • 1 yellow cake mix
  • 1 c. flour
  • 1 packet active dry yeast (1/4 oz.)
  • 2/3 c. warm water
  • 2 eggs – slightly beaten
  • 2 Tbsp. sugar
  • 1 Tbsp. vanilla extract
  • 1 – 21 oz pie filling (any variety i.e. cherry, blueberry, apple)
  • 5 T. butter melted

Make it:

  • Preheat oven to 350° F
  • Grease a 9 x 13 Pan. (I prefer a glass pan)
  • Add 1 1/2 c. of cake mix (reserve rest for topping), flour, sugar, and yeast to a bowl.  Lightly mix.
  • Add water, vanilla and eggs.  Using an hand mixer, stir until a thick dough forms.
  • Spread into prepared baking pan.  Dough is thick, but can be spread evenly in pan.  An offset spatula works best!
  • Top evenly with pie filling.  I used a cherry/blueberry mixed can.

Prepare topping:

  • Mix reserved, remaining cake mix and melted butter.
  • Using your fingers, put small dollops of the topping all over the cake.  Do not cover completely – you want little spots peeking through with fruit filling.

Bake it:

  • Bake for 35-40 minutes at 350° F.  Turn the pan half way through.  The edges of the cake will be just brown and pull away from the sides of the pan.  A glass pan makes it easier to watch the color of the cake because the topping won’t darken much in the oven.
  • The cake will rise in spots creating bubbles and valleys.  Don’t worry – this gives it a very nice appearance when cut and served!
  • Remove from oven and allow to cool completely.
  • Optional: Drizzle with a powdered sugar glaze if desired.


Ice coffee make a refreshing accompaniment to this!

Make Your Own Cold Brew Coffee

Filed Under: Featured, Recipes Tagged With: Breakfast, Brunch, Cake, Cake Mix, Coffee Cake

  • « Previous Page
  • 1
  • …
  • 3
  • 4
  • 5
  • 6
  • 7
  • …
  • 33
  • Next Page »

{ Your info will never be shared because spam stinks }

Archives

Deals

Walgreens Photo: FREE 8X10 Photo Print – Valid through 6/15

Target: Crayola Supertips 20ct Pastel Markers ONLY $3.49

Target Circle Deal: $1 Women’s flip flops

Target: Sun Squad Inflatable Lounge Pool Float $5.00 (Reg. $10.00)

72% Savings! 3-Pack 2.5-inch Blue & Orange Squeaker Toy Dog Balls

More Deals

Coupons

75% Off! 5×7 or 8×10 Wood Panel Photo Prints

Hellmann’s (Unilever) Sign UP Rewards! $5 towards your next purchase + Get exclusive details about new products, recipes & savings

Kohl’s Last Minute Gift Sale – Valid thru 12/24

EXCLUSIVE OFFERS: Additional 10% off ALL these sale prices!

Have you tried Mike’s Popcorn? If not, you are MISSING OUT!

More Coupon Posts

Sweeps & Giveaways

Merry Christmas Giveaway – 2 Hatchimals & One Nintendo NES

Win A Zoo Pass From Zoological Society Of Milwaukee!

Culver’s Cow Tippin’ Instant Win Game!

WIN a Dream Vacation from Club Med!

WIN a Trip to the Indy 500 from Craftsman (2 Tickets, Airfare, and Hotel Included)

More Sweeps & Giveaways

Copyright ©2025, Midwest Coupon Clippers. All Rights Reserved. Site by Pixel Me Designs