Midwest Coupon Clippers

Cudding Coupons and Saving You Some Moolah

  • Home
  • Coupons
    • Newest Coupons
    • Coupons.com
    • Red Plum
    • Smart Source
    • Hopster
    • Saving Star
    • Coupon Database
  • Deals
    • Amazon
    • eBates
  • Freebies
  • Sweeps & Giveaways
  • Store Match-ups
    • Midwest Matchups
      • Copps/Pick n’ Save
      • Festival
      • Menards
      • Piggly Wiggly
    • Nationwide Matchups
      • CVS
      • Dollar Stores
        • Dollar General
        • Dollar Tree
        • Family Dollar
      • Target
      • Walgreens
      • Wal-Mart
  • This & That
    • Recipes
    • Around the House
    • Money Saving Tips
    • Get Organized
    • Disney
    • Pets
    • Gardening
  • About
    • Contact
    • Disclosure

Design Your Own Plates!

August 16, 2013 By Micki 1 Comment

Let your child design their own plates!

Supplies Needed:

Dollar Store Plate (white – Porcelain)

Sharpie Marker (any color!) – We researched and Sharpies are in fact NON TOXIC.

Oven set at 425* for 30 minutes


I have a 3 (soon to be 4!) year old son that loves doing arts & crafts with me.  Recently we were at the dollar store and I passed by the dishware.  They have nice, white plates for only $1 each so I thought we would give this a shot!

I purchased one white plate from the Dollar Store.  Make sure it’s white so they can draw on it all over!  I’m sure you could buy ones that have color & designs on the side also!  Also make sure you have a sharpie marker.  We used plain black because that’s all my store had and I wanted to see how this worked before using colored ones.

I let my son draw whatever his little heart desired.  (I did write his name and the year on it.)  While he was working on his masterpiece, I pre-heated my oven to 425*.  When he was completely finished, I let the plate sit for about 15 minutes to allow the marker to dry completely.  After that, I stuck it in the oven for 30 minutes.  Set your kitchen timers!  When the 30 minutes is up, turn off your oven and allow your plate to sit in there and cool completely.

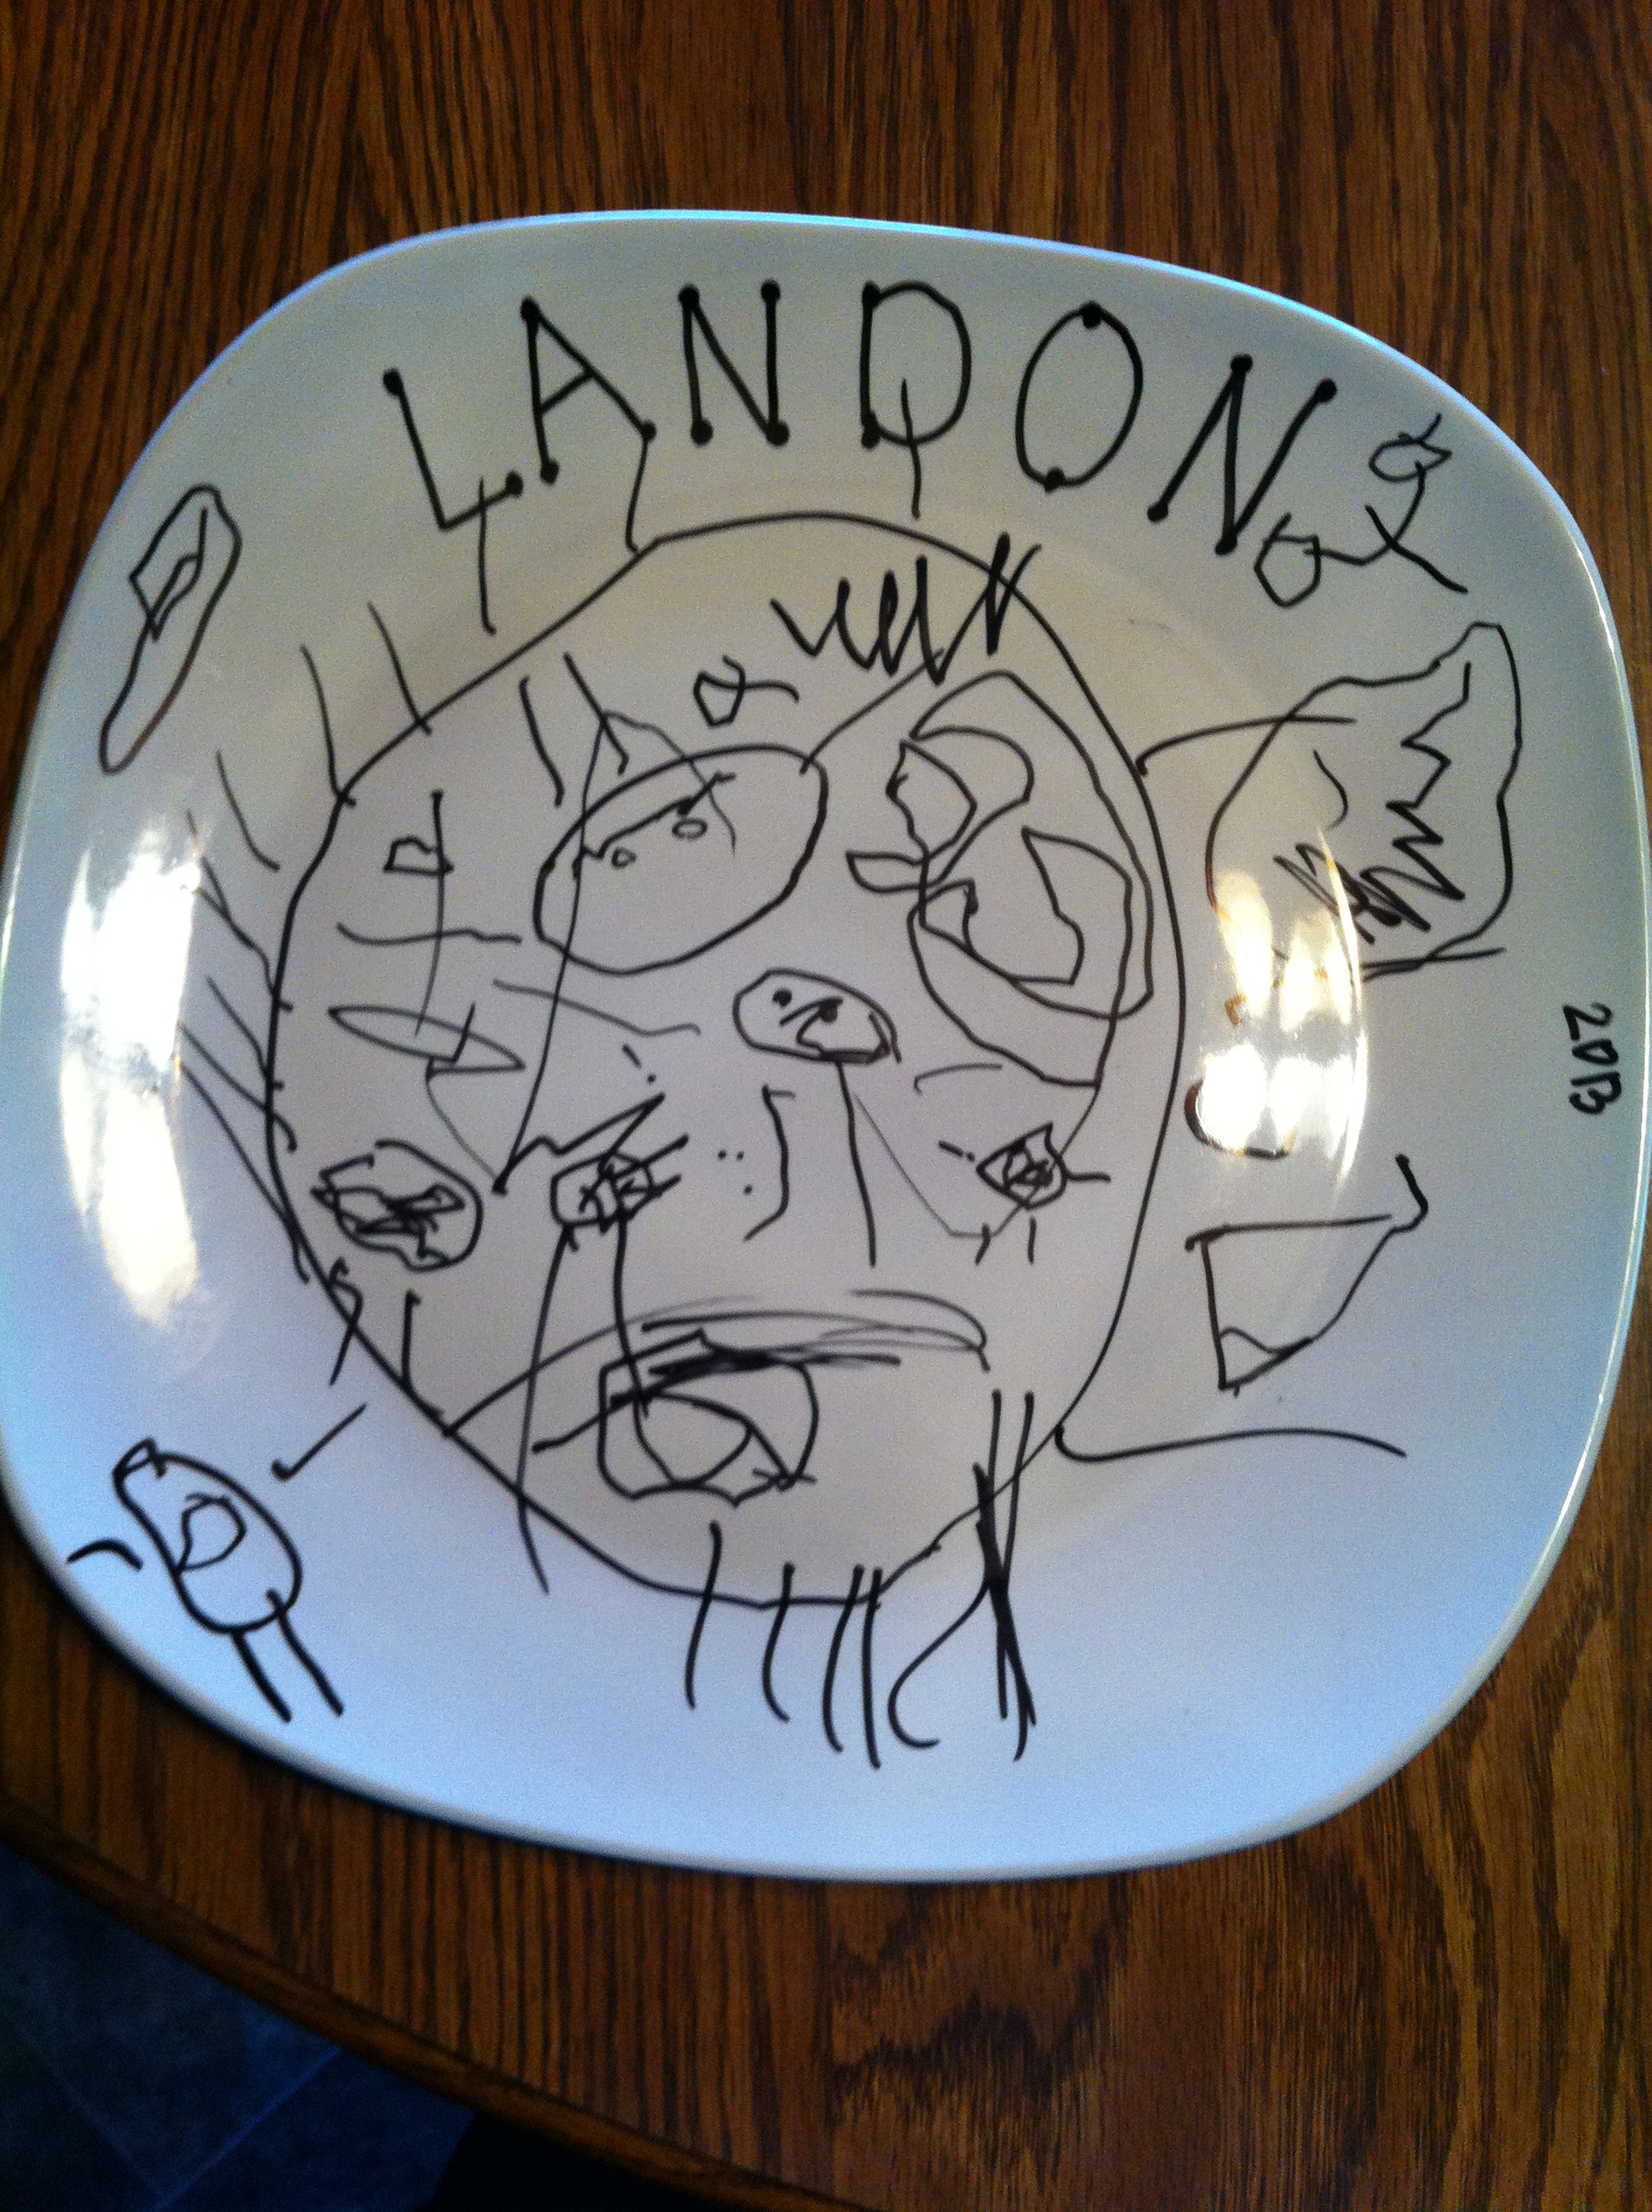
His finished project!

Filed Under: Fun for the Family, This & That, Uncategorized

How to Remove Stubborn Carpet Stains

August 12, 2013 By Micki Leave a Comment

How to Get Those Stubborn Carpet Stains Out for GOOD!

Products Needed:
(1) Empty Spray Bottle

(1) Iron (Set on the highest setting)

(1) Bottle Vinegar

Hot Water

Mix the HOT water and vinegar (equal parts) into the spray bottle

 If your house is anything like mine, carpet stains happen all the time.  They are especially frequent in my house because of my very light carpet.  Combined with a 3 year old and a 1 year old, it’s a constant battle.  I’ve been searching for the perfect carpet spot cleaner for years and I haven’t found anything that really works.  I have given up on store bought cleaners because they just don’t cut it!

Recently my 3 year old spilled a very full cup of red Kool-Aid.  Yup, right in my living room on the very light carpet. This has to be every parents nightmare because as we all know, Kool-Aid never comes out!  It was there for almost two months until I found something that worked, and I want ALL parent’s/care givers to see this! Yes, it works!

My son’s wonderful Kool-Aid stain.

As seen in the picture above, I used an empty spray bottle with a mixture of very hot water and vinegar (equal parts).  I sprayed the stain so it was soaking wet.  After that, I took a white towel (make sure it’s white, you don’t want anymore color to transfer into your carpet!) and laid on top of the stain.  Turn your iron on to the highest setting and then on top of your white and rub back and forth.  Like magic, you will see your nasty stain come right UP into the towel!

It’s a miracle! After doing this for about a half hour, it looked like this!(keep re-spraying the stain when needed, moving the towel around so you get every part of the stain)

I continued the process of spraying and ironing on the white towel until it was completely gone!  You may need more than one white towel, depending on how large your stain is!  I have now used this on other stains and it always works!


Filed Under: Around the House, Pets

The Perfect Hanging Baskets for a Few Dollars (Tips & Tricks)

July 3, 2013 By Micki Leave a Comment

Beautiful Hanging Baskets that Cost a FEW Dollars

Have you ever bought a gorgeous hanging basket in full bloom in the early spring only to be disappointed in a short time later when it is past it’s prime already? Well, here is how to grow your own for just a few dollars, that will be beautiful long after some of those expensive ones have headed to the dumpster.

First you need to get a good quality hanging basket. I buy mine at the end of the season clearance at Walmart or a home supply store like Home Depot. Get a good quality heavy duty one that will last for many years. I have had mine for about 10 years now, and have only had to fix a couple of the hanging hooks on them, and replaced the coco liners a couple of times. ( On a side note, I always buy liners at the end of season clearance, too.)

I have found that a 16” basket is a perfect size for me, and will hold moisture for a good amount of time.

Line the bottom of the basket (on top of the coco liner) with a piece of cardboard, that fits in the bottom of the basket, and goes up the sides a bit. This helps to keep moisture in the basket. (I live in a rather windy area out in the country). We also have a farm, so I put a bit of manure and dirt mix in the bottom of the basket.

Then I fill the basket almost to the top with good quality potting soil(also purchased at the end of season clearance).

I have found that although there are many annuals available that are very pretty, the very best for a beautiful yet low maintenance hanging basket are the Wave Petunias. (Not regular petunias-they must say Wave). Wave Petunias do not have to be dead-headed, withstand cool or high temps well, are available in a wide array of colors and are very disease and pest resistant. I usually pay about $4-5.00 for a 6-pack of them. Three plants per 16” planter works perfectly and then I add a Sweet Potato Vine. For larger baskets, 4 petunias would be better, and for 14” baskets 2 plants is good.

Sweet Potato Vines can usually be purchased for about .75-$1.00 each. Next year, since I have a dozen hanging baskets on my porch around my house, plus a few planters on the garage and chicken coop, and a few pots scattered around the yard, I am going to purchase a couple of packages of a dozen sweet potato slips from a nursery supply company/seed catalog, such as Henry Fields or Gurneys. They are usually less than .50/plant. There are many colors/varieties of sweet potato that complement your choice of Wave Petunia. This year I have lime green, dark purple, and tricolor vines in my planters.

After putting the plants in the baskets, top off the basket with a little more soil. Water well and hang in desired location. Since I try to start mine as early as possible, I usually hang them in a protected area for a couple of weeks, to keep them safe from frost. Petunias can handle a light frost with minimal damage, but sweet potato vines are very susceptible to frost damage.

Water the pots every day in the summer, depending on the weather and fertilize with Miracle Gro about once a week. It takes a little time to get full pots, but at the time when the other baskets are fading in beauty, yours will be just beginning and will just get better and better until frost. And best of all, you will have spent only a couple of dollars per basket.

~ Hannah from Hannah’s Homestead

If you liked this Post, You will also like “Saving with Perennials”

Filed Under: Gardening, Miscellaneous, Uncategorized

BBQ Kielbasa Sausage Recipe

June 27, 2013 By Micki 5 Comments


BBQ Kielbasa Sausage

Here is a Simple, QUICK recipe I like to throw in the crock pot in the Morning so it is ready for supper. My picky eaters in my household even like it! If you forget to put it in the crock pot in the Morning (Like I did today) you can also make it on your stove top!

Update: Since originally blogging this, I have now started to add strips of Green Peppers. YUMMY!

Ingredients:

  • 2 Packages of Polish Kielbasa Sausage or Smoked Sausage
    We always have leftovers, and it tastes even better the second day!
  • 1 Sweet Vidalia Onion & 1 Green Pepper
  • 2 Small BBQ Sauce (I always use Sweet Baby Ray)
  • Optional:
  • Grape Jelly
  • Brown Sugar
  • Crock Pot

Directions:

Step 1) Slice sausage into one inch chunks. (Chop onions & Peppers as you prefer, We like ours bigger and chunky. WE ARE NOT big onion fans, but it ads to the flavor and once it is done, you eat them both together, sausage and onion in one bite and you can not taste the onion)

Step 2) In Crock Pot or Pan mix onions, peppers, sausage, and both bottles of BBQ Sauce. Before you start stirring… Take both empty BBQ Sauce bottles, fill both half to 3/4 of the way with warm water, put the top back on and shake, then add that to your mixture. (This helps thin it down a bit, you do not want it to thick)

Step 3) Gently fold everything together. DO NOT MIX hard or you will break the skin off of the sausage.

Optional:

  • 2 tbsp. Grape Jelly (Helps take that vinegar take your breath away reaction of bbq sauce away, sweetens it, and helps the sauce stick better to the sausage)
  • Brown Sugar (For a Sweeter Taste)

Step 4: Simmer on low in your crock pot six to eight hours.
(If you are cooking on  your stove top in a pan, Put on medium heat for two hours stirring often)

Simple as that, Enjoy!

Filed Under: Recipes

Apple Snicker Fluff Salad

June 26, 2013 By Micki Leave a Comment

Apple Snicker Fluff Salad

Ingredients:

  • 6-8 medium (or 4-6 large) apples — I prefer Granny Smith, but any apple will work
  • 1 small pkg vanilla instant pudding (cheesecake, white chocolate or french vanilla flavors also work well)
  • 1 cup milk
  • 1-6pk of FROZEN Snickers candy bars
  • 16oz Cool Whip
  • Optional: Can of drained, crushed pineapple (helps apples from turning brown)

Preparation:

1.) Whisk pudding and milk together in a large mixing bowl until thickened (2 minutes)

2) Fold Cool Whip into pudding mixture 8oz at a time until thoroughly combined

3) Put frozen Snickers bars into food processor and process until crushed (or place unwrapped bars in a gallon sized ZipLoc bag and pound with hammer or meat tenderizer until crushed well)

4) Fold crushed Snickers bars into cool whip mixture until well blended

5) Slice apples off of core and dice into bite sized pieces (I leave peel on, but you can peel them if you like)

6) Put diced apple pieces into cool whip/snickers mixture.

7) Mix well and enjoy!!

8) Leftovers (if there are any ) should be placed in an air-tight container and stored in the refrigerator for up to 4 days.

Filed Under: Recipes

Home Made Fabric Freshener

June 6, 2013 By Micki Leave a Comment


How to make your own Home Made Fabric Freshener!

We’ve had to watch our budget and I had to find a way to keep my house smelling FRESH!
This is what I’ve found to make the most PERFECT  fabric freshener!

Here’s what you’ll need:
1/8 cup of liquid fabric softener (You can use ANY kind you like , I personally like the lavender Gain)
2 table spoons of baking soda
&
hot tap water

Directions:
Mix all three ingredients together in the bottle and shake for about a minute.

Spray your fabrics with it and enjoy!


Filed Under: Around the House, Family Savings, Miscellaneous, This & That

Protein Shakes

June 4, 2013 By Micki Leave a Comment

Protein Shakes

Who said protein shakes have to taste like chocolate covered chalk? The best thing about the powder shakes is that you can mix them up with easy to find ingredients! From pumpkin in a can to fresh berries and bananas! With this many recipes, you will never get sick of the flavor and will be on your way to a new you! When shopping for protein powder, the prices scare me. I tend to stick to whatever is on sale. I tend to stay away from anything that costs more than $15 that’s not on sale. Flip through your local drugstore flyers and see what they have on sale. Also, GNC usually has a buy 1 get 1 free sale on their brands. If you can’t find anything on sale, store brand works just as well! You can mix your shakes with skim milk, however, I mix mine with silk due to lactose sensitivity plus it adds extra flavor (I buy the vanilla), you can also use ice cold water if you want to cut out a few calories! You don’t need a fancy blender bottle (okay so I know they aren’t fancy, but all you see are people walking around with them, they tend to drink just plain jane shakes!) You can use whatever cup you want, including a martini glass to dress it up! You also need a blender, and yes, I know most people have one! It doesn’t have to be the top of the line blender, mine is a $15 blender from Wal-Mart that works just fine for me!

Coffee Shakes – I use instant coffee in mine, but you can also use brewed coffee that is cold, or another tip, make coffee ice cubes and kill 2 birds with 1 stone!


Vanilla Frappe

1 – 2 scoops of vanilla protein powder

2/3 C. of Vanilla Almond Silk (Check their site for coupons!)

4 – 5 ice cubes

A packet of instant coffee (a good use for those freebies!)

Add all of this in the blender and let it rip! I usually blend mine for a minute. Pour into your glass of choice and enjoy!


Mocha

1 – 2 scoops of chocolate protein powder

2/3 C. of Chocolate Silk (you can also just use vanilla, or plain skim milk, this just adds extra chocolate J )

4 – 5 ice cubes

A packet of instant coffee

Do the usual and blend it up! See these recipes are very easy and fast!


Caramel Frappe (vanilla or chocolate!)

2 scoops of the flavor you want

1 C. Milk of choice

1 Packet of Nescafe Memento Caramel

4 – 5 ice cubes

If you want extra flavoring, you can also use a caramel coffee creamer, just add about 1 serving

Blend and enjoy J


Mocha Mint Frappe

2 scoops of chocolate protein powder

2/3 C. milk of your choice

1 drop of peppermint extract

1 packet of instant coffee

4 -5 cubes of ice

Blend and go!


Pumpkin Coffee

2 scoops of vanilla protein powder

2/3 C. milk of choice

¼ C. of canned pumpkin (not pumpkin pie mix)

1 packet of instant coffee

1 to 2 tsps. of cinnamon, depending on your taste.

1 packet of Truvia or your choice of sweetener

4 – 5 ice cubes

Blend and go!


Cinnamon Cappuccino

2 scoops of vanilla protein powder

2/3 c. of milk of choice

1 packet of instant coffee

1 or 2 packets of your choice of sweetener

A few shakes of cinnamon

4 – 5 ice cubes

Blend and go!


Hazelnut Coffee

2 scoops of vanilla protein powder

2/3 c. of milk of choice

1 packet of instant coffee

1 tbsp. of hazelnut creamer

Blend and go!


Gingerbread Latte

1 – 2 scoops of vanilla protein powder

2/3 c. milk of choice

½ tsp. cinnamon

1/4 tsp. ground ginger

½ tsp. vanilla extract

2 packets of a sweetener of your choice

1 packet of instant coffee

4 – 5 ice cubes

Blend and go!


Chocolate Shakes – for those who have a sweet tooth that is preventing them to lose weight!

Chocolate Covered Strawberries

2 scoops Chocolate protein powder (or you can mix it up, 1 scoop chocolate and 1 scoop strawberry!)

A handful of frozen strawberries (there’s that killing 2 birds with one stone again!)

3/4 C. Milk of choice or water

Blend and go!


Chocolate Mint Shake

2 scoops chocolate protein powder

2/3 c. milk

1 drop peppermint extract

3 – 5 ice cubes

Blend and go!


Banana Chocolate Shake

2 scoops Chocolate protein powder

1 frozen banana (tip: peel, slice the banana, and wrap in saran wrap and freeze)

2/3 c. milk

Blend and go!


Berries and Chocolate

2 scoops chocolate protein powder

1 ½ c. frozen berries

2/3 c. milk

Blend and go!


Chocolate PBanana

2 scoops chocolate protein powder

1 frozen banana

1 tbsp. low fat PB

2/3 c. milk

Blend and go!


Caramel – Chocolate Shake

2 scoops chocolate protein powder

2 tbsp. caramel coffee creamer

2/3 c. milk

3 – 5 ice cubes

Blend and go!


Red Velvet Cake (Thanks to the Shake N Steak flyer)

1 scoop vanilla protein powder

2 scoops chocolate protein powder

2 tsp. of Jell-O Cheesecake powder

1 tsp. vanilla extract

¾ C. milk of choice

3 drops of red food coloring for the “red velvet” color

3 – 5 ice cubes.

Blend all together and go.

Filed Under: Recipes

Saving with Perennials

June 3, 2013 By Micki 2 Comments

$$ Saving with Perennials $$

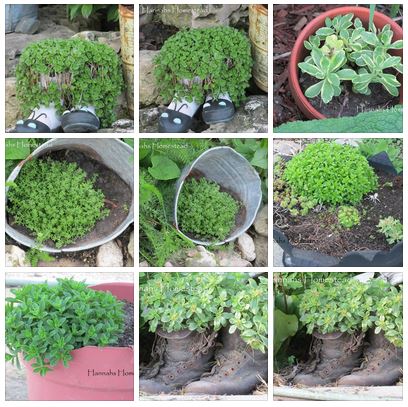
Did you know that you can grow perennial plants in pots and planters? Instead of going out and purchasing expensive annuals every year, think about filling those pots with plants that will come back year after year. You could fill half of the pot or planter with a perennial and then put an annual in part of it, too. I have successfully grown sedum(many varieties), hosta, daylily, veronica, creeping phlox, black eyed susans and more in pots.

I use old metal pails, old boots, clay pots, and old cattle watering troughs to grow my plants in. I have also used an old, large branch from a downed tree, hollowed out part of it, filled it with dirt and planted hosta and sedum in that, too. I make sure that I fill the pot with a mix of good dirt, manure/organic matter, and potting soil. Fertilize plants once in a while and they will give you many years of pleasure! I leave my pots outdoors all year around and they have successfully come back every spring.

~ Hannah from Hannah’s Homestead


Filed Under: Family Savings, Gardening

How To Delete Cookies

June 1, 2013 By Micki Leave a Comment


One question we get frequently is:
How do I delete my cookies?

GREAT SITE that explains how to Delete your Cookies!
Deleting your cookies not only speeds up your computer and is a plus for security,
but it also allows you to see coupons that may be reset!
http://kb.iu.edu/data/ahic.html

Filed Under: Coupons, Miscellaneous, Newest Coupons, This & That Tagged With: Computer Cookies

Natural Way to KEEP SPIDERS AWAY Outside

June 1, 2013 By Micki Leave a Comment

Natural Way to KEEP SPIDERS AWAY Outside

You will need:

White Vinegar
Coconut Oil
Spray Bottle

Directions:

  • Pour 12 ounces of vinegar in the spray bottle.
  • Add one tablespoon of coconut oil and mix well.
  • Remove ALL visible cob webs with a broom.
  • Spray the area good with the mixture. Make sure you do key areas like around lights outside doors.
  • Repeat after rainfall.


Filed Under: Around the House, This & That

  • « Previous Page
  • 1
  • …
  • 25
  • 26
  • 27
  • 28
  • 29
  • …
  • 33
  • Next Page »

{ Your info will never be shared because spam stinks }

Archives

Deals

Summer Cyber Days at Kohl’s – Daily Deals & FREE Shipping for Everyone

Target Circle Week! July 6th to the 12th

Walgreens Photo: FREE 8X10 Photo Print – Valid through 6/15

Target: Crayola Supertips 20ct Pastel Markers ONLY $3.49

Target Circle Deal: $1 Women’s flip flops

More Deals

Coupons

75% Off! 5×7 or 8×10 Wood Panel Photo Prints

Hellmann’s (Unilever) Sign UP Rewards! $5 towards your next purchase + Get exclusive details about new products, recipes & savings

Kohl’s Last Minute Gift Sale – Valid thru 12/24

EXCLUSIVE OFFERS: Additional 10% off ALL these sale prices!

Have you tried Mike’s Popcorn? If not, you are MISSING OUT!

More Coupon Posts

Sweeps & Giveaways

Merry Christmas Giveaway – 2 Hatchimals & One Nintendo NES

Win A Zoo Pass From Zoological Society Of Milwaukee!

Culver’s Cow Tippin’ Instant Win Game!

WIN a Dream Vacation from Club Med!

WIN a Trip to the Indy 500 from Craftsman (2 Tickets, Airfare, and Hotel Included)

More Sweeps & Giveaways

Copyright ©2025, Midwest Coupon Clippers. All Rights Reserved. Site by Pixel Me Designs