Midwest Coupon Clippers

Cudding Coupons and Saving You Some Moolah

  • Home
  • Coupons
    • Newest Coupons
    • Coupons.com
    • Red Plum
    • Smart Source
    • Hopster
    • Saving Star
    • Coupon Database
  • Deals
    • Amazon
    • eBates
  • Freebies
  • Sweeps & Giveaways
  • Store Match-ups
    • Midwest Matchups
      • Copps/Pick n’ Save
      • Festival
      • Menards
      • Piggly Wiggly
    • Nationwide Matchups
      • CVS
      • Dollar Stores
        • Dollar General
        • Dollar Tree
        • Family Dollar
      • Target
      • Walgreens
      • Wal-Mart
  • This & That
    • Recipes
    • Around the House
    • Money Saving Tips
    • Get Organized
    • Disney
    • Pets
    • Gardening
  • About
    • Contact
    • Disclosure

Nick Jr Birthday Club

April 23, 2014 By Heather Rodefer Leave a Comment

bday club

Nick Jr Birthday Club

Sign up now HERE for the Nick Jr Birthday Club and receive a personalized birthday phone call from your favorite Nick Jr character plus much much more!!!

nick junior birthday club

Filed Under: Freebies, Uncategorized

How to Play Duck…Duck…Goose on Coupon Clippers Facebook Page

April 23, 2014 By Micki Leave a Comment

how to play duck duck goose

How to Play Duck…Duck…Goose on Coupon Clippers Facebook

Ready to play Duck…Duck… Goose on Coupon Clippers Facebook Page?  And yup, WE WERE the FIRST page to start this game THREE years ago, developed by our very creative admin. Rita! It really is very simple!

How to Duck:

Randomly, at anytime when our Facebook Page is busy with fans commenting and liking on our posts, Donald Duck (Image above) will pop up on our page.

When you see the image above Pop Up, Comment “Duck” under the Photo. Every 10 comments, you can comment duck (Example of a previous Game below)

duck duck goose comments

Now remember, You can Duck every ten fan comments…Any more and you will be disqualified. For example… Jean commented at 8:02, after ten more people comment “Duck” she can comment “Duck again.” Warning: DO NOT OVER DUCK… if you do it to fast, Facebook will comment block you for commenting to fast in to short of time.

How you get “Goosed”:

At anytime… You can get “Goosed” (Example below) I will “Goose” someone and hyperlink their name (so they get a notification) In this comment I will not only hyperlink your name saying you have been goosed… but I will also put a link for you to go and put your email address in a blog comment and state you have been “Goosed”. YOU MUST DO THIS in 3 minutes or less! If you do not leave your email address and let us know you were “Goosed” in the required time we will start Ducking and goose a new member.

duck duck goose hyperlinkTips:

  • Be Patient – Sometimes facebook hides comments. (When you comment Duck) so we have to unhide them. NO WORRIES, if you commented Duck, it is there, it just may take us a few minutes to unhide them, but know WE DO SEE THEM. When we play Duck…Duck… Goose… we always have at least three admins. helping… One unhiding comments, one watching to make sure everyone follows the rules, and one watching for us to Goose someone and verify the winner.
  • Our “Commercials Count as a Duck” –  While playing you will see what we like to call “Our Commercials” (example below) you are not required to click on them (we do not mind if you do though, and it helps pass the time), they do count towards “Ducks” when you are waiting for the next ten comments.

duck duck goose ads

  • When & Why – We never have a set time to play, but a helpful tip would be to BE ACTIVE on our page when you see a post of ours. Like or comment. The more active our page is during the day, the more likely Donald will pop up with some fun prizes to win. (When fans are active liking and commenting, it lets us know a lot of you are out there at that time, and what better time to play a fun game!)
  • Hint – Sometimes… NOT ALWAYS… but sometimes we will give you a hint Donald just may be coming around! So if you see this picture (example below) chances are good he is about to make an appearance in the next hour or so 🙂

donald duck smallThats it! Sound like fun? Come on over to Wisconsin Coupon Clippers Facebook page and have some fun!


Filed Under: Miscellaneous, Uncategorized

Freebies, Freebies, Freebies (Pampers and P&G)

April 21, 2014 By Micki Leave a Comment


freebies from pampers and p&gFreebies, Freebies, Freebies

(Pampers and P&G)

We often get asked, “HOW DO YOU GET SO MANY FREEBIES?” Here are two of our Favorite Places.

Pampers Gifts to Grow and P&G Everyday!

P&G Everyday

With P&G Everyday, you can not only print RARE Exclusive Member Only Coupons, but you can also claim Quarterly FREEBIES! Everything is COMPLETELY FREE! Go HERE to become a FREE P&G everyday Member.

Pampers Gifts to Grow

With Pampers Gifts to Grow, If you have a child or not, collect the “Pampers Points” that we posted OFTEN on our page when they are available. As you collect points, you can redeem them for some Neat FREE Gifts. Some examples would be Shutterfly, or awhile ago you could get that Freebie Pack in the Photo above, full of P&G products for ONLY 400 Points! Go HERE to become a FREE Pampers Gift to Grow Member.

Filed Under: Freebies, Uncategorized

Craft Project: Stuffed Easter Treat Gifts

April 18, 2014 By Micki Leave a Comment

stuffed easter treat gifts

Craft Project: Stuffed Easter Treat Gifts

Items Needed:

  • Scrapbooking Paper Construction
  • Paper Ziploc Bags (sandwich size)
  • Easter Candy (we used jelly beans & M&M’s)
  • Hot Glue Gun
  • Glue Sticks Elmers Glue Scissors

brooke 2

Directions:

  • Start by making patterns out of construction paper. We made an egg, bunny, and chick. Size can vary, just big enough that a sandwich sized ziploc bag can be the belly. If you have a Cricut machine, you can use that, too!

brooke 1

  • Trace your patterns on scrapbooking paper and cut them out. *Tip – if you trace them on the back, opposite side of the pattern, you will not have to erase pencil marks. You can slightly fold the belly part to cut to get an even circle for the belly. Trace just the outside of your pattern on construction paper and cut out. These will be the back of your goodie bags.
  • On the construction paper shapes, use the glue gun to make a thin line around where the belly would be & glue the ziploc bag down, just enough to get the first layer of the bag to stick.

brooke 2

  • Fill your bag with candy & place the top scrapbook piece over top to see if you have enough (or too much candy) that will peek through the belly window.
  • Once enough candy, you’ll do a thicker line of hot glue around the edge of the belly on top of the second layer of the ziploc bag & quickly glue the top scrapbook piece to the bottom, firmly pushing the edges together. *Tip – hot glue will melt the ziploc bag & make it start shrinking in towards the candy, just aim to do the line of glue a bit more toward the outer edge of the belly to give you more room.

brooke 3

  • Cut the remnants of the ziploc bag.
  • Use Elmers glue to finish gluing the heads on the chicks & bunnies.
  • When dry, feel free to draw faces on the chicks and bunnies. If the top & bottom pieces didn’t completely glue together, feel free to use a bit more hot glue & glue back together so the candy won’t leak out.

Filed Under: Family Savings, Fun for the Family, Uncategorized

Kids Craft: Puffy Paint Project (3 Household Ingredients)

April 18, 2014 By Micki Leave a Comment

easter puffy paint craft project

Kids Craft: Puffy Paint Project
(3 Household Ingredients)

Ingredients:

  • 1 tablespoon Self Rising Flour
  • 1 tablespoon Salt
  • Food Coloring

brooke 3

Let’s have some Easter fun with homemade puffy paint!

Directions:

  • Start by cutting out Easter shapes out of construction paper, any color, shape, and size will work.
  • Mix 1 tbs of self rising flour, 1 tbs salt, and a few (we used 4, but can use more/less dependent on how dark or light you would like paint to be) drops of food coloring.

brooke 4

  • Mix in water, just enough to make it like a thicker paint. Enough that it’s not pasty, but you don’t want it runny either. *Tip – if it’s too runny, just add equal parts of flour & salt into it until it gets to the right consistency.

brooke 6

  • Paint away! We made fun eggs and an Easter bunny.
  • Place in microwave & cook for 10-30 seconds, until painted parts rise & look nice & puffy & a bit dry. Our bunny took a little longer, but we did it in small increments of 10-15 seconds.
  • Voila, you now have made your own puffy paint! Super easy, super fun!

brooke 7

Filed Under: Family Savings, Fun for the Family, Uncategorized

Easter Brownies… Think chocolate, Peeps, and M&M’s!

April 15, 2014 By Micki Leave a Comment

easter brownies

Easter Brownies… Think chocolate, Peeps, and M&M’s!

Ingredients:

  • 1 box of brownie mix (could use chocolate cake mix, too) -plus ingredients to make brownies: eggs, oil, water
  • Peeps (2 packages, so about 20 Peep chicks or bunnies)
  • M&M’s – about 1 cup

Directions:

  • Prepare brownies as directed on box and bake about 5-7 minutes less than baking time called for (mine called for 24-26 minutes and I put them in for 20 minutes).
  • While brownies are baking, cut Peeps into bite sized pieces.

brooke 1

  • When timer goes off, take brownies out and top with Peeps pieces. *please note, I added Easter marshmallows at this point, too, because I should have had more Peeps – note 2 self, 2 packages of Peeps next time.
  • Put back in oven and bake an additional 5-7 minutes until Peeps are turning soft and just before they turn too brown.

brooke 2

  • While hot and fresh from the oven, sprinkle 1 cup of M&M’s on brownies.
  • Wait until cool to cut and enjoy!

brooke 3

Side Notes: Using different color Peeps would be fun! Chicks or bunnies both work! If using chocolate cake mix, instead of getting a cake like texture, to make them a bit denser like brownies, use 2 eggs & 1/2 cup oil instead of what is called for on back of box.

Filed Under: Recipes, Uncategorized

Wet Chalk Painted Easter Eggs (Kids Crafts)

April 15, 2014 By Micki Leave a Comment

wet chalk painted easter eggsMaterials needed:

  • Construction Paper
  • Colored Chalk
  • Painters Tape
  • Scissors
  • Water

brooke 1

Directions:

  • Cut egg shapes out of your construction paper, any color and any size works.
  • Put thin strips of painters tape across egg – diagonally, stripes, be creative.  *Please note, all I had on hand was the wide painters tape, so I cut it into thinner strips.
  • Dip one end of the chalk in the water and paint a part of the egg. Repeat with any colors or design desired until all visible parts of original construction paper parts are painted.
  • Remove painters tape.
  • Voila, you now have a uniquely decorated Easter egg!

brooke 2

Thanks to our BIG HELPER Tucker for doing this!
Filed Under: Fun for the Family, Uncategorized

Fast & Easy Egg Cups

March 19, 2014 By Micki Leave a Comment

egg cups

Fast & Easy Egg Cups

cheryl 9

Ingredients:

  • Bread

  • Eggs

  • Meat of Choice

  • Pam Spray

Step By Step Photo Directions:

  • Preheat oven to 350 Degrees & Spray muffin pan with Pam

cheryl 2

  • Use a circular biscuit cutter in the size that fits your muffin pan and cut out circle in bread (You can also use a glass)

cheryl 3

  • Place the cut bread inside each muffin cup

cheryl 4

  • Wrap your meat around muffin cup

cheryl 5

  • Crack 1 egg at a time in separate cup and pour into each muffin cup

cheryl 6

cheryl 7

  • Bake at 350 Degrees between 15-20 minutes depending on how you like your eggs done.

cheryl 8

  • I bake the leftover pieces of bread to toast them and place each egg cup in the hole

cheryl 9

Filed Under: Recipes, Uncategorized

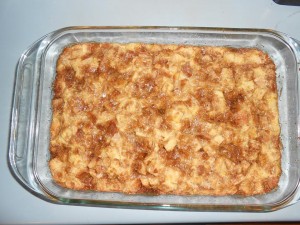
Bread Pudding Recipe

March 17, 2014 By carry Leave a Comment

bread pudding

Bread Pudding Recipe

Ingredients:

  • 1 to 1 ½ cups sugar
  • 5 large eggs
  • 2 cups milk
  • 2 tsp vanilla
  • 3 cups cubed Bread (I used cinnamon bread) leave out over night to become stale
  • ½ cup packed brown sugar
  • ¼ cup butter, softened
  • 1 cup chopped pecans (optional)
  • Suggestion: ½ Cup peeled and cubed apples

Topping Ingredients:

  • 1 cup sugar
  • ½ cup butter, melted
  • 1 large egg, beaten

Direction:

1) Preheat the oven to 350 degrees F.

2) Grease a 9 x 13 x 2 pan.

3) Put the 3 cups of cubed bread (if thicker is what you prefer add 4 cups) into a bowl

4) Combined in separate bowl the 5 eggs, 1 ½ cups sugar (this makes it really sweet, for a little less sweet use 1 cups), 2 cups milk, & 2 tsp vanilla.

5) Pour the mixed ingredients over the top of the cubed bread and leave it stand for 15 minutes.

6) Combined in another bowl ½ cup brown sugar, ¼ cup softened butter, and 1 cups pecans (if desired) to create the crumble for the top.

7) Pour the bread mixture into the grease pan and then sprinkle the crumble over the top of the bread mixture.

8) Place in oven for 40 to 45 minutes, or until set.

9) About 10 to 15 minutes before the bread mixture is done baking, mix together ½ cup melted butter, 1 large beaten egg, 2 tsp vanilla, 1 cup sugar (here again this makes it extremely sweet, so use ½ cup of sugar for a little less sweet), Turn to medium heat and stir together until the sugar melts.

10) When bread mixture is done baking pour the sauce over the top. Can serve warm or cold

Filed Under: Recipes, Uncategorized

Home Made Pizza Dough Recipe

March 6, 2014 By carry Leave a Comment

Home Made Pizza Dough Recipe

Dough Ingredients:

  • 1 1/2 cups warm water
  • 3 1/2 Cups Flour
  • 1 package (2 1/4 teaspoons) active dry yeast
  • 2 Tablespoons olive oil
  • 2 teaspoons salt
  • 1 teaspoon sugar
  • shortening to grease the bowl

Pizza Ingredients:

  • 1 to 2 cans pizza sauce
  • 16 ounces mozzarella cheese
  • Cheddar Cheese (Just a little to sprinkle on)
  • olive oil
  • Toppings of choice

Directions:

  • In electric mixer bowl combine the warm water and the package of active dry yeast, let stand for 5 minutes.   If it is not dissolved at end of the 5 minutes stir until it is dissolved.
  • Add olive oil, flour, salt, & sugar to the mixing bowl
  • Attach mixing paddle to mixer and mix contents of the bowl for a minute or 2 on low speed.
  • Remove mixing paddle and replace it with the dough hook.  Knead with the mixer on low speed for 10 minutes (you can knead by hand if you do not have an electric mixer) if dough seems to wet you can sprinkle more flour into the bowl.  From the times i have made it, it is always dry so you may have to add a little more water.
  • Use some shortening or olive oil to grease the bottom and all the sides of the bowl
  • Roll the dough in the bowl so to coat the entire ball of dough
  • Cover bowl with plastic wrap and let stand for 60 to 90 minutes or until it doubles in size (the longer you let it rise the more you will improve the flavor).  The longest I waited was 2 hours.
  • Pre-heat the oven to 450 degrees.
  • Punch down to deflate the dough a bit then divide into two equal halves and form them into balls and place them into their own separate bowl.  Cover with plastic wrap and let stand for 10 minutes.

  • On a floured surface place one of the dough balls and flatten it with your hands.  Now starting at the center and working outwards use your fingertips to stretch the dough out to the desired diameter (10 to 12 inches).  Let the dough rest for 5 minutes (it will shrink back in size) then continue to push the dough back out to the desired diameter.  Once it stays at the desired diameter, use the palm of your hand to flatten out the thick spots.  If you desire you can pinch the end of the dough to form a lip.
  • Now do the same thing to the second dough ball.
  • Sprinkle a little flour onto the flatten dough and spread it around.  Now fold in half and sprinkle flour on the dough and fold in half again. Sprinkle your pizza pan with corn meal (flour works also) and place the dough on your pizza pan and unfold it.
  • Place your pans in your oven for 8 minutes to start the dough cooking.
  • Remove you pans from the oven and place on pot holders.
  • Brush the dough with olive oil (this will prevent the crust from becoming soggy when you add your toppings)
  • Spoon on your pizza sauce, sprinkle on your mozzarella cheese, and your desired toppings on the the dough.  Now I sprinkle on a little mild cheddar cheese to give it a little more flavor.
  • Place in your oven for 10 to 20 minutes, depending on the amount of toppings and how crispy you like your crust.

Filed Under: Recipes, Uncategorized

  • « Previous Page
  • 1
  • …
  • 53
  • 54
  • 55
  • 56
  • 57
  • …
  • 64
  • Next Page »

{ Your info will never be shared because spam stinks }

Archives

Deals

200 Count Paper Napkins ONLY $1.99 (Limit 3) Reg. $3.49

Clearance BLOWOUT! Additional 50% off

2-Pack Girls Tank Dress w/Pockets ONLY $6.50! Sizes 4-18 & Plus

Walgreens Photo: FREE 8X10 Photo Print – Valid through 7/25

Additional 50% OFF Clearance!

More Deals

Coupons

75% Off! 5×7 or 8×10 Wood Panel Photo Prints

Hellmann’s (Unilever) Sign UP Rewards! $5 towards your next purchase + Get exclusive details about new products, recipes & savings

Kohl’s Last Minute Gift Sale – Valid thru 12/24

EXCLUSIVE OFFERS: Additional 10% off ALL these sale prices!

Have you tried Mike’s Popcorn? If not, you are MISSING OUT!

More Coupon Posts

Sweeps & Giveaways

Merry Christmas Giveaway – 2 Hatchimals & One Nintendo NES

Win A Zoo Pass From Zoological Society Of Milwaukee!

Culver’s Cow Tippin’ Instant Win Game!

WIN a Dream Vacation from Club Med!

WIN a Trip to the Indy 500 from Craftsman (2 Tickets, Airfare, and Hotel Included)

More Sweeps & Giveaways

Copyright ©2025, Midwest Coupon Clippers. All Rights Reserved. Site by Pixel Me Designs