Midwest Coupon Clippers

Cudding Coupons and Saving You Some Moolah

  • Home
  • Coupons
    • Newest Coupons
    • Coupons.com
    • Red Plum
    • Smart Source
    • Hopster
    • Saving Star
    • Coupon Database
  • Deals
    • Amazon
    • eBates
  • Freebies
  • Sweeps & Giveaways
  • Store Match-ups
    • Midwest Matchups
      • Copps/Pick n’ Save
      • Festival
      • Menards
      • Piggly Wiggly
    • Nationwide Matchups
      • CVS
      • Dollar Stores
        • Dollar General
        • Dollar Tree
        • Family Dollar
      • Target
      • Walgreens
      • Wal-Mart
  • This & That
    • Recipes
    • Around the House
    • Money Saving Tips
    • Get Organized
    • Disney
    • Pets
    • Gardening
  • About
    • Contact
    • Disclosure

Micki’s Cheesy Potatoes

May 14, 2013 By Micki Leave a Comment

Micki’s Cheesy Potatoes
(Secret Recipe)

Think you have tried the best Cheesy Potatoes out there? Think again! This is my personal recipe I have put together over the last few years to get everything JUST PERFECT! It is essential you do not alter anything in the recipe. This is a double batch for our get together’s, if you want a smaller amount, you can split everything in half. Use the Ore Ida O’Brien with the peppers and onions (My hubby and son who do not like onions or peppers even love them) and very important to use the Campbells brand for the soups. Makes for the PERFECT consistency. Please make sure to bookmark this page, and come back and visit us after you make these delicious cheesy’s and let us know your thoughts!

Ingredients:

  • 2 Bags Ore Ida O’Brien Potatoes with Onions and Peppers (28 ounce bags)
  • 1 Can Campbell’s Cream of Potato (10.75 ounce)
  • 1 Can Campbell’s Cream of Celery (10.75 ounce)
  • 1 Can Campbell’s Cheddar Cheese (10.75 ounce)
  • 3/4 Container Sour Cream (16 ounces)
  • 1 Package Kraft Shredded Cheddar Cheese (16 ounce)
  • Salt & Pepper to taste

Directions:

  • Preheat Oven to 400 Degrees.
  • Mix all 3 Cans of Soup, Sour Cream, and Shredded Cheese well. Add Potatoes and continue mixing.
  • Use (2) 9×13 rectangular glass dishes and and separate potato mixture between both pans.  I recommend spraying them with Pam.
  • Cover with aluminum foil (shiny side in) Bake at 400 degrees for 30 minutes. Remove aluminum foil, Stir, and reduce heat to 350 degrees and bake uncovered for an additional 60 minutes.


Filed Under: Recipes, Uncategorized

Oreo Pops “How To…”

March 30, 2013 By Micki Leave a Comment

Oreo Pops “How To…”

Feel Free to Share:

Pin it: http://pinterest.com/pin/420101471460924593/

Blog Link: https://midwestcouponclippers.net/oreo-pops/

I recently scored a few packages of Oreo cookies for only $0.50/package!!  I love Oreos, but I also love making desserts!  There are so many options when it comes to making desserts with Oreos, but I wanted to try something new!!  So today I spent some time in my kitchen playing with Oreos!!

I decided to try my hand at making some Oreo pops and wanted to try out some flowers since it is finally starting to feel like Spring!!!

I gathered up all the supplies I needed Oreos, Mini Oreos, and some colored chocolate.  I also had some Nutter Butter Bites, which were perfect for the job as well!  I got a great deal on Wilton Candy Melts at our local Jo Ann Fabric & Craft Store.  They were on sale for 25% off, plus I had a coupon for an additional 25% off.  They also have some interesting flavors.  I found some white chocolate that was marshmallow flavor and some Dark Cocoa Raspberry flavored chocolate as well!

To melt the chocolate I used a glass measuring cup and melted in the microwave at 50% power, stirring every 30 seconds.


I took apart all of the Mini Oreos to use them as petals for the flower.  In order to secure the Oreo on the pop stick I added some extra chocolate inside, plus who doesn’t like extra chocolate?!?  I let those sit and harden for about 15 minutes before moving on to the next step.


After the cookies were secured to the stick it was time to attach the petals.  I dipped each piece of Mini Oreo into some more chocolate and pressed it into the center of the Oreo.  I found that 6 or 7 Mini Oreos worked great!  After those were all attached, it was again time to wait for them to harden and be sure the petals were nice and secure.


After the petals were dried on I could then cover the entire Oreo Flower Pop with chocolate.  I found that using a spoon to pour the chocolate onto the Oreo pop worked best versus dipping.  I then lightly tapped it on the side of the bowl to remove excess and laid it on parchment paper to dry completely.  I have many ideas to try for decorating them yet with sprinkles, using M&M’s, other colored chocolates and so much more.  These would make such cute party favors!  If you decide to try, we would love to see what you come up with!!

Since I was going to be meeting up with a certain someone, whom we all love dearly, who just happens to be a HUGE Mickey Mouse fan, I decided to make her a Mickey and Minnie Oreo pop too!  But, Mickey decided to wear a birthday hat, since her birthday will be here soon.  Did you know they make Bugles in Chocolate Peanut Butter?!  Those worked great for a birthday hat!


Clippie from Wisconsin Coupon Clippers (Nationwide Page) decided he wanted his own tested and approved Oreo pop as well!! Clippie approved the Final Results and decided they were Mooolicious!

Overall it was a fun day in the kitchen, playing with Oreos!  I packed them all up in bags to share with some great friends.  I have so many more ideas for next time!  What is your favorite dessert to make with Oreos?  We would love to hear from you, please feel free to comment below!

Filed Under: Recipes

Peanut Butter Fudge Brownie Trifle

March 28, 2013 By Micki Leave a Comment


Peanut Butter Fudge Brownie Trifle

Ingredients:

* 1 batch of your favorite brownies (boxed or from scratch) baked, cooled and cut into cubes
(I used Betty Crocker Peanut Butter Brownie boxed mix)

* 1 Large Box (5 ounce) of instant chocolate pudding, prepared and chilled

* 1 Bag of Peanut Butter Cups, chopped

* 2 – 8oz Extra Creamy Cool Whip

* 1 ¼ cups of creamy Peanut Butter

* 1 cup of powdered sugar

* 2 tablespoons milk

* 8 ounces of Whipped Cream Cheese


Directions:

* Peanut Butter Mixture Layer: Mix the peanut butter and 8 ounces of whipped cream cheese with a hand mixer at medium speed until mixture is creamy. Add in the powdered sugar and 2 tablespoons of milk and mix until combined. Then add 1 cup of the cool whip and mix until combined.

* Grab your trifle dish and begin to layer your ingredients. I did a layer of brownie cubes, then the peanut butter mixture, then a handful of chopped peanut butter cups, then chocolate pudding, then Cool Whip and repeated the process until I got to the top. I then piped the remaining Cool Whip on top and added some extra chopped peanut butter cups.

* Use a long spoon to serve and ENJOY!!!!

This Recipe is made and comes from Midwest Coupon Clippers Admin. Amy G.

Filed Under: Recipes

Orange Fluff Recipe

March 5, 2013 By Micki Leave a Comment

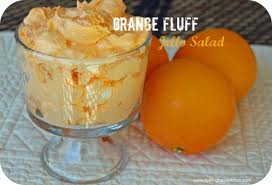
Orange Fluff Jello Salad

Ingredients:

  • 2 (11 ounce) cans mandarin oranges, drained
  • 1 (15 ounce) can crushed pineapple
  • 1 pound cottage cheese
  • 2 (3 ounce) packages orange flavored Jell-O mix
  • 1 (16 ounce) package frozen whipped topping, thawed


Directions:

Combine the well drained oranges and pineapple in a large bowl and mix together with the cottage cheese. Add the dry orange flavored gelatin powder and stir until well blended. Fold in the thawed frozen whipped topping and refrigerate for at least one hour.

Makes Eight Servings

Filed Under: Recipes

Hamantaschen Recipe (traditional Purim cookie)

February 25, 2013 By Micki Leave a Comment

(Midwest Coupon Clippers Admin. Amies Beautiful Daughter)

Hamantaschen Recipe
(traditional Purim cookie)

Ingredients:

3 sticks of butter, cut into pieces
1 1/2 cup granulated sugar
2 teaspoons vanilla
—
2 eggs (I use egg beaters)
8 teaspoons milk
4 cups sifted all-purpose flour
3 teaspoons baking powder
1/2 teaspoon salt
Jam filling of your choice (I use several different types in squeeze bottles)

Directions:

  • Cream shortening, sugar and vanilla with electric mixer. Add egg and beat until light and fluffy. Turn mixer to low and add milk. Sift together the dry ingredients in a separate bowl, add gradually to creamed mixture. Cover and chill for one hour.
  • Preheat oven to 375. I use silpat mats on a cookie sheet for best results, but parchment works well too. I advise against greasing plain cookie sheets because the bottoms seem to either get gooey or burn.
  • On a floured surface, roll chilled dough to about an eighth of an inch. Cut into circles with a biscuit cutter or drinking glass. Place on mat or parchment on cookie tray in batches of about ten or twelve for best results.
  • Put a small (teaspoon-sized) dollop of jam in the center of each circle. Pinch the edges together so it’s a roughly triangular shape with the jam showing in the middle. Make sure there is no sagging on the sides or the jam will spill out. Pinch the corners shut and bake for 6-8 minutes or until jam is bubbling and bottom edge is getting a slight golden-brown tinge.
  • Cool on mat and transfer to waxed paper or foil. These seem to get softer if they’re stored in a lidded container after the jam firms up.

Filed Under: Recipes

Easter Bunny Rolls

February 23, 2013 By Micki 1 Comment

(Photo Credit Ancika konyhája)

Easter Bunny Rolls

Pin It on Pinterest HERE: https://www.pinterest.com/pin/420101471466826640/

Tip: If you are in a time crunch, you can also use Pillsbury refrigerated breadsticks. MAKE SURE to round out ears before baking so you do not get devil horns. I also recommend brushing with an egg wash right before baking and after when they come out of the oven and are still hot!

Ingredients:

  • 2-1/2 to 3 cups all-purpose flour
  • 2 tablespoons sugar
  • 1 package (1/4 ounce) active dry yeast
  • 1 teaspoon salt
  • 1 cup (8 ounces) sour cream
  • 1/4 cup water
  • 2 tablespoons butter
  • 1 egg

Directions:

  • Put the butter, the sour cream and water in a small saucepan and heat, but do not cook. Cool to tepid then add the remaining ingredients. Put in a kneader. If thick add more water.
  • Let it rise double and cut into 16 equal parts.
  • Baking tray lined with baking paper and cut the ears with scissors.
    IMPORTANT: When the dough is STILL SOFT, Make sure you smooth the edges around, so you do not end up with devil horns.
  • The eyes can be put in or use something as pepper grains.
  • Bake at 375° for about 10 minutes or until golden brown.

Some other Easter Posts you may like:

Easter Bunny Suckers
Directions: http://wp.me/p1T1oF-1hyH
Pin It: https://www.pinterest.com/pin/420101471478273553/

Easy Easter Carrot Snack Bags
Directions: http://wp.me/p1T1oF-1gl8

Easter Egg Wreath
Directions: http://wp.me/p1T1oF-1hxY
Pin It: https://www.pinterest.com/pin/420101471478247136/

Some other Recipes you may like:

Easy Crock Pot Mac & Cheese Recipe
Recipe: http://wp.me/p1T1oF-FY7
Pin It: https://www.pinterest.com/pin/420101471466826615/

Cheesecake Recipe – Yellow Cake Crust
Recipe: http://wp.me/p1T1oF-MPU
Pin It: https://www.pinterest.com/pin/420101471469119878/

Simple Crock Pot Spaghetti
Recipe: http://wp.me/p1T1oF-JPi
Pin It: https://www.pinterest.com/pin/420101471467737712/

Filed Under: Fun for the Family, Recipes

Oreo Fluff Recipes

February 22, 2013 By Micki Leave a Comment

Oreo Fluff Recipes

Basic Oreo Fluff

Ingredients:

2 boxes of vanilla pudding mix
2 tubs of cool whip
1 and 1/2 packs of oreos.

Directions:

Crush Oreo’s in bag.

Mix instant pudding mix as directed

Mix in Cool Whip & then Crushed Oreo’s & Chill

Oreo Fluff w/ Marshmallows

Ingredients:

1 Box White Chocolate Instant Pudding Mix
2 Cups Milk
8oz. Cool Whip
24 Oreos Crushed
2 Cups Mini Marshmallows

Directions:

In A Large Bowl Whisk Together The Pudding Mix And Milk For 2 Minutes.

Add Cool Whip, Oreos And Marshmallows, Stir Well.

Refrigerate Until Ready To Serve.


Filed Under: Recipes

Oreo Heaven Cake

February 22, 2013 By Micki 1 Comment

Oreo Heaven Cake

Oreo Heaven Cake

Ingredients:

1 pkg.  (2-layer size) devil’s food cake mix
4 squares  BAKER’S Semi-Sweet Chocolate
1/4 cup  butter
1 pkg.  (8 oz.) PHILADELPHIA Cream Cheese, softened
1/2 cup  sugar
2 cups  thawed COOL WHIP Whipped Topping
12 OREO Cookies, coarsely crushed

Directions:

HEAT oven to 350ºF.

PREPARE cake batter and bake in 2 (9-inch) round pans as directed on package. Cool cakes in pans 10 min. Invert onto wire racks; gently remove pans. Cool cakes completely.

MICROWAVE chocolate and butter in small microwaveable bowl on HIGH 2 min. or until butter is melted. Stir until chocolate is completely melted. Cool 5 min. Meanwhile, beat cream cheese and sugar in large bowl with mixer until blended. Gently stir in COOL WHIP and crushed cookies.

PLACE 1 cake layer on plate, spread with cream cheese mixture. Top with remaining cake layer. Spread top with chocolate glaze; let stand 10 min. or until firm. Keep refrigerated.


Thanks Kraft Recipes for this AWESOME recipe! 

Filed Under: Recipes

Bottle Cap Coupon Board

February 13, 2013 By Micki Leave a Comment

Bottle Cap Coupon Board

(This is what I have hanging in my kitchen to keep coupons organized for shopping trips. It’s a twin of one on the other side of the wall, which holds bills awaiting payment)

You will need:

  • Magnetic whiteboard (about $10 at Walmart)
  • Way to hang the board (I used two Hercules Hooks, but you might want to use something more stable because the magnets will pull the board away from the wall when you try to lift them)
  • Two packages of magnetic clips (about $2 ea at walmart)
  • Package of craft bottlecaps, make sure they are the flat-backed ones(varies…$2-5/dozen at Hobby Lobby)
  • Glue (I use one of those purple-to-clear glue sticks because they dry quickly without a mess)
  • Package of 1″ epoxy stickers (about $3/dozen at Hobby Lobby)
  • 1″ round hole punch (I got mine at Hobby Lobby for around $7, but they might be cheaper elsewhere…mine was worth the investment because I also make jewelry and hair bows like this)
  • Hot-glue gun with sticks
  • Color printer and at least one sheet of paper

Directions:

  • Start out by choosing a location for your board and hanging it. As I said earlier, the magnets will pull the board away from the wall a little, so make it as stable as you need it to be. Since the clips will angle the labels downward, you might want the board a little above eye level.
  • Copy and paste the logos from the stores you normally go to onto a blank Word document. Resize them so they are tiny (about half an inch wide) and print them out. You might have some trial and error trying to get them small enough. Keep them all in a row along the margin so they’ll be easy to punch.
  • Center the hole punch over each logo and punch them out. Use the glue to attach them to the front of each decorative bottlecap. LET THEM DRY. It’s tempting to do the whole thing quickly, but if you don’t let the glue dry the epoxy caps won’t attach right!
  • When all of the logos have been glued into the bottlecaps, carefully place the epoxy caps over each and press firmly to get any air bubbles out.
  • Use the hot glue gun to glue the bottlecaps to the clips. Don’t be stingy with the glue, because these will be under stress as you clip and unclip things. I attached mine and then went back over them until the entire tab was covered.
  • Place the clips and use to plan out your shopping trips! This way you can just grab your coupons and go.

Filed Under: Coupons, Get Organized, Newest Coupons, This & That

Sassy Water

February 10, 2013 By Micki Leave a Comment

“Sassy Water”

This water not only tastes GREAT, but it helps you to do a Natural Detox on your body and even better… Trim down some of that belly weight! Did I mention it TASTES GREAT?

So where did “Sassy Water” start you ask? It was put together by Prevention.com nutrition director Cynthia Sass when she created her “Flat Belly Diet” She recommends drinking a pitcher a day for four days to start. (As with ALL DIET, Consult  your Doctor FIRST)

Sassy water will help improve digestion, and for some, helps curb their appetite. Even if you are not looking to lose weight, In general it is VERY refreshing and TASTES GREAT!

Sassy Water Recipe

  • 8 ½ cups of water
  • 1 teaspoon freshly grated ginger
  • 1 medium cucumber, peeled and thinly sliced
  • 1 medium lemon, thinly sliced
  • 12 small spearmint leaves

Combine the ingredients in a pitcher overnight and let chill for at least eight hours. I use a covered pitcher and filtered water. You can also mix it up in Mason Jars with Covers.

Here is another alternative

  • 8 ½ cups of water
  • 1 medium mandarin or tangerine, sliced thinly
  • 4 fresh pineapple sage leaves
  • 8 fresh lemon verbena leaves
  • 12 fresh mint leaves, small


Filed Under: Recipes

  • « Previous Page
  • 1
  • …
  • 26
  • 27
  • 28
  • 29
  • 30
  • …
  • 33
  • Next Page »

{ Your info will never be shared because spam stinks }

Archives

Deals

Summer Cyber Days at Kohl’s – Daily Deals & FREE Shipping for Everyone

Target Circle Week! July 6th to the 12th

Walgreens Photo: FREE 8X10 Photo Print – Valid through 6/15

Target: Crayola Supertips 20ct Pastel Markers ONLY $3.49

Target Circle Deal: $1 Women’s flip flops

More Deals

Coupons

75% Off! 5×7 or 8×10 Wood Panel Photo Prints

Hellmann’s (Unilever) Sign UP Rewards! $5 towards your next purchase + Get exclusive details about new products, recipes & savings

Kohl’s Last Minute Gift Sale – Valid thru 12/24

EXCLUSIVE OFFERS: Additional 10% off ALL these sale prices!

Have you tried Mike’s Popcorn? If not, you are MISSING OUT!

More Coupon Posts

Sweeps & Giveaways

Merry Christmas Giveaway – 2 Hatchimals & One Nintendo NES

Win A Zoo Pass From Zoological Society Of Milwaukee!

Culver’s Cow Tippin’ Instant Win Game!

WIN a Dream Vacation from Club Med!

WIN a Trip to the Indy 500 from Craftsman (2 Tickets, Airfare, and Hotel Included)

More Sweeps & Giveaways

Copyright ©2025, Midwest Coupon Clippers. All Rights Reserved. Site by Pixel Me Designs